> ## Documentation Index
> Fetch the complete documentation index at: https://docs.simplismart.ai/llms.txt
> Use this file to discover all available pages before exploring further.
# Encoder Model Training
> Train encoder models on Simplismart for sequence classification tasks, enabling efficient feature extraction and accurate prediction from textual data.
Encoder models are ideal for tasks like sentiment analysis, spam detection, intent classification, and other text categorization problems.
## Prerequisites
Before starting, ensure you have:
* Dataset formatted according to the [Encoder training requirements](#dataset-preparation)
## Supported Model Architectures
Simplismart supports training for the following encoder-only transformer architectures:
* [**BERT**](https://huggingface.co/google-bert/bert-base-uncased) (Bidirectional Encoder Representations from Transformers)
* [**RoBERTa**](https://huggingface.co/FacebookAI/roberta-base) (Robustly Optimized BERT Pretraining Approach)
* [**DeBERTa**](https://huggingface.co/microsoft/deberta-v3-base) (Decoding-enhanced BERT with Disentangled Attention)
* [**DistilBERT**](https://huggingface.co/distilbert/distilbert-base-uncased) (Distilled version of BERT)
## Dataset Preparation
Your dataset must be in **JSONL format**, where each line contains the input text and its corresponding label for text classification.
**Example JSONL Entry:**
```json theme={null}
{
"messages": [
{
"role": "user",
"content": "The weather is really nice today"
}
],
"label": 1
}
{
"messages": [
{
"role": "user",
"content": "Today is really unlucky"
}
],
"label": 0
}
```
**Field Descriptions:**
* **`messages`** – Array containing the input text for classification. Each message has a `role` and `content`.
* **`role`** – Indicates the message source. Use `"user"` for encoder model training.
* **`content`** – The text sequence to be classified (e.g., product review, customer query, email content).
* **`label`** – Integer representing the target class (e.g., `0` for negative sentiment, `1` for positive sentiment).
### Example JSONL File
Here's a complete example for sentiment analysis (binary classification with 2 labels):
```json theme={null}
{"messages": [{"role": "user", "content": "The weather is really nice today"}], "label": 1}
{"messages": [{"role": "user", "content": "Today is really unlucky"}], "label": 0}
{"messages": [{"role": "user", "content": "So happy"}], "label": 1}
{"messages": [{"role": "user", "content": "This product is terrible"}], "label": 0}
{"messages": [{"role": "user", "content": "Excellent service and quality"}], "label": 1}
```
**Label Guidelines:**
* Labels must be integers starting from `0`
* For binary classification: use `0` and `1`
* For multi-class: use `0`, `1`, `2`, etc. (e.g., 5 classes = labels 0-4)
* Ensure all labels in your dataset are represented in the training data
## Creating a Training Job
To create a new training job, navigate to `My Trainings` > `LLM/VLM Model` > `Add a Training Job`
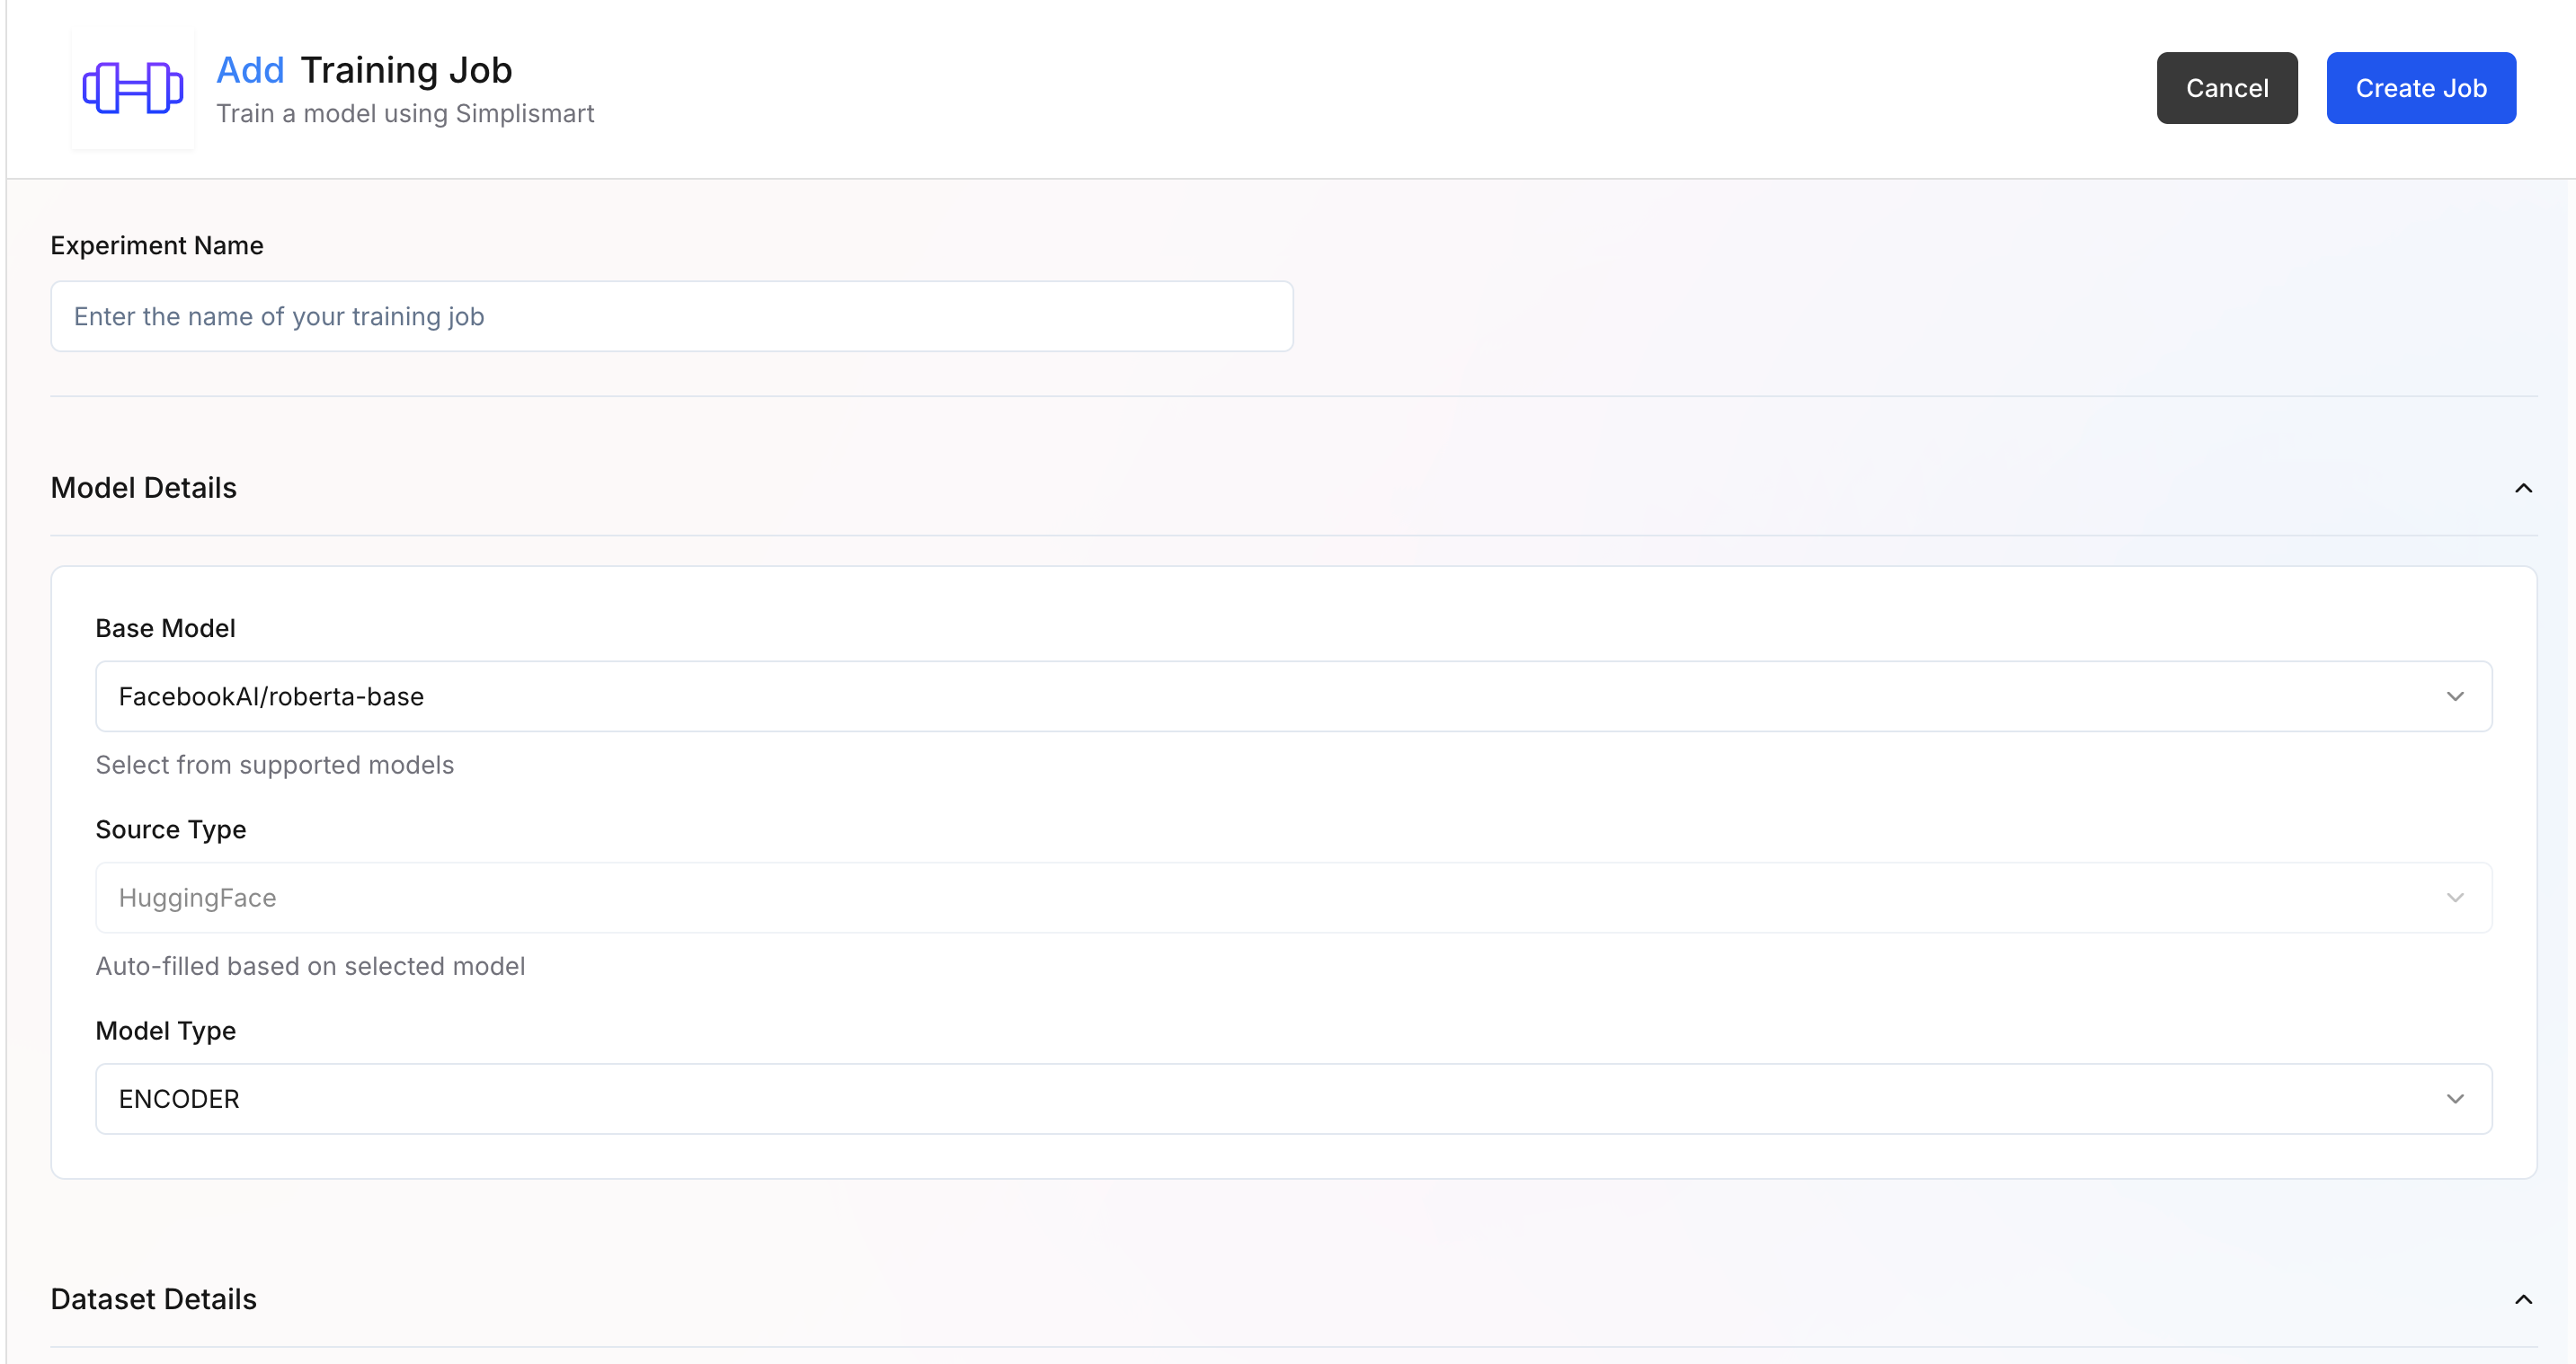 Provide the following details:
1. **Experiment Name**: Enter a descriptive name for your training experiment
2. **Model Details**:
* **Base Model** – Select the base model you want to fine-tune. Supported models (e.g., `FacebookAI/roberta-base`) are available in the dropdown.
* **Source Type** – Automatically filled based on the selected model source (e.g., `Hugging Face`).
* **Model Type** – Defines the architecture type for training. (here `Encoder`)
When the base model is selected, the rest of the parameters get updated automatically with recommended defaults for that model and training type.
Provide the following details:
1. **Experiment Name**: Enter a descriptive name for your training experiment
2. **Model Details**:
* **Base Model** – Select the base model you want to fine-tune. Supported models (e.g., `FacebookAI/roberta-base`) are available in the dropdown.
* **Source Type** – Automatically filled based on the selected model source (e.g., `Hugging Face`).
* **Model Type** – Defines the architecture type for training. (here `Encoder`)
When the base model is selected, the rest of the parameters get updated automatically with recommended defaults for that model and training type.
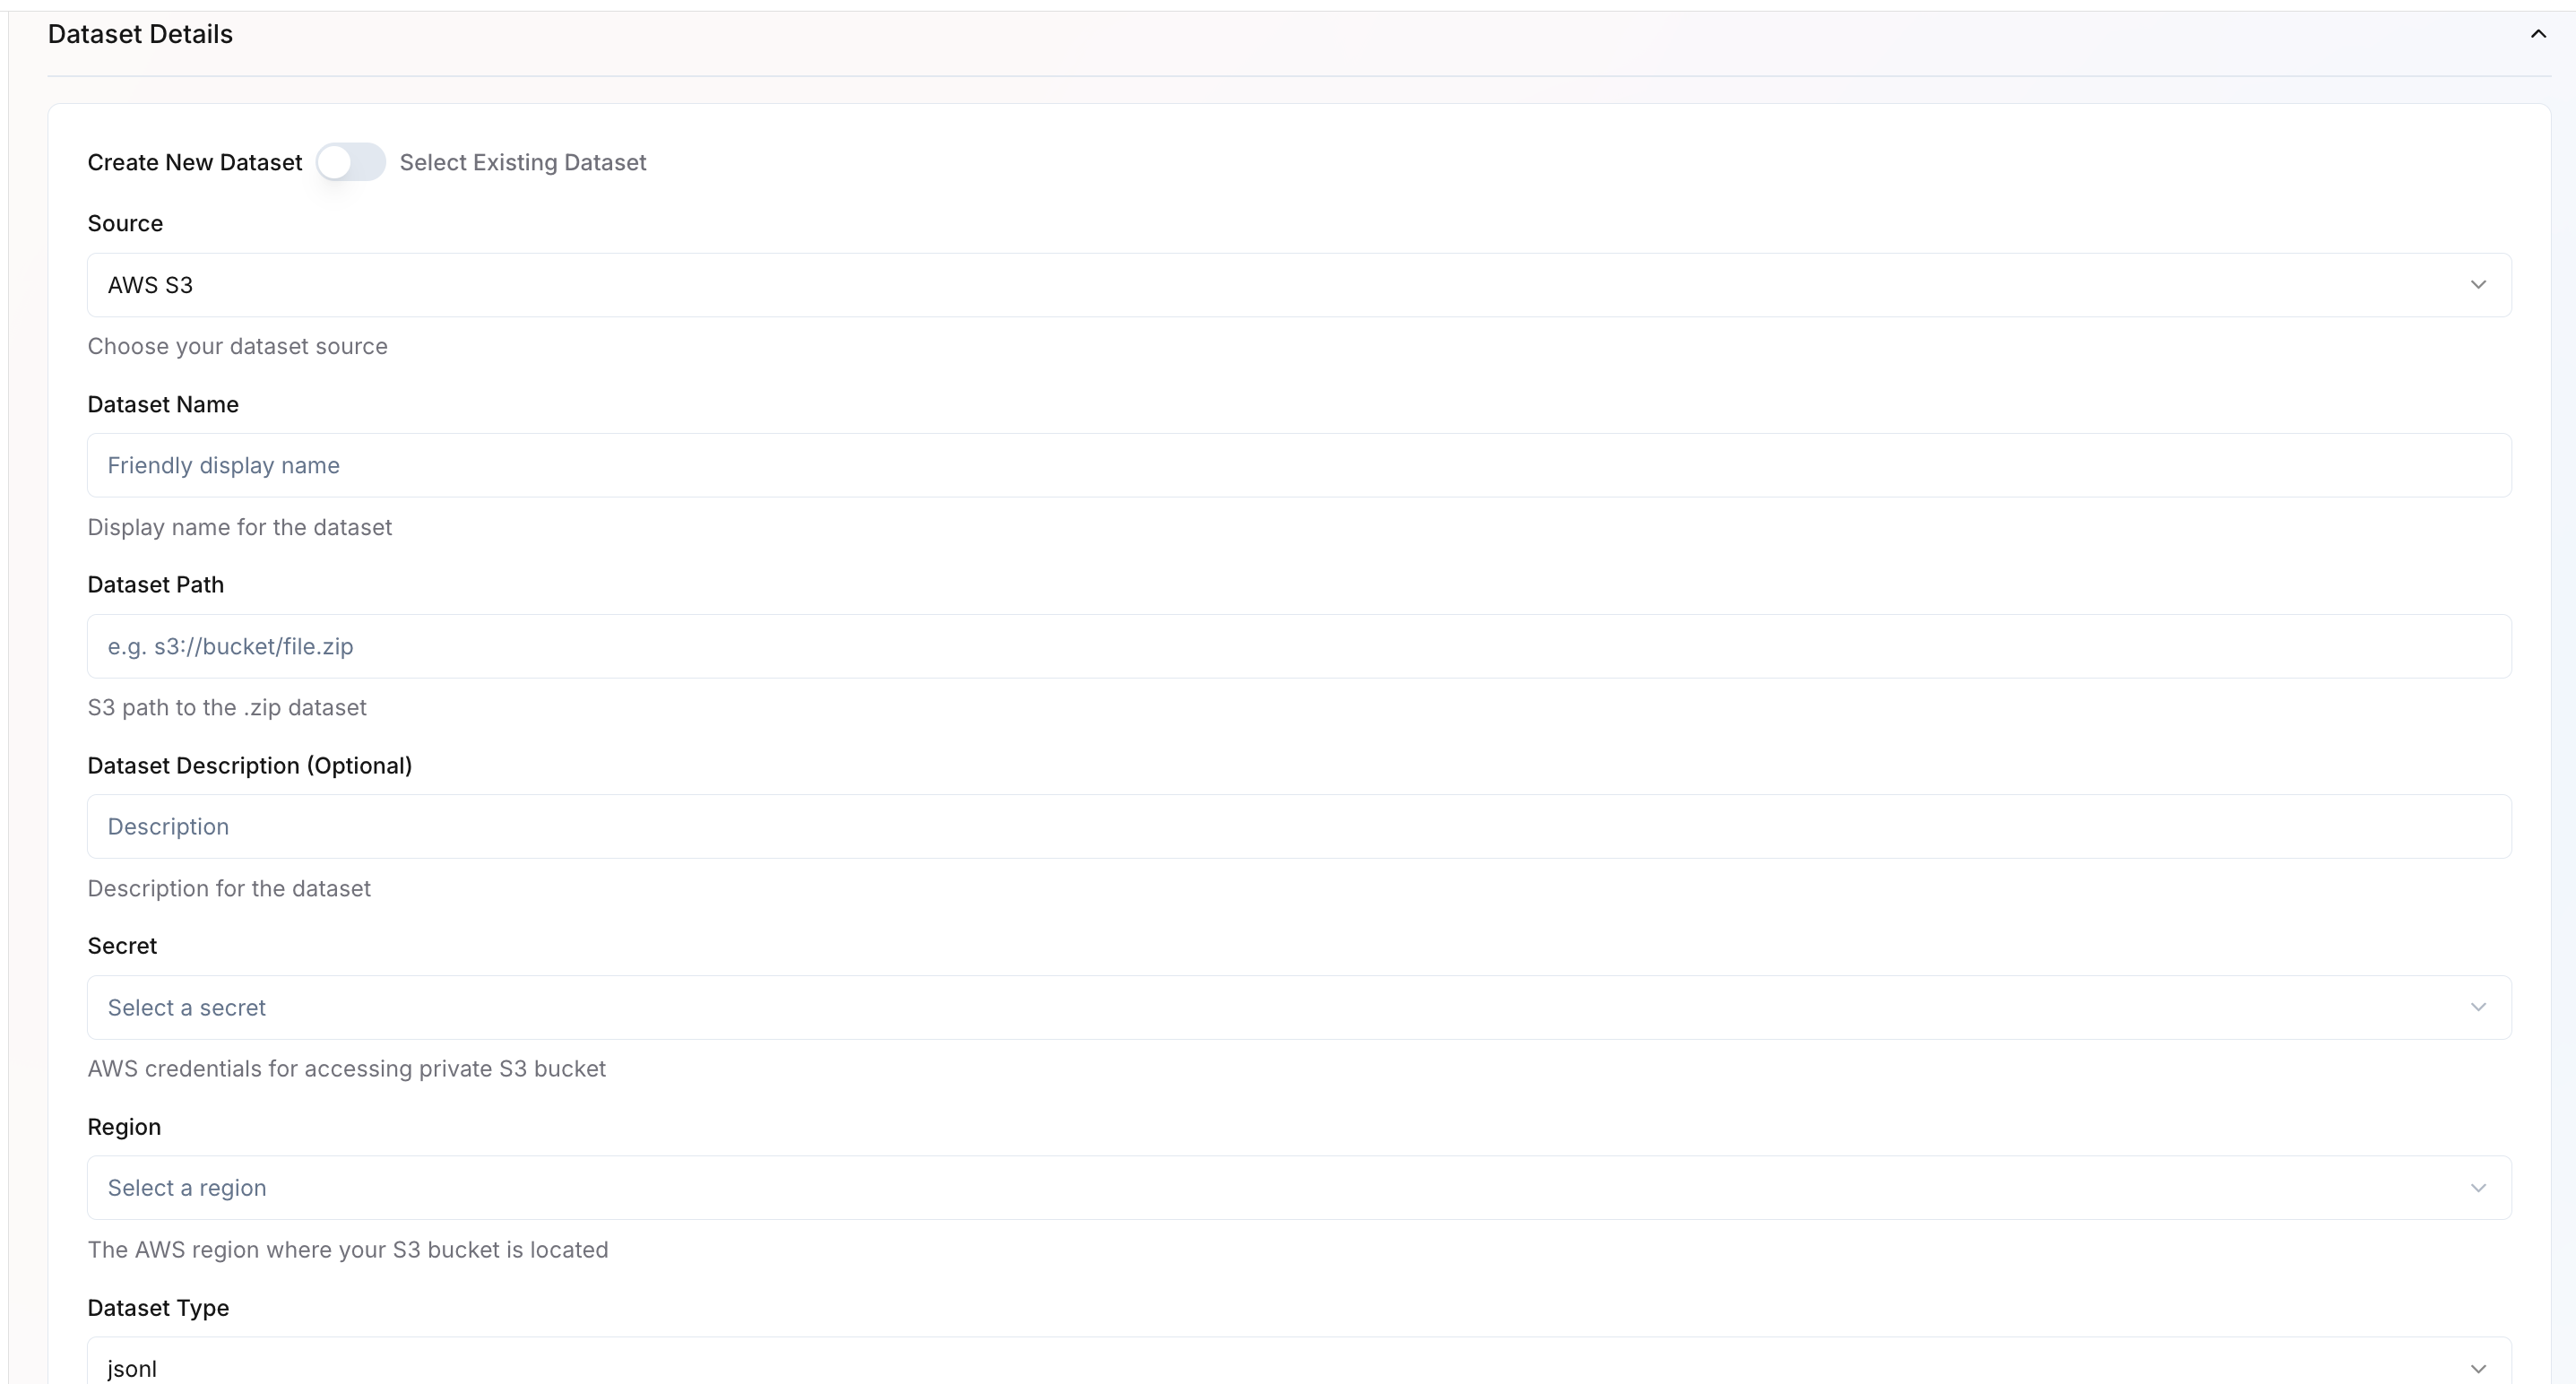 You can either create a new dataset or select an existing one.
**Create New Dataset**
* **Source** – Choose the dataset source (e.g., AWS S3, GCP).
* **Dataset Name** – Provide a friendly name for your dataset.
* **Dataset Path** – Specify the full path to your dataset (e.g., `s3://bucket/file.jsonl`).
* **Dataset Description** – Optional field for describing your dataset.
* **Secret** – If AWS/GCP source, select the credential secret required to access private buckets. Learn how to [configure cloud credentials](/model-suite/integrations/secrets).
* **Region** – If AWS/GCP source, choose the region where your bucket is located.
* **Dataset Type** – Specify the data format, such as **JSONL**.
**Select Existing Dataset**
You can reuse a previously uploaded dataset instead of creating a new one.
1. In the **Dataset Details** section, select **Use Existing Dataset**.
2. A dropdown will appear listing all datasets available under your organization.
3. Choose the dataset you want to attach to this training job.
4. Once selected, key information such as **Dataset Name**, **Source**, **Path**, and **Region** will auto-populate based on the saved configuration.
5. Review the prefilled values to ensure the dataset is still valid and accessible.
6. After selection, proceed to configure **Dataset Configuration** parameters.
You can either create a new dataset or select an existing one.
**Create New Dataset**
* **Source** – Choose the dataset source (e.g., AWS S3, GCP).
* **Dataset Name** – Provide a friendly name for your dataset.
* **Dataset Path** – Specify the full path to your dataset (e.g., `s3://bucket/file.jsonl`).
* **Dataset Description** – Optional field for describing your dataset.
* **Secret** – If AWS/GCP source, select the credential secret required to access private buckets. Learn how to [configure cloud credentials](/model-suite/integrations/secrets).
* **Region** – If AWS/GCP source, choose the region where your bucket is located.
* **Dataset Type** – Specify the data format, such as **JSONL**.
**Select Existing Dataset**
You can reuse a previously uploaded dataset instead of creating a new one.
1. In the **Dataset Details** section, select **Use Existing Dataset**.
2. A dropdown will appear listing all datasets available under your organization.
3. Choose the dataset you want to attach to this training job.
4. Once selected, key information such as **Dataset Name**, **Source**, **Path**, and **Region** will auto-populate based on the saved configuration.
5. Review the prefilled values to ensure the dataset is still valid and accessible.
6. After selection, proceed to configure **Dataset Configuration** parameters.
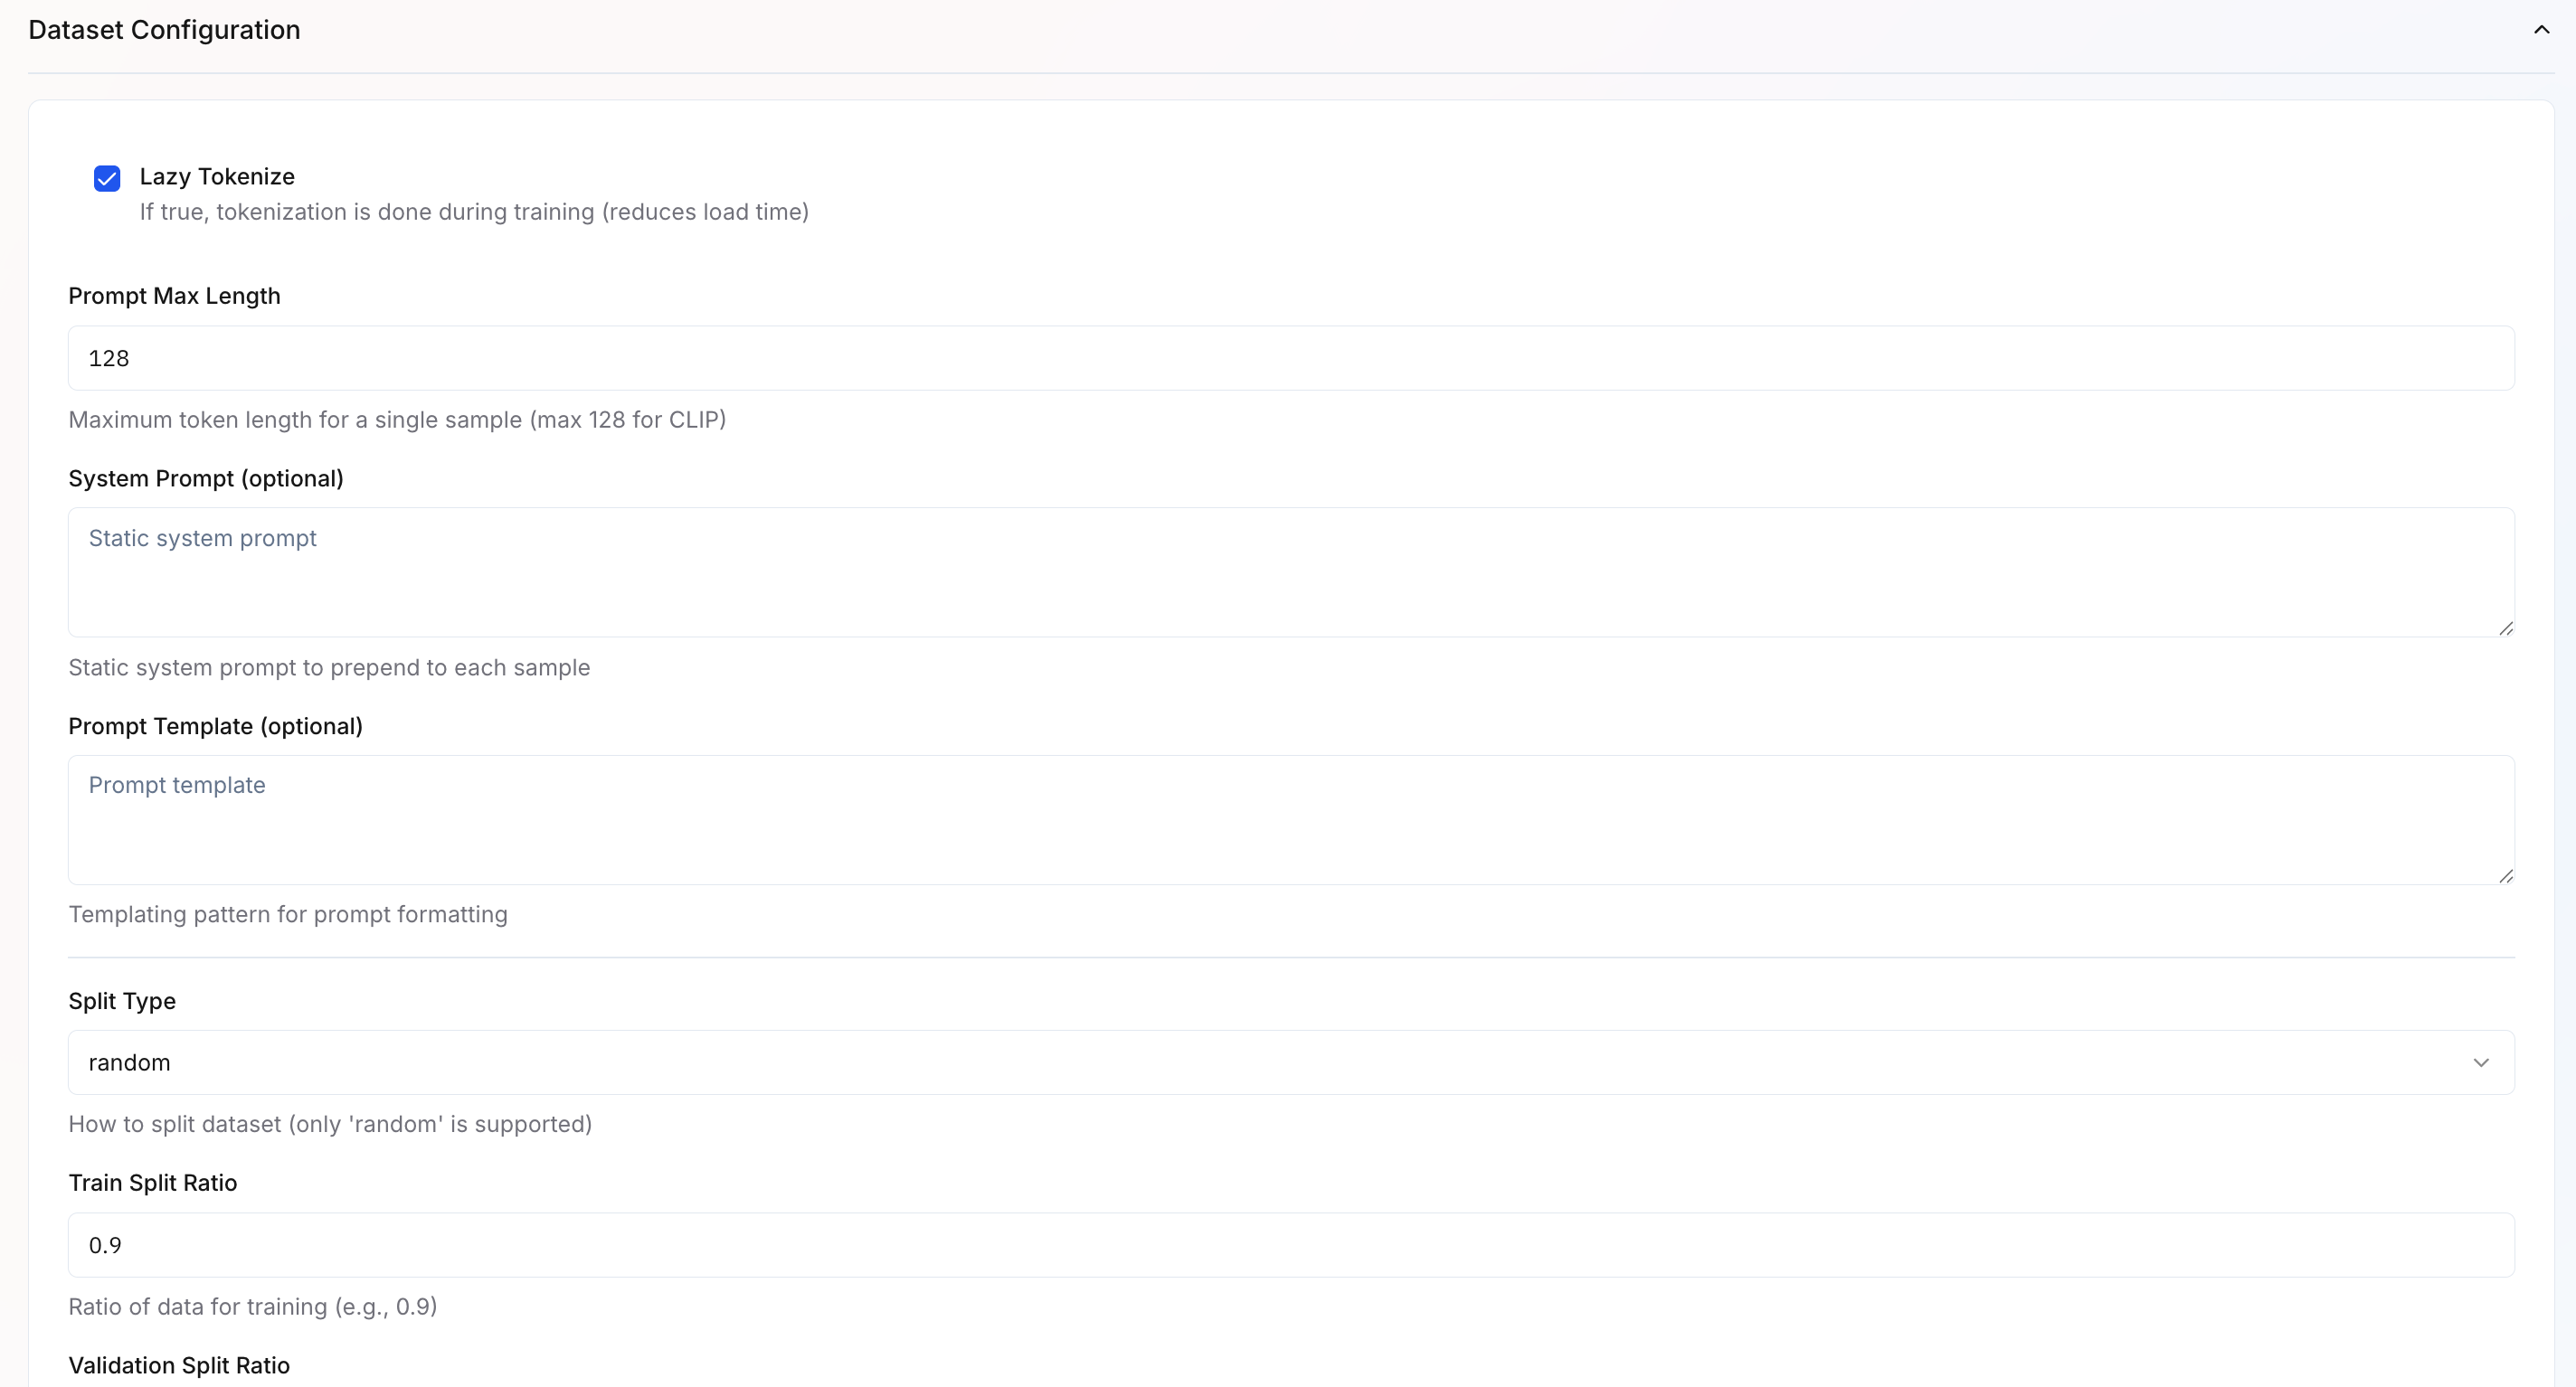 Configure how your dataset will be processed and split for training:
* **Lazy Tokenize** – Tokenizes text during training rather than upfront, reducing memory usage and initial load time.
* **System Prompt** – Optional instruction prepended to each input sequence (e.g., "Classify the sentiment of the following text:").
* **Prompt Template** – Template for formatting inputs consistently (supports variables like `{content}`).
* **Split Type** – Method for dividing data into train/validation sets. Currently supports `random` splitting.
* **Train Split Ratio** – Proportion of data used for training (default: `0.9` or 90%).
* **Validation Split Ratio** – Proportion reserved for validation to monitor overfitting (default: `0.1` or 10%).
Configure how your dataset will be processed and split for training:
* **Lazy Tokenize** – Tokenizes text during training rather than upfront, reducing memory usage and initial load time.
* **System Prompt** – Optional instruction prepended to each input sequence (e.g., "Classify the sentiment of the following text:").
* **Prompt Template** – Template for formatting inputs consistently (supports variables like `{content}`).
* **Split Type** – Method for dividing data into train/validation sets. Currently supports `random` splitting.
* **Train Split Ratio** – Proportion of data used for training (default: `0.9` or 90%).
* **Validation Split Ratio** – Proportion reserved for validation to monitor overfitting (default: `0.1` or 10%).
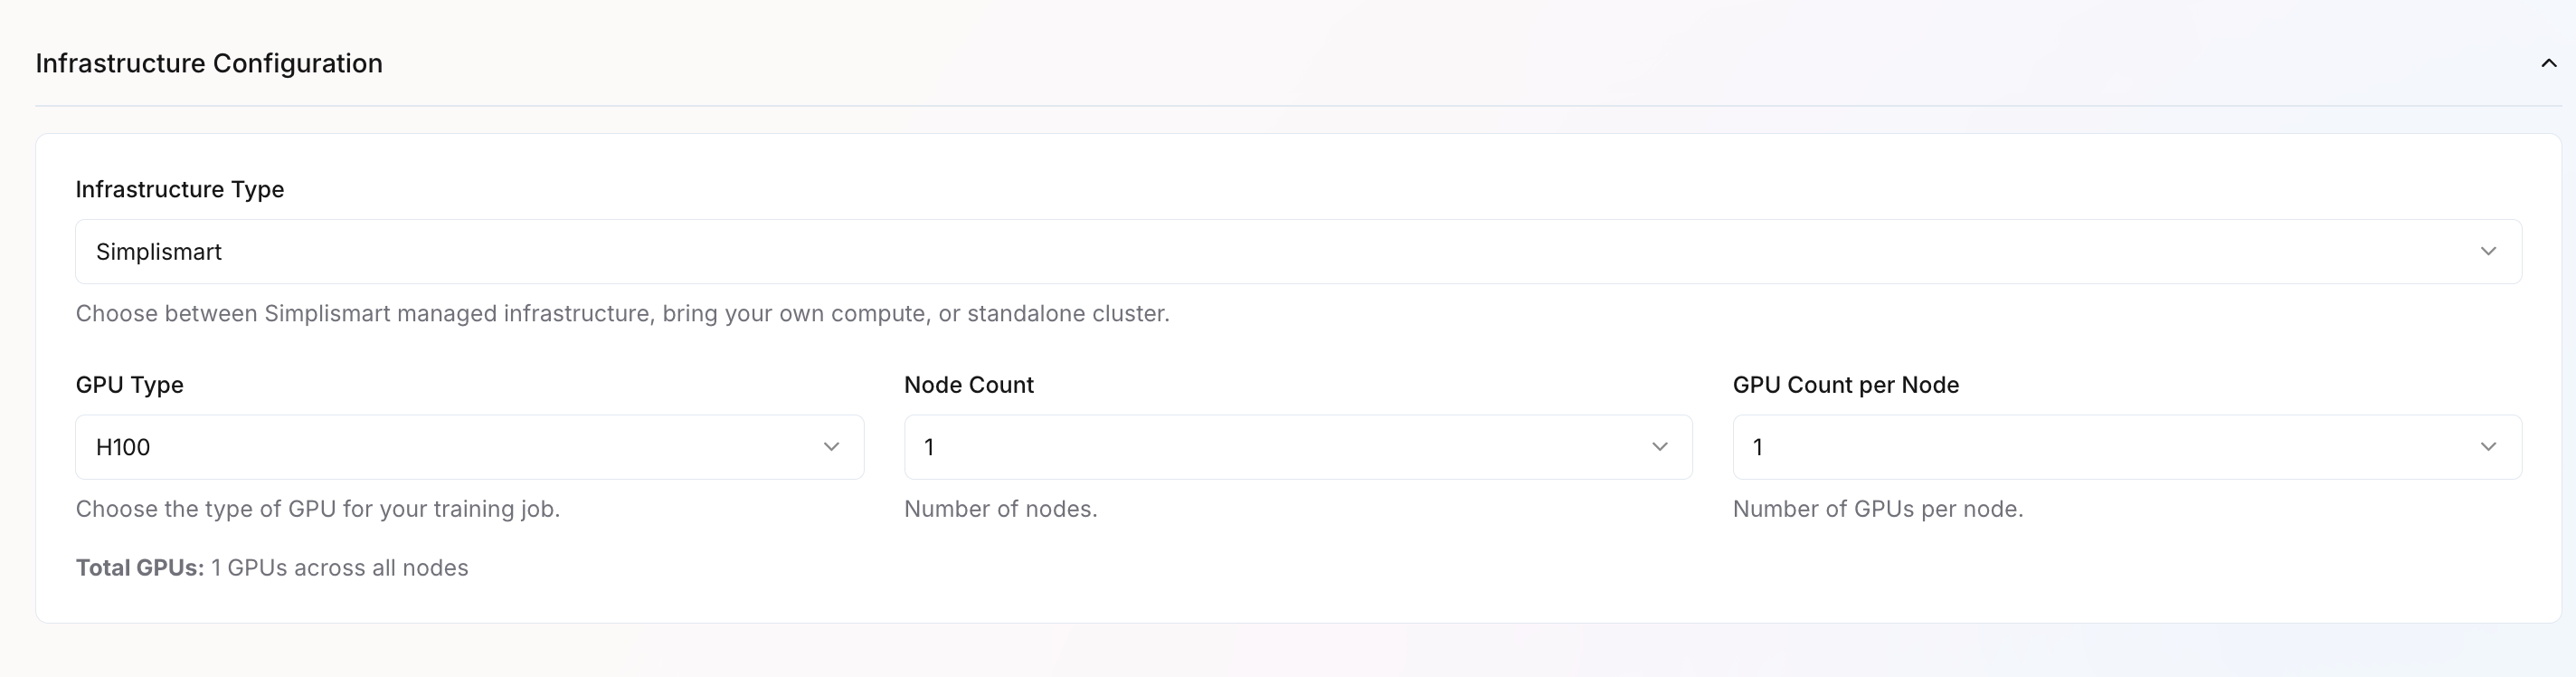 Select the compute resources for your training job:
* **Infrastructure Type** – Choose where to run training:
* **Simplismart Cloud** – Fully managed infrastructure
* [**Bring Your Own Compute**](/inference/bring-your-own-compute) – Use your own cloud resources
* **Imported Cluster** – Use a pre-configured standalone cluster
* **GPU Type** – Select GPU hardware based on your performance needs
* **Node Count** – Number of machines to use
* **GPU Count per Node** – GPUs per machine
Configure your training parameters based on your use case. The configuration is organized into several sections:
Select the compute resources for your training job:
* **Infrastructure Type** – Choose where to run training:
* **Simplismart Cloud** – Fully managed infrastructure
* [**Bring Your Own Compute**](/inference/bring-your-own-compute) – Use your own cloud resources
* **Imported Cluster** – Use a pre-configured standalone cluster
* **GPU Type** – Select GPU hardware based on your performance needs
* **Node Count** – Number of machines to use
* **GPU Count per Node** – GPUs per machine
Configure your training parameters based on your use case. The configuration is organized into several sections:
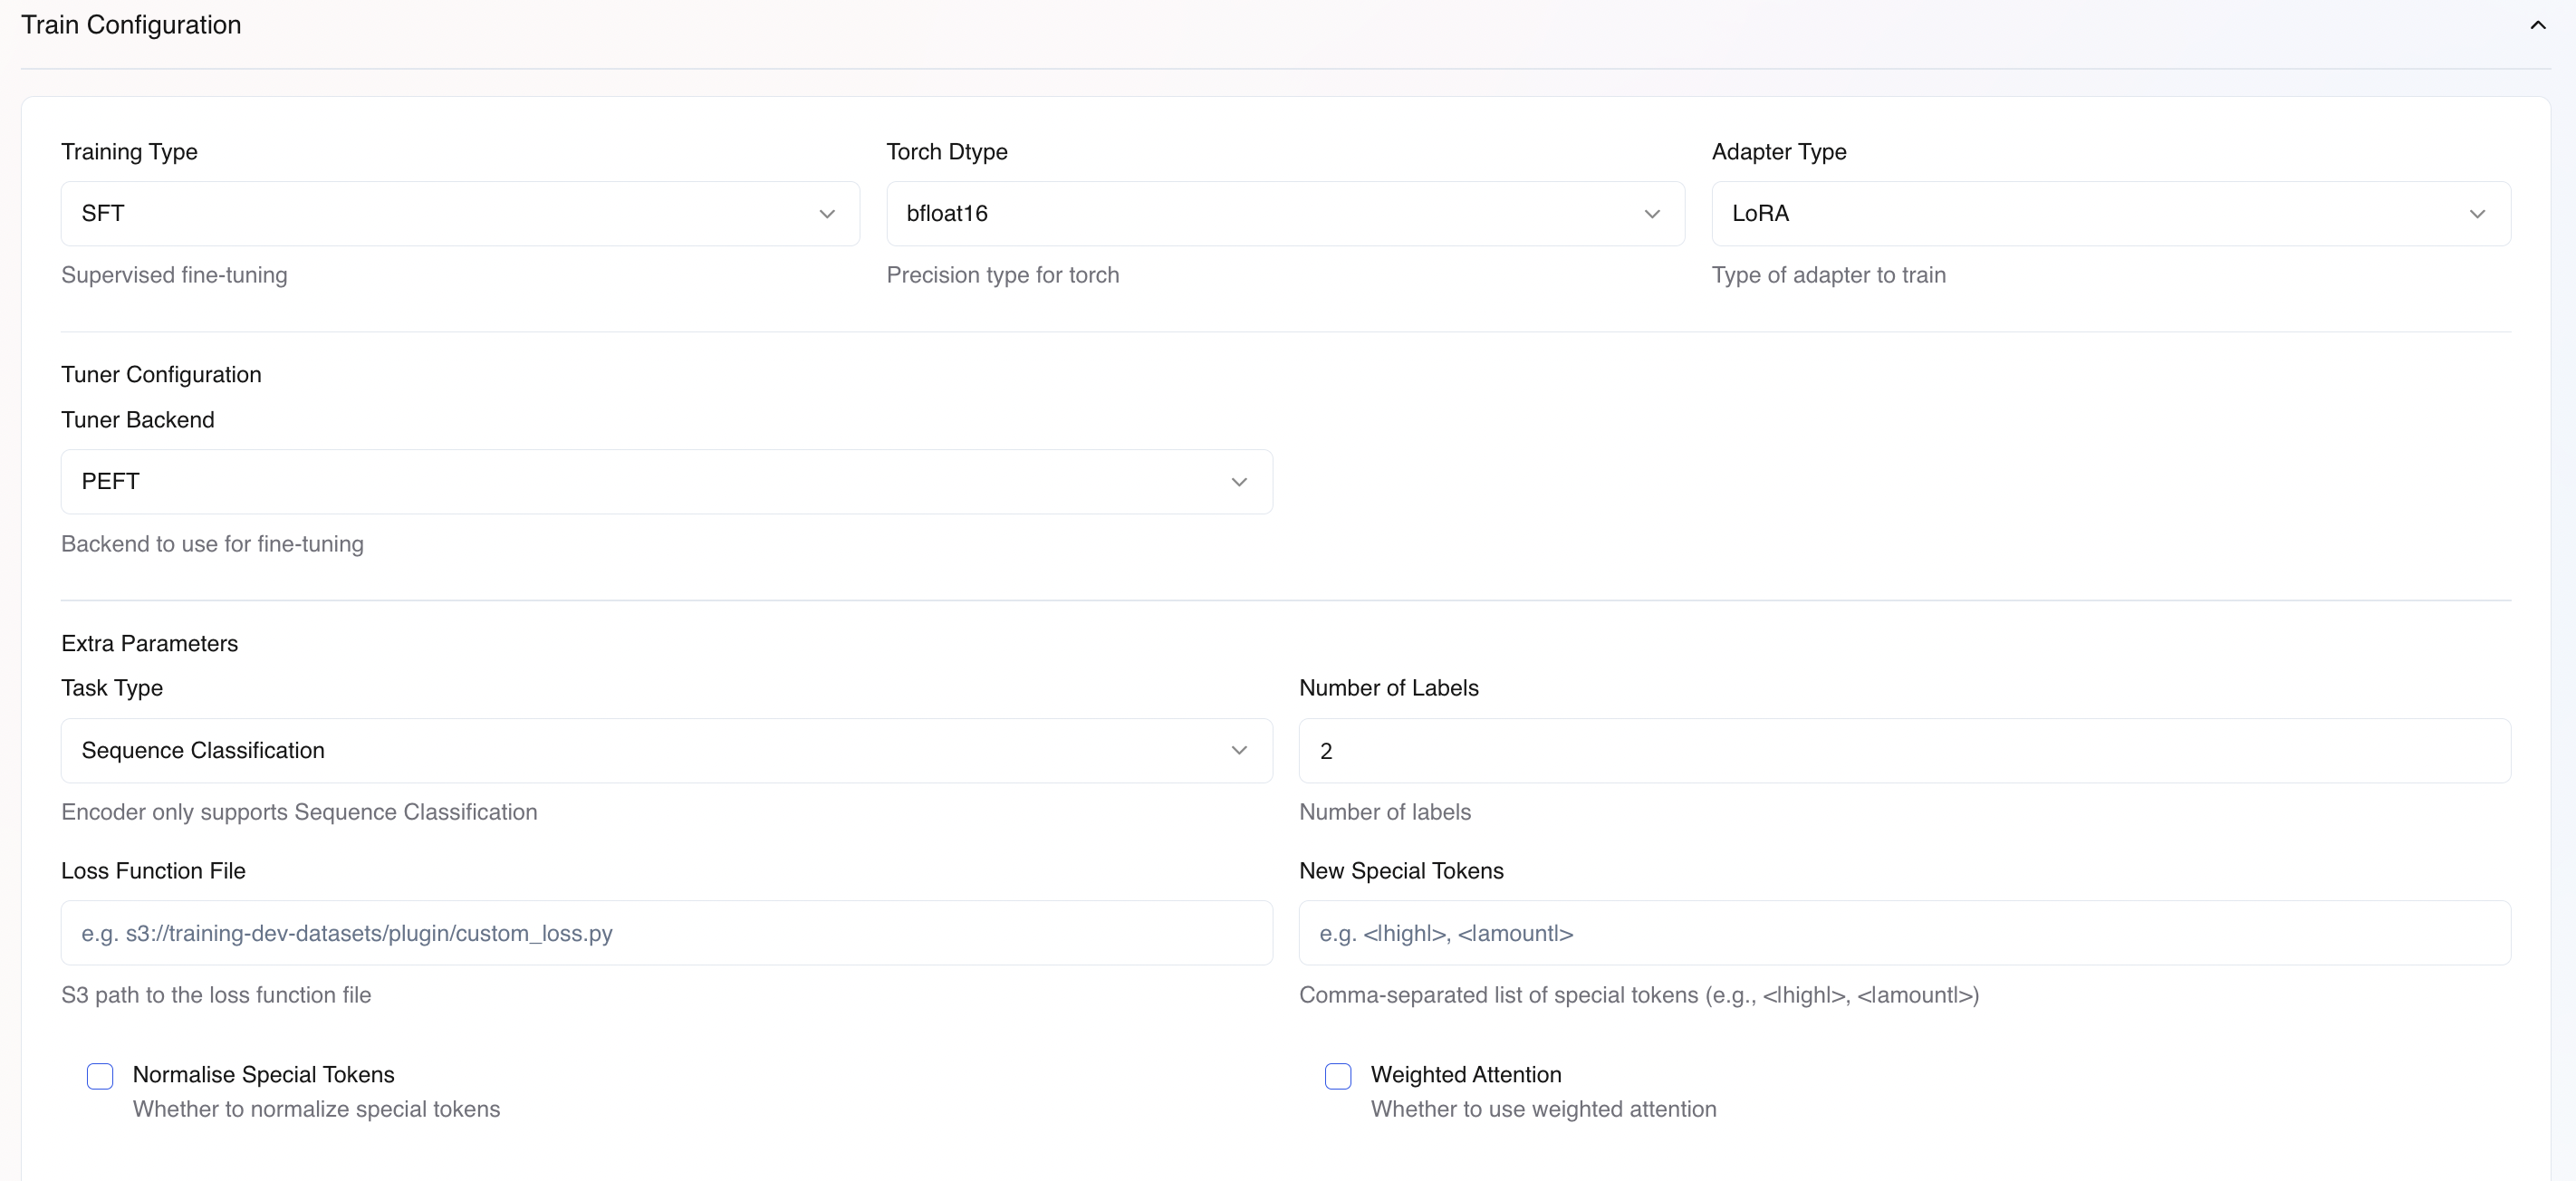 ### Basic Training Configuration
| Parameter | Description | Default Value |
| ------------- | ----------------------------------------------------------------------------------------- | ------------- |
| Training Type | Training methodology. Auto-selected as `SFT` (Supervised Fine-Tuning) for encoder models. | SFT |
| Torch Dtype | Numerical precision for model weights and activations. `bfloat16` or `float32` | bfloat16 |
| Adapter Type | Parameter-efficient fine-tuning method. `LoRA` or `Full` (full finetuning) | LoRA |
### Tuner Configuration
| Parameter | Description | Default Value |
| ------------- | ------------------------------------------------------------------------------------------------------- | ------------- |
| Tuner Backend | Framework for parameter-efficient fine-tuning. `PEFT` (Parameter-Efficient Fine-Tuning) is recommended. | PEFT |
### Extra Parameters
| Parameter | Description | Default Value |
| ------------------------ | ---------------------------------------------------------------------------------------------------------------------- | ----------------------- |
| Task Type | Defines the model's objective. For encoder training, use `Sequence Classification`. | Sequence Classification |
| Number of Labels | Total number of classes in your dataset (e.g., `2` for binary classification, `5` for 5-class). | - |
| Loss Function File | S3 path to a custom loss function file (e.g., `s3://bucket/loss_function.py`). Must expose `loss_fn_adapter` variable. | - |
| New Special Tokens | Comma-separated list of special tokens to add to the tokenizer | - |
| Normalize Special Tokens | Whether to aggregate embeddings of compound special tokens from their constituent tokens. | False |
| Weighted Attention | Uses attention pooling to create a weighted representation of input tokens instead of relying on the \[CLS] token. | False |
**Special Token Initialization:**
Normalisation of embedding is only performed when `Normalize Special Tokens` is True.
When using compound special tokens (e.g., `<|high_amount|>`), their embeddings can be initialized from constituent tokens (`<|high|>` and `<|amount|>`) by taking the normalized mean of the constituent embeddings. This helps the model understand the semantic relationship between tokens.
**Example:**
If you add tokens `<|high|>`, `<|amount|>`, and `<|high_amount|>`, the embedding for `<|high_amount|>` will be:
`embedding(<|high_amount|>) = (embedding(<|high|>) + embedding(<|amount|>)) / 2`
```python theme={null}
from torch import nn, Tensor
import torch
import os
import torch.nn.functional as F
def my_custom_loss_func(outputs, labels, num_items_in_batch=None, **kwargs) -> torch.Tensor:
logits = outputs.logits if hasattr(outputs, 'logits') else outputs
shift_logits = logits[..., :-1, : ].contiguous()
shift_labels = labels[..., 1:].contiguous()
ce_loss = F.cross_entropy(
shift_logits.view(-1, shift_logits.size(-1)),
shift_labels.view(-1),
reduction='none'
)
gamma = float(os.environ.get('FOCAL_LOSS_GAMMA', '2.0'))
alpha = float(os.environ.get('FOCAL_LOSS_ALPHA', '0.25'))
pt = torch.exp(-ce_loss)
focal_weight = alpha * (1 - pt) ** gamma
focal_loss = focal_weight * ce_loss
mask = (shift_labels. view(-1) != -100)
focal_loss = focal_loss[mask]
if num_items_in_batch is None:
num_items_in_batch = mask.sum()
return focal_loss.sum() / num_items_in_batch
loss_fn_adapter = my_custom_loss_func
```
The custom loss function must expose a variable named `loss_fn_adapter` (a Callable) with the signature shown above. The function receives model outputs, labels, and optionally the number of items in batch, and must return a scalar loss tensor.
Weighted attention pooling computes a learned attention score for each token in the sequence, creating a weighted representation that focuses on the most informative tokens. This approach can be more effective than relying solely on the \[CLS] token for sequence classification tasks.
#### How it works:
1. Each token's contextual embedding from the encoder is scored using a learned linear layer
2. Scores are normalized across the sequence using softmax
3. A weighted sum of token embeddings is computed based on these attention weights
4. The pooled representation is passed to the classification head
Here is an example implementation:
```python theme={null}
import torch
import torch.nn as nn
import torch.nn.functional as F
from transformers import (
BertPreTrainedModel,
BertModel
)
from transformers.modeling_outputs import SequenceClassifierOutputWithPast
class BertWeightedPoolForSequenceClassification(BertPreTrainedModel):
def __init__(self, config):
super().__init__(config)
self.num_labels = config.num_labels
hidden = config.hidden_size
self.eps = 1e-9
# Encoder
self.bert = BertModel(config)
# Attention pooling
self.scorer = nn.Linear(hidden, 1)
self.log_temp = nn.Parameter(torch.tensor(0.0))
self.dropout = nn.Dropout(config.hidden_dropout_prob)
self.classifier = nn.Linear(hidden, self.num_labels)
# HF required
self.post_init()
# Debug hook
self.last_attn_weights = None
def forward(
self,
input_ids=None,
attention_mask=None,
token_type_ids=None,
labels=None,
**kwargs
):
outputs = self.bert(
input_ids,
attention_mask=attention_mask,
token_type_ids=token_type_ids,
return_dict=True,
)
hidden_states = outputs.last_hidden_state # (B, T, H)
# Token scoring
scores = self.scorer(hidden_states).squeeze(-1) # (B, T)
temp = torch.exp(self.log_temp)
scores = scores / (temp + self.eps)
# Mask padding
mask = attention_mask.to(scores.dtype)
scores = scores.masked_fill(mask == 0, -1e9)
# Stable softmax
attn_weights = F.softmax(scores.float(), dim=1).to(scores.dtype)
attn_weights = attn_weights * mask
attn_weights = attn_weights / (attn_weights.sum(dim=1, keepdim=True) + self.eps)
self.last_attn_weights = attn_weights.detach()
# Weighted pooling
pooled = torch.bmm(
attn_weights.unsqueeze(1),
hidden_states
).squeeze(1)
pooled = self.dropout(pooled)
logits = self.classifier(pooled)
loss = None
if labels is not None:
loss = F.cross_entropy(logits, labels)
return SequenceClassifierOutputWithPast(
loss=loss,
logits=logits,
hidden_states=outputs.hidden_states,
attentions=None,
)
```
### Hyperparameters
### Basic Training Configuration
| Parameter | Description | Default Value |
| ------------- | ----------------------------------------------------------------------------------------- | ------------- |
| Training Type | Training methodology. Auto-selected as `SFT` (Supervised Fine-Tuning) for encoder models. | SFT |
| Torch Dtype | Numerical precision for model weights and activations. `bfloat16` or `float32` | bfloat16 |
| Adapter Type | Parameter-efficient fine-tuning method. `LoRA` or `Full` (full finetuning) | LoRA |
### Tuner Configuration
| Parameter | Description | Default Value |
| ------------- | ------------------------------------------------------------------------------------------------------- | ------------- |
| Tuner Backend | Framework for parameter-efficient fine-tuning. `PEFT` (Parameter-Efficient Fine-Tuning) is recommended. | PEFT |
### Extra Parameters
| Parameter | Description | Default Value |
| ------------------------ | ---------------------------------------------------------------------------------------------------------------------- | ----------------------- |
| Task Type | Defines the model's objective. For encoder training, use `Sequence Classification`. | Sequence Classification |
| Number of Labels | Total number of classes in your dataset (e.g., `2` for binary classification, `5` for 5-class). | - |
| Loss Function File | S3 path to a custom loss function file (e.g., `s3://bucket/loss_function.py`). Must expose `loss_fn_adapter` variable. | - |
| New Special Tokens | Comma-separated list of special tokens to add to the tokenizer | - |
| Normalize Special Tokens | Whether to aggregate embeddings of compound special tokens from their constituent tokens. | False |
| Weighted Attention | Uses attention pooling to create a weighted representation of input tokens instead of relying on the \[CLS] token. | False |
**Special Token Initialization:**
Normalisation of embedding is only performed when `Normalize Special Tokens` is True.
When using compound special tokens (e.g., `<|high_amount|>`), their embeddings can be initialized from constituent tokens (`<|high|>` and `<|amount|>`) by taking the normalized mean of the constituent embeddings. This helps the model understand the semantic relationship between tokens.
**Example:**
If you add tokens `<|high|>`, `<|amount|>`, and `<|high_amount|>`, the embedding for `<|high_amount|>` will be:
`embedding(<|high_amount|>) = (embedding(<|high|>) + embedding(<|amount|>)) / 2`
```python theme={null}
from torch import nn, Tensor
import torch
import os
import torch.nn.functional as F
def my_custom_loss_func(outputs, labels, num_items_in_batch=None, **kwargs) -> torch.Tensor:
logits = outputs.logits if hasattr(outputs, 'logits') else outputs
shift_logits = logits[..., :-1, : ].contiguous()
shift_labels = labels[..., 1:].contiguous()
ce_loss = F.cross_entropy(
shift_logits.view(-1, shift_logits.size(-1)),
shift_labels.view(-1),
reduction='none'
)
gamma = float(os.environ.get('FOCAL_LOSS_GAMMA', '2.0'))
alpha = float(os.environ.get('FOCAL_LOSS_ALPHA', '0.25'))
pt = torch.exp(-ce_loss)
focal_weight = alpha * (1 - pt) ** gamma
focal_loss = focal_weight * ce_loss
mask = (shift_labels. view(-1) != -100)
focal_loss = focal_loss[mask]
if num_items_in_batch is None:
num_items_in_batch = mask.sum()
return focal_loss.sum() / num_items_in_batch
loss_fn_adapter = my_custom_loss_func
```
The custom loss function must expose a variable named `loss_fn_adapter` (a Callable) with the signature shown above. The function receives model outputs, labels, and optionally the number of items in batch, and must return a scalar loss tensor.
Weighted attention pooling computes a learned attention score for each token in the sequence, creating a weighted representation that focuses on the most informative tokens. This approach can be more effective than relying solely on the \[CLS] token for sequence classification tasks.
#### How it works:
1. Each token's contextual embedding from the encoder is scored using a learned linear layer
2. Scores are normalized across the sequence using softmax
3. A weighted sum of token embeddings is computed based on these attention weights
4. The pooled representation is passed to the classification head
Here is an example implementation:
```python theme={null}
import torch
import torch.nn as nn
import torch.nn.functional as F
from transformers import (
BertPreTrainedModel,
BertModel
)
from transformers.modeling_outputs import SequenceClassifierOutputWithPast
class BertWeightedPoolForSequenceClassification(BertPreTrainedModel):
def __init__(self, config):
super().__init__(config)
self.num_labels = config.num_labels
hidden = config.hidden_size
self.eps = 1e-9
# Encoder
self.bert = BertModel(config)
# Attention pooling
self.scorer = nn.Linear(hidden, 1)
self.log_temp = nn.Parameter(torch.tensor(0.0))
self.dropout = nn.Dropout(config.hidden_dropout_prob)
self.classifier = nn.Linear(hidden, self.num_labels)
# HF required
self.post_init()
# Debug hook
self.last_attn_weights = None
def forward(
self,
input_ids=None,
attention_mask=None,
token_type_ids=None,
labels=None,
**kwargs
):
outputs = self.bert(
input_ids,
attention_mask=attention_mask,
token_type_ids=token_type_ids,
return_dict=True,
)
hidden_states = outputs.last_hidden_state # (B, T, H)
# Token scoring
scores = self.scorer(hidden_states).squeeze(-1) # (B, T)
temp = torch.exp(self.log_temp)
scores = scores / (temp + self.eps)
# Mask padding
mask = attention_mask.to(scores.dtype)
scores = scores.masked_fill(mask == 0, -1e9)
# Stable softmax
attn_weights = F.softmax(scores.float(), dim=1).to(scores.dtype)
attn_weights = attn_weights * mask
attn_weights = attn_weights / (attn_weights.sum(dim=1, keepdim=True) + self.eps)
self.last_attn_weights = attn_weights.detach()
# Weighted pooling
pooled = torch.bmm(
attn_weights.unsqueeze(1),
hidden_states
).squeeze(1)
pooled = self.dropout(pooled)
logits = self.classifier(pooled)
loss = None
if labels is not None:
loss = F.cross_entropy(logits, labels)
return SequenceClassifierOutputWithPast(
loss=loss,
logits=logits,
hidden_states=outputs.hidden_states,
attentions=None,
)
```
### Hyperparameters
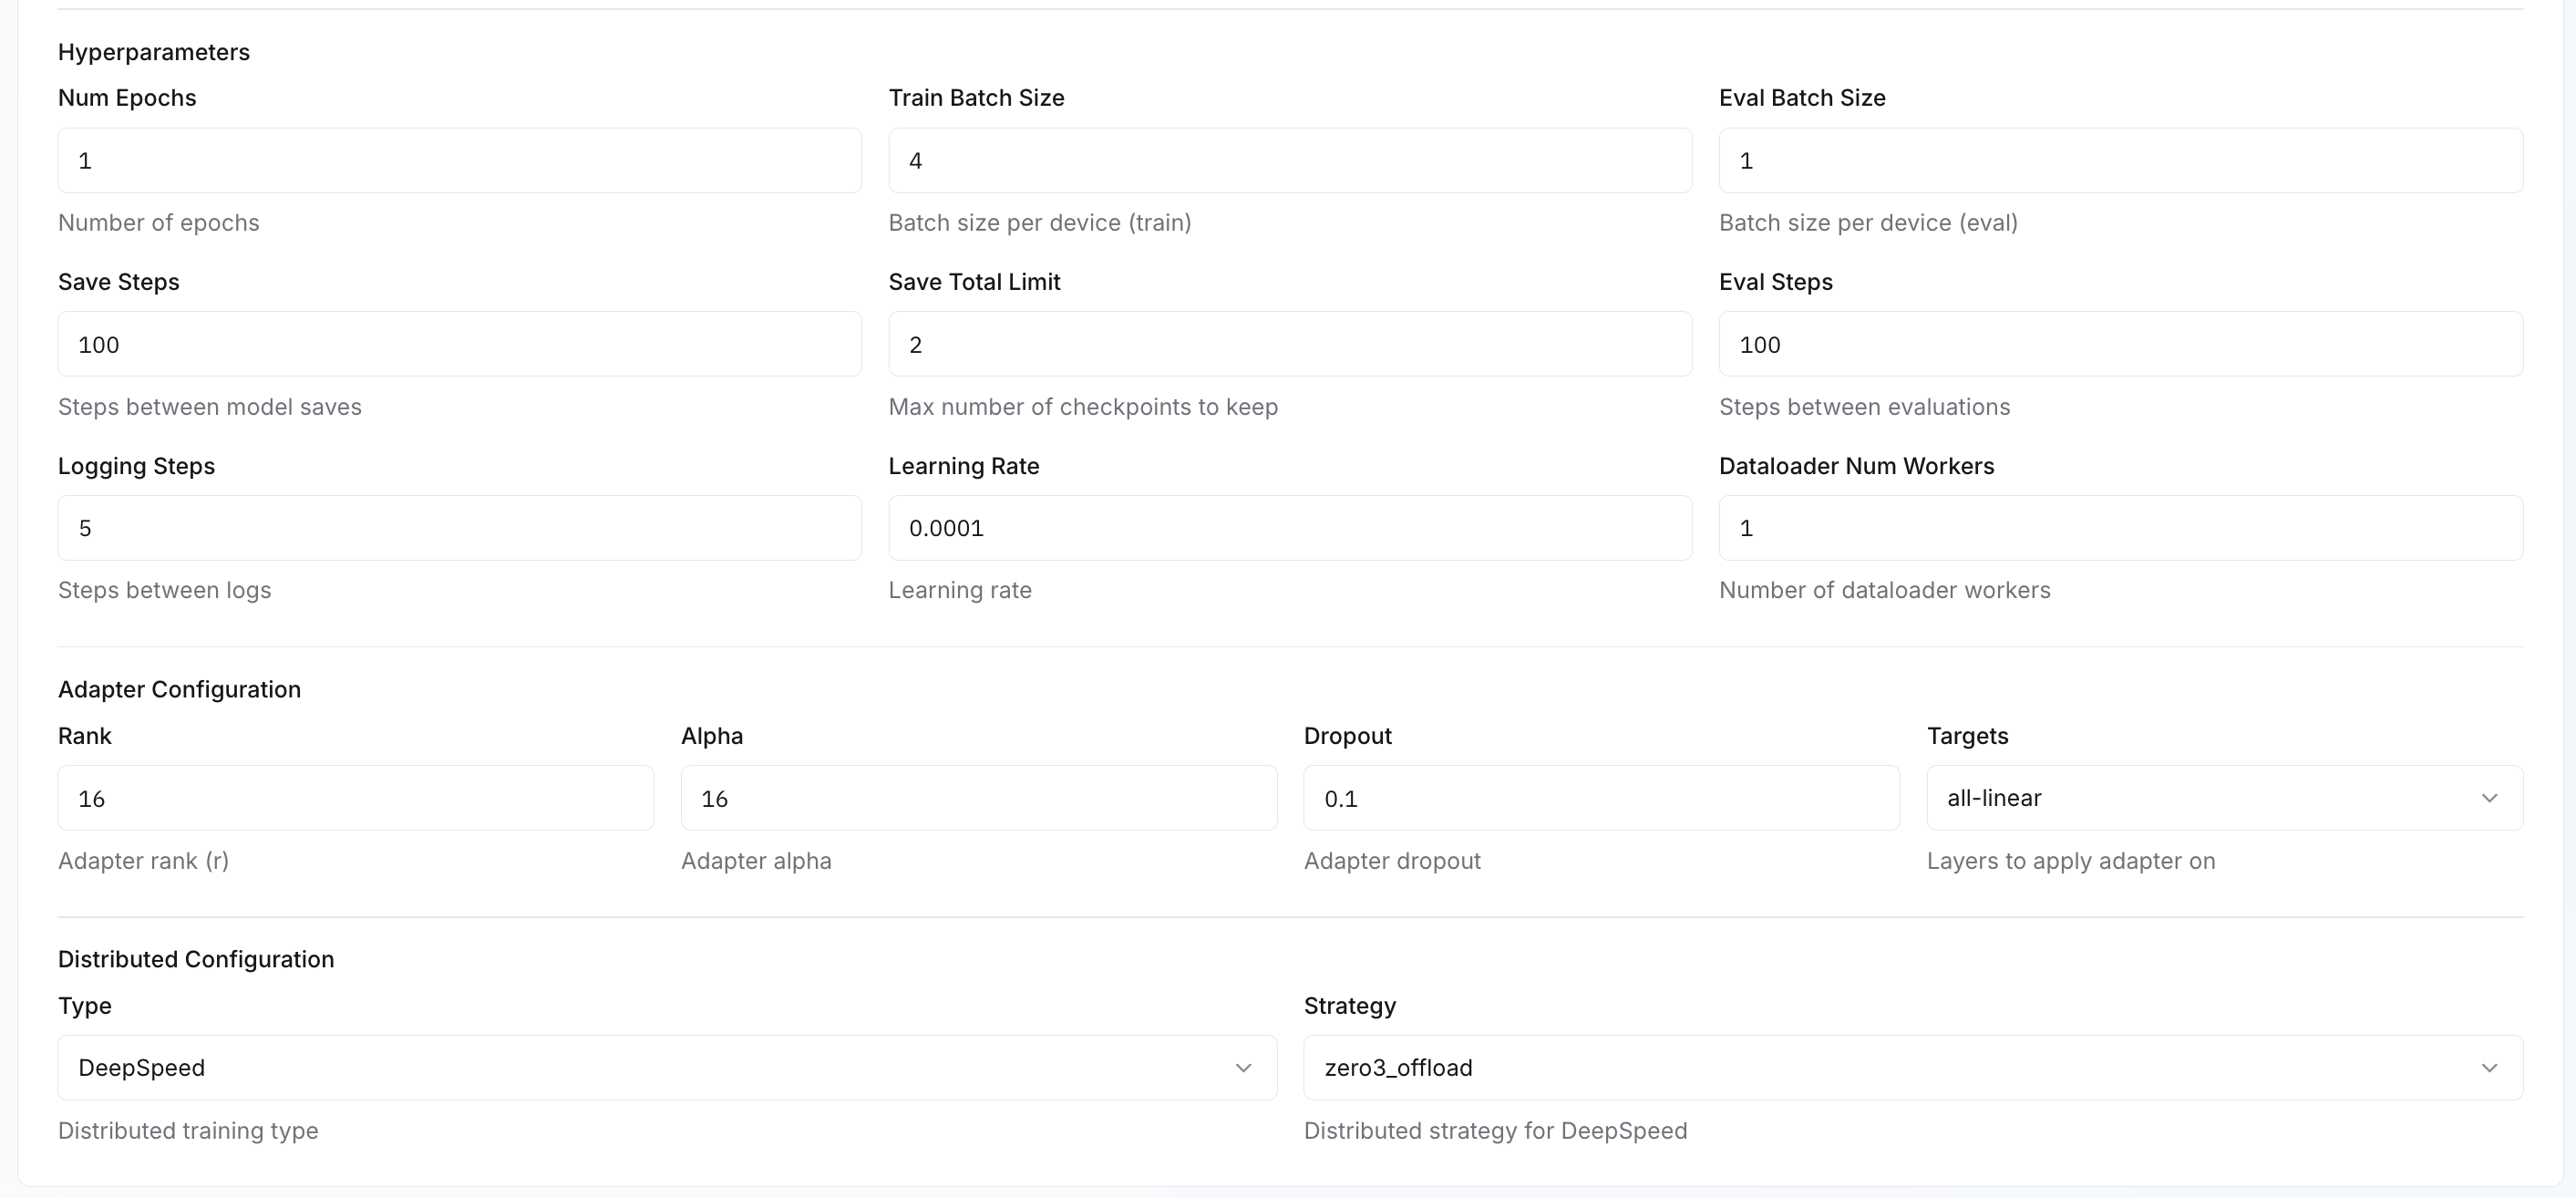 | Parameter | Description | Default Value |
| ---------------------- | ---------------------------------------------------------------------------------------- | ------------- |
| Num Epochs | Number of complete passes through the training dataset. | 1 |
| Train Batch Size | Number of samples processed together per GPU during training. | 8 |
| Eval Batch Size | Batch size during validation. | 8 |
| Save Steps | Checkpoint frequency. Model is saved every N training steps for recovery and evaluation. | 100 |
| Save Total Limit | Maximum checkpoints to keep. Older checkpoints are deleted to save storage. | 2 |
| Eval Steps | Validation frequency. Model performance is evaluated on validation set every N steps. | 100 |
| Logging Steps | How often metrics (loss, accuracy) are recorded to tracking systems | 5 |
| Learning Rate | Initial learning rate for optimizer | 0.00001 |
| Dataloader Num Workers | Parallel data-loading threads per device | 1 |
### Adapter Configuration
Configure fine-tuning parameters based on your selected **Adapter Type** (LoRA or Full). Different parameters apply depending on your choice. Learn more about [adapter configuration](/training-suite/llms/training-new#lora-adapter-configuration).
| Parameter | Description | Default Value | Applies To |
| --------- | --------------------------------------------------------------------------------------------------------- | ------------- | ----------- |
| Rank (r) | Adapter rank determines capacity. Higher rank = more expressive but slower. 16-64 works for most tasks. | 16 | LoRA only |
| Alpha | Scaling factor for adapter updates. Typically set equal to rank. Higher alpha = stronger influence. | 16 | LoRA only |
| Dropout | Regularization to prevent overfitting. Randomly drops adapter weights during training. | 0.1 | LoRA & Full |
| Targets | Which model layers to fine-tune. `all-linear` targets all linear/attention layers for maximum adaptation. | all-linear | LoRA & Full |
### Distributed Configuration
Configures multi-GPU or multi-node training for large-scale training.
| Parameter | Description | Default Value |
| --------- | ------------------------------------------------------------------------------------------------------- | -------------- |
| Type | Distributed training framework. `DeepSpeed` enables memory-efficient training across GPUs. | DeepSpeed |
| Strategy | Memory optimization strategy. `zero3_offload` splits model states across GPUs and CPU for large models. | zero3\_offload |
1. Review all settings carefully
2. Click `Create Job` to start training
3. Monitor training progress in the `My Trainings` > `Your Training Job` > `Metrics` tab.
## Deployment and Inference
Once training completes successfully, you can [compile and deploy](/training-suite/deploy-fine-tuned-model) your Encoder model for inference.
During model compilation, if your usecase is text-classification please add a field under `extra_params` adding `"task": "text-classification"`.
Sharing below, a sample `Pipeline Configuration` for your reference. By default, it takes `fill-mask` as a task.
```python theme={null}
{
"mode": "chat",
"type": "llm",
"loras": [],
"is_lora": true,
"lora_repo": {
"path": "",
"type": "",
"secret": {
"type": ""
},
"ownership": ""
},
"extra_params": {
"task": "text-classification"
},
"load_lora_dynamic": false,
"enable_model_caching": true,
"quantized_model_path": {
"path": "",
"type": "",
"secret": {
"type": ""
},
"ownership": ""
}
}
```
For encoder models, once deployed, you can run inferences using the example given below. Your request payload and expected output will change according to your use-case.
### **Text Classification Example**
```python theme={null}
import requests
url = "YOUR_MODEL_ENDPOINT"
data = {
"text": "The capital of France is Paris"
}
headers = {
"Authorization": "Bearer "
}
response = requests.post(url, json=data, headers=headers)
print(response.json())
```
**Expected Output:**
```bash theme={null}
[{'label': 'LABEL_1', 'score': 0.5462469458580017}]
```
### **Fill Mask Example**
You can refer to the HuggingFace page of the respective model for more information about the``token.
```python theme={null}
import requests
url = "YOUR_MODEL_ENDPOINT"
data = {
"text": "The capital of France is [MASK]."
}
headers = {
"Authorization": "Bearer "
}
response = requests.post(url, json=data, headers=headers)
print(response.json())
```
For RoBERTa base model replace `[MASK]` with ``
**Expected Output**
```python theme={null}
[
{'score': 0.9036276936531067, 'token': 2201, 'token_str': ' Paris', 'sequence': 'The capital of France is Paris.'
},
{'score': 0.08029197156429291, 'token': 12790, 'token_str': ' Lyon', 'sequence': 'The capital of France is Lyon.'
},
{'score': 0.004803310614079237, 'token': 16911, 'token_str': ' Nice', 'sequence': 'The capital of France is Nice.'
},
{'score': 0.002099075587466359, 'token': 8239, 'token_str': ' Nancy', 'sequence': 'The capital of France is Nancy.'
},
{'score': 0.0011299046454951167, 'token': 35767, 'token_str': ' Napoleon', 'sequence': 'The capital of France is Napoleon.'
}
]
```
| Parameter | Description | Default Value |
| ---------------------- | ---------------------------------------------------------------------------------------- | ------------- |
| Num Epochs | Number of complete passes through the training dataset. | 1 |
| Train Batch Size | Number of samples processed together per GPU during training. | 8 |
| Eval Batch Size | Batch size during validation. | 8 |
| Save Steps | Checkpoint frequency. Model is saved every N training steps for recovery and evaluation. | 100 |
| Save Total Limit | Maximum checkpoints to keep. Older checkpoints are deleted to save storage. | 2 |
| Eval Steps | Validation frequency. Model performance is evaluated on validation set every N steps. | 100 |
| Logging Steps | How often metrics (loss, accuracy) are recorded to tracking systems | 5 |
| Learning Rate | Initial learning rate for optimizer | 0.00001 |
| Dataloader Num Workers | Parallel data-loading threads per device | 1 |
### Adapter Configuration
Configure fine-tuning parameters based on your selected **Adapter Type** (LoRA or Full). Different parameters apply depending on your choice. Learn more about [adapter configuration](/training-suite/llms/training-new#lora-adapter-configuration).
| Parameter | Description | Default Value | Applies To |
| --------- | --------------------------------------------------------------------------------------------------------- | ------------- | ----------- |
| Rank (r) | Adapter rank determines capacity. Higher rank = more expressive but slower. 16-64 works for most tasks. | 16 | LoRA only |
| Alpha | Scaling factor for adapter updates. Typically set equal to rank. Higher alpha = stronger influence. | 16 | LoRA only |
| Dropout | Regularization to prevent overfitting. Randomly drops adapter weights during training. | 0.1 | LoRA & Full |
| Targets | Which model layers to fine-tune. `all-linear` targets all linear/attention layers for maximum adaptation. | all-linear | LoRA & Full |
### Distributed Configuration
Configures multi-GPU or multi-node training for large-scale training.
| Parameter | Description | Default Value |
| --------- | ------------------------------------------------------------------------------------------------------- | -------------- |
| Type | Distributed training framework. `DeepSpeed` enables memory-efficient training across GPUs. | DeepSpeed |
| Strategy | Memory optimization strategy. `zero3_offload` splits model states across GPUs and CPU for large models. | zero3\_offload |
1. Review all settings carefully
2. Click `Create Job` to start training
3. Monitor training progress in the `My Trainings` > `Your Training Job` > `Metrics` tab.
## Deployment and Inference
Once training completes successfully, you can [compile and deploy](/training-suite/deploy-fine-tuned-model) your Encoder model for inference.
During model compilation, if your usecase is text-classification please add a field under `extra_params` adding `"task": "text-classification"`.
Sharing below, a sample `Pipeline Configuration` for your reference. By default, it takes `fill-mask` as a task.
```python theme={null}
{
"mode": "chat",
"type": "llm",
"loras": [],
"is_lora": true,
"lora_repo": {
"path": "",
"type": "",
"secret": {
"type": ""
},
"ownership": ""
},
"extra_params": {
"task": "text-classification"
},
"load_lora_dynamic": false,
"enable_model_caching": true,
"quantized_model_path": {
"path": "",
"type": "",
"secret": {
"type": ""
},
"ownership": ""
}
}
```
For encoder models, once deployed, you can run inferences using the example given below. Your request payload and expected output will change according to your use-case.
### **Text Classification Example**
```python theme={null}
import requests
url = "YOUR_MODEL_ENDPOINT"
data = {
"text": "The capital of France is Paris"
}
headers = {
"Authorization": "Bearer "
}
response = requests.post(url, json=data, headers=headers)
print(response.json())
```
**Expected Output:**
```bash theme={null}
[{'label': 'LABEL_1', 'score': 0.5462469458580017}]
```
### **Fill Mask Example**
You can refer to the HuggingFace page of the respective model for more information about the``token.
```python theme={null}
import requests
url = "YOUR_MODEL_ENDPOINT"
data = {
"text": "The capital of France is [MASK]."
}
headers = {
"Authorization": "Bearer "
}
response = requests.post(url, json=data, headers=headers)
print(response.json())
```
For RoBERTa base model replace `[MASK]` with ``
**Expected Output**
```python theme={null}
[
{'score': 0.9036276936531067, 'token': 2201, 'token_str': ' Paris', 'sequence': 'The capital of France is Paris.'
},
{'score': 0.08029197156429291, 'token': 12790, 'token_str': ' Lyon', 'sequence': 'The capital of France is Lyon.'
},
{'score': 0.004803310614079237, 'token': 16911, 'token_str': ' Nice', 'sequence': 'The capital of France is Nice.'
},
{'score': 0.002099075587466359, 'token': 8239, 'token_str': ' Nancy', 'sequence': 'The capital of France is Nancy.'
},
{'score': 0.0011299046454951167, 'token': 35767, 'token_str': ' Napoleon', 'sequence': 'The capital of France is Napoleon.'
}
]
```