> ## Documentation Index
> Fetch the complete documentation index at: https://docs.simplismart.ai/llms.txt
> Use this file to discover all available pages before exploring further.
# CLIP Model Training
> Train CLIP models on Simplismart to align images and text, customize embeddings, and build accurate vision–language applications
Follow this guide to train CLIP (Contrastive Language-Image Pre-training) models to align visual and textual representations for your specific use cases.
## Prerequisites
Before starting, ensure you have:
* A Simplismart account
* Dataset formatted according to the [CLIP training requirements](#dataset-format)
## Supported Model Architectures
Simplismart currently supports the following CLIP model configurations:
| Component | Model | HuggingFace Link |
| -------------------- | ---------------------------- | ---------------------------------------------------------------------------- |
| **Vision Encoder** | openai/clip-vit-base-patch32 | [clip-vit-base-patch32](https://huggingface.co/openai/clip-vit-base-patch32) |
| **Language Encoder** | FacebookAI/roberta-base | [roberta-base](https://huggingface.co/FacebookAI/roberta-base) |
CLIP training on Simplismart uses **full fine-tuning** and runs on a **single GPU**. Distributed training and LoRA are not currently supported.
## Dataset Preparation
Your dataset must be in **JSONL format** where each line contains an image path and corresponding captions.
**Example JSONL Entry:**
```json theme={null}
{
"image": "images/airport_1.jpg",
"captions": [
"Many aircraft are parked next to a long building in an airport.",
"many planes are parked next to a long building in an airport."
]
}
```
**Field Descriptions**
* **`image`**: Relative path to the image file within your ZIP archive
* **`captions`**: Array of text descriptions for the image (2-5 captions recommended)
### Example JSONL File
```json theme={null}
{"image": "images/airport_1.jpg", "captions": ["Many aircraft are parked next to a long building in an airport.", "Planes parked at the airport terminal."]}
{"image": "images/beach_scene.jpg", "captions": ["A sandy beach with blue ocean waves.", "People enjoying a sunny day at the seaside."]}
{"image": "images/city_street.jpg", "captions": ["Busy urban street with cars and pedestrians.", "Downtown city traffic during rush hour."]}
```
### Dataset Format
1. Organize your files in a directory:
```
dataset/
├── images/
│ ├── airport_1.jpg
│ ├── beach_scene.jpg
│ └── city_street.jpg
└── metadata.jsonl
```
2. Create a ZIP archive:
```bash theme={null}
cd /path/to/dataset
zip -r dataset.zip .
```
Ensure all image paths in your JSONL file match the relative paths within the ZIP archive.
## Creating a Training Job
To create a new training job, navigate to `My Trainings` > `LLM/VLM Model` > `Add a Training Job`
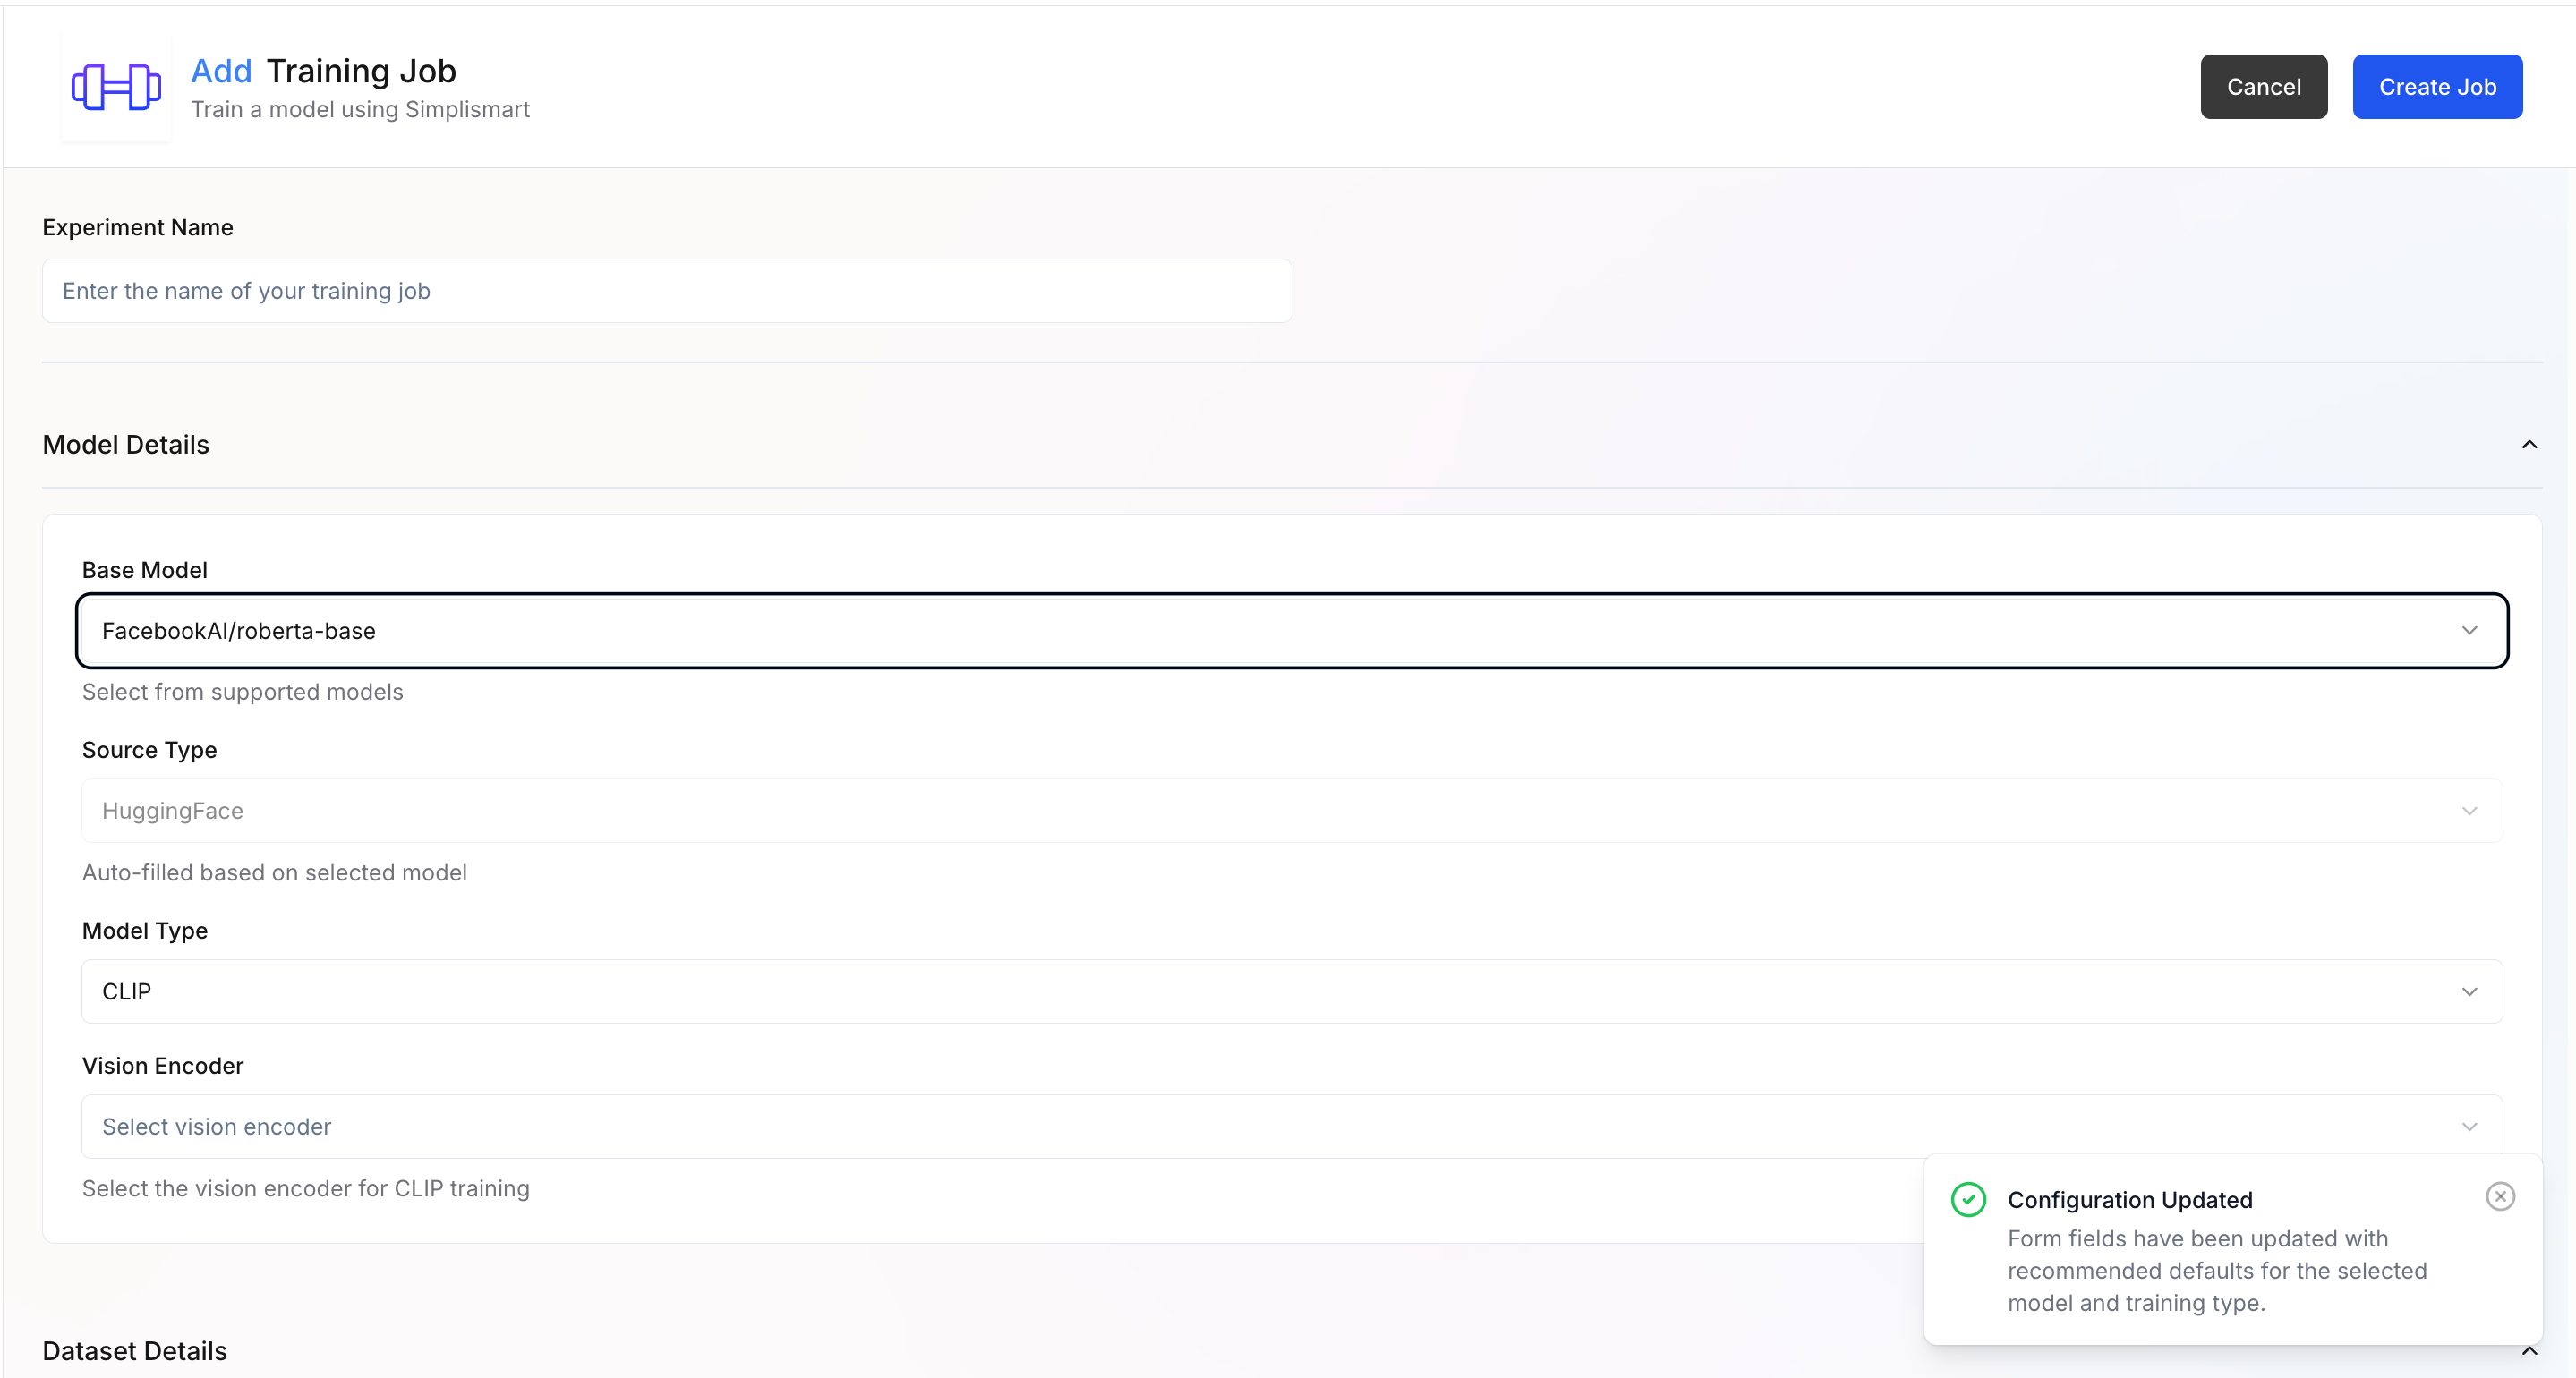 Provide the following details:
1. **Experiment Name**: Enter a descriptive name for your training experiment
2. **Model Details**:
* **Base Model** – Select the base model you want to fine-tune. Supported models (e.g., FacebookAI/roberta-base) are available in the dropdown.
* **Source Type** – Automatically filled based on the selected model source (e.g., Hugging Face).
* **Model Type** – Defines the architecture type for training. (here CLIP)
* **Vision Encoder** – Select the vision encoder used for CLIP-based training (e.g. `openai/clip-vit-base-patch32`).
When a base model is selected, the rest of the parameters get updated automatically with recommended defaults for that model and training type.
Provide the following details:
1. **Experiment Name**: Enter a descriptive name for your training experiment
2. **Model Details**:
* **Base Model** – Select the base model you want to fine-tune. Supported models (e.g., FacebookAI/roberta-base) are available in the dropdown.
* **Source Type** – Automatically filled based on the selected model source (e.g., Hugging Face).
* **Model Type** – Defines the architecture type for training. (here CLIP)
* **Vision Encoder** – Select the vision encoder used for CLIP-based training (e.g. `openai/clip-vit-base-patch32`).
When a base model is selected, the rest of the parameters get updated automatically with recommended defaults for that model and training type.
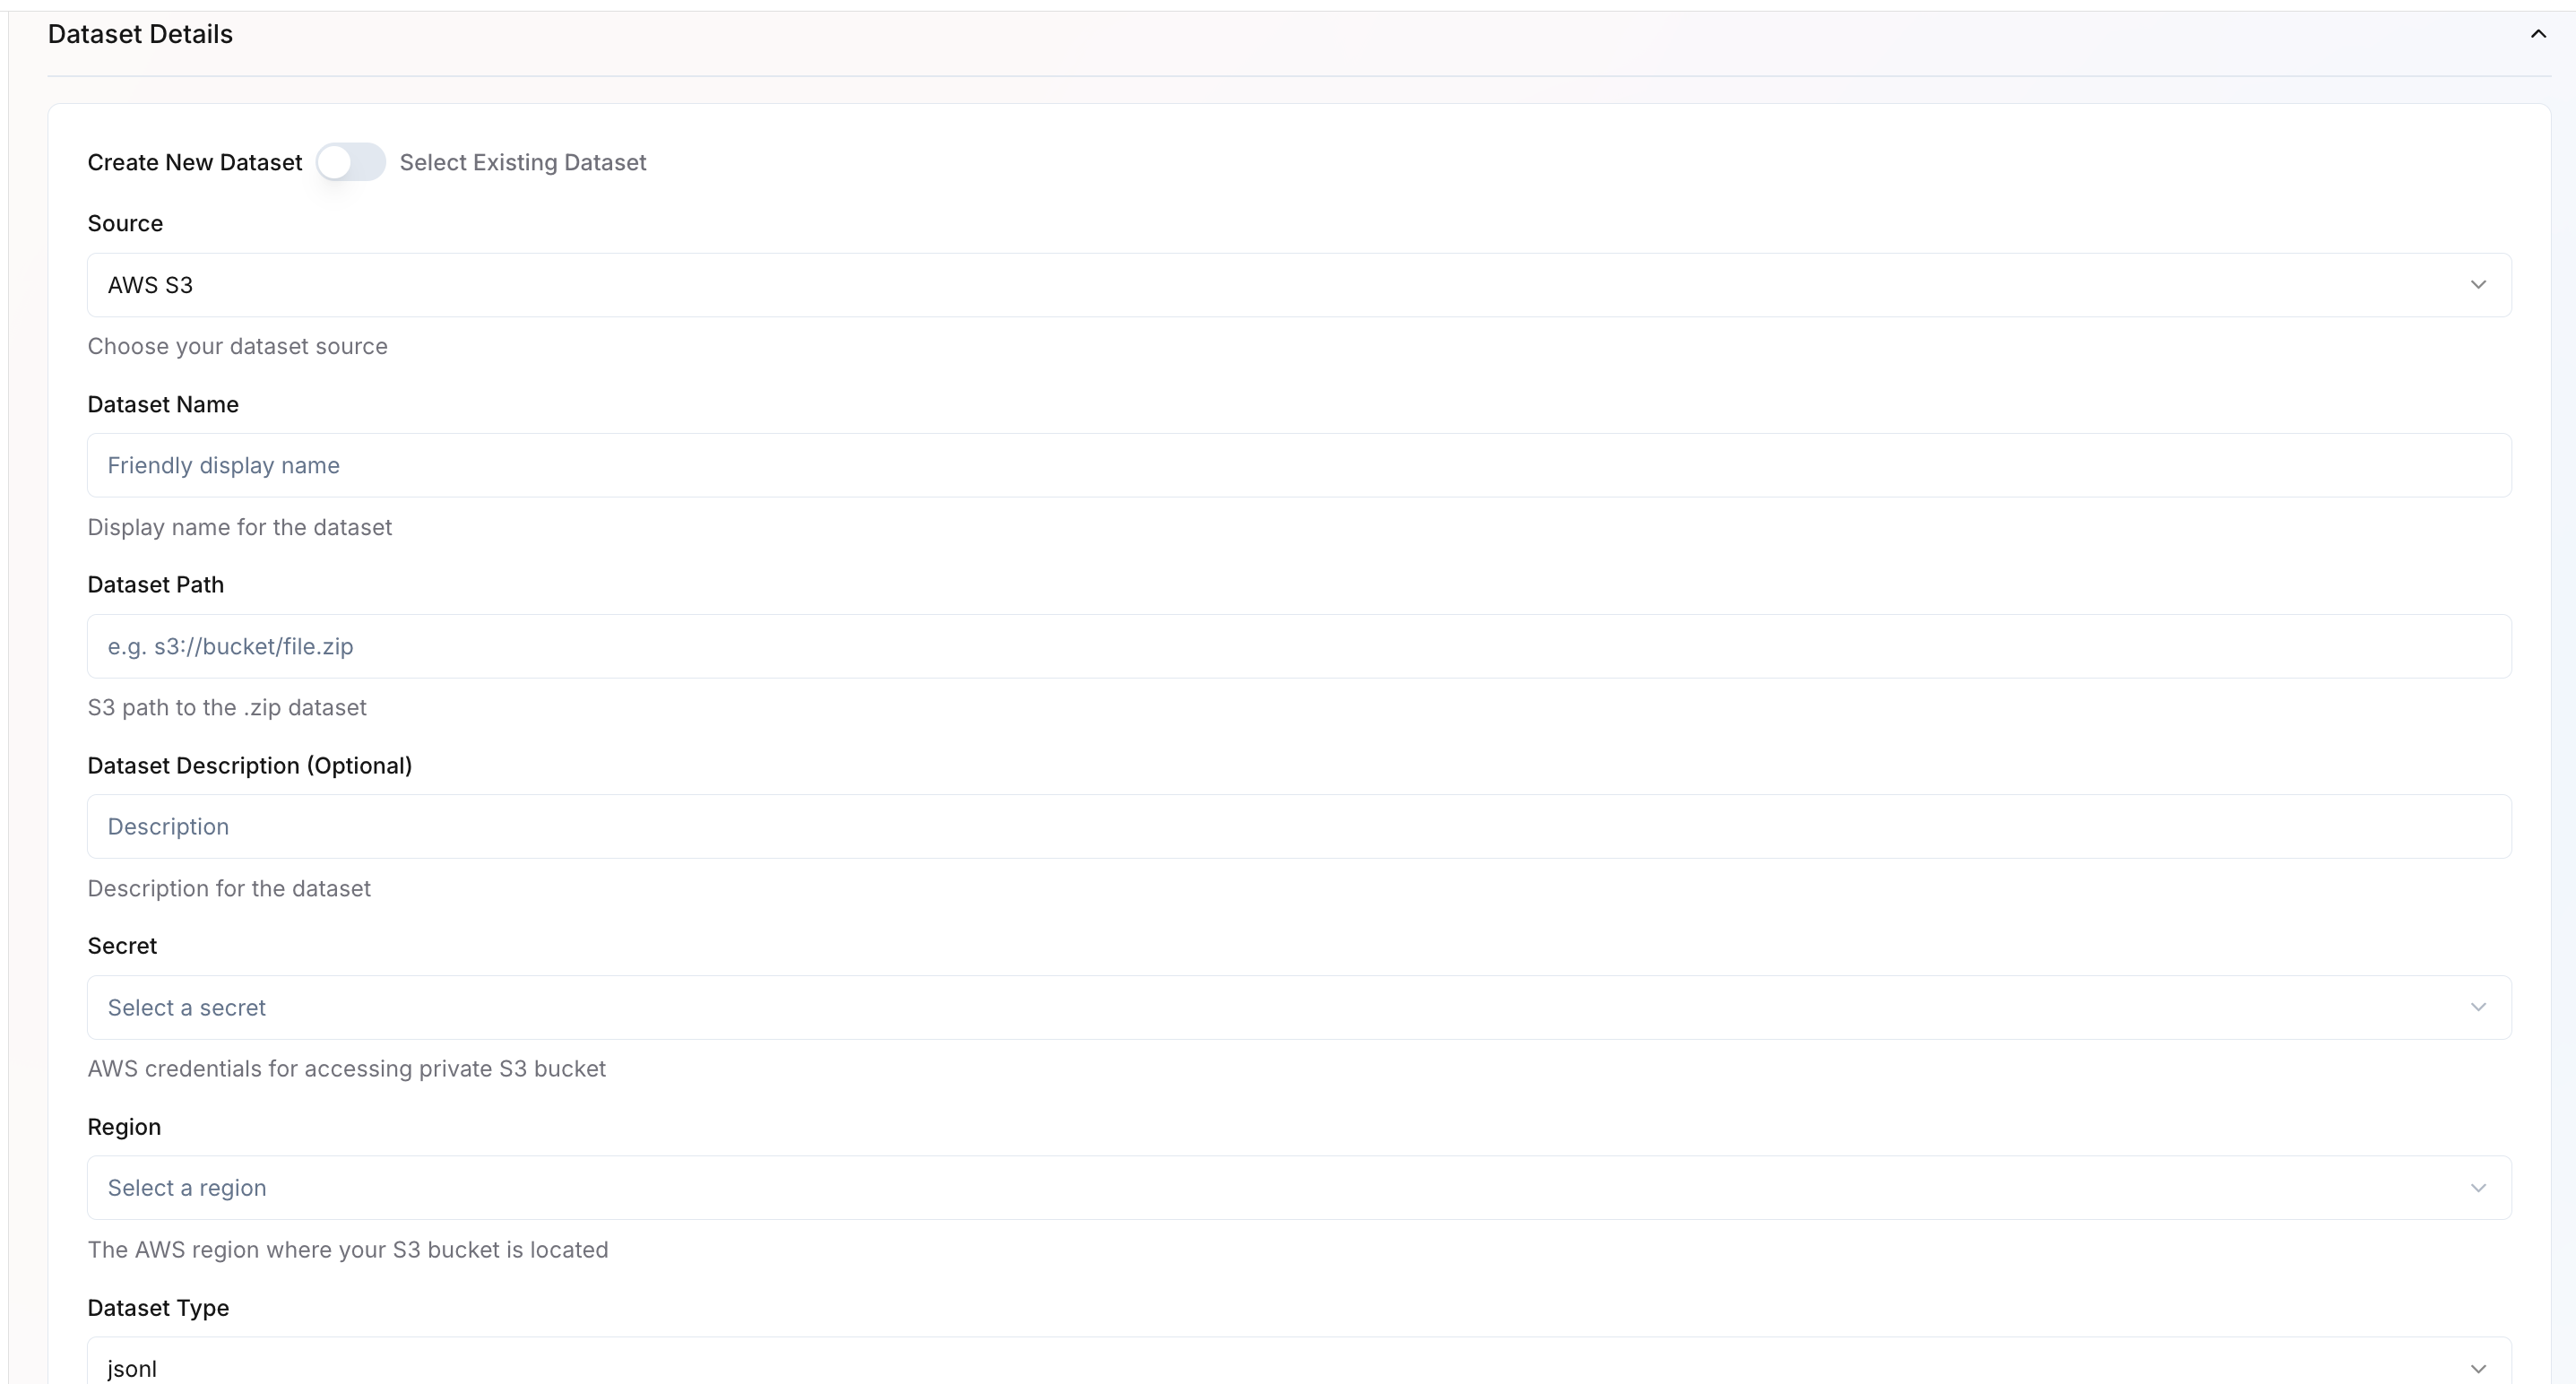 You can either create a new dataset or select an existing one.
**Create New Dataset**
* **Source** – Choose the dataset source (e.g., AWS S3, GCP).
* **Dataset Name** – Provide a friendly name for your dataset.
* **Dataset Path** – Specify the full path to your dataset (e.g., `s3://bucket/file.zip`).
* **Dataset Description** – Optional field for describing your dataset.
* **Secret** – If AWS/GCP source, select the AWS/GCP credential secret required to access private buckets.
* **Region** – If AWS/GCP source, choose the AWS/GCP region where your bucket is located.
* **Dataset Type** – Specify the data format, such as **JSONL**.
**Select Existing Dataset**
You can reuse a previously uploaded dataset instead of creating a new one.
1. In the **Dataset Details** section, select **Use Existing Dataset**.
2. A dropdown will appear listing all datasets available under your organization.
3. Choose the dataset you want to attach to this training job.
4. Once selected, key information such as **Dataset Name**, **Source**, **Path**, and **Region** will auto-populate based on the saved configuration.
5. Review the prefilled values to ensure the dataset is still valid and accessible.
6. After selection, proceed to configure **Dataset Configuration** parameters.
You can either create a new dataset or select an existing one.
**Create New Dataset**
* **Source** – Choose the dataset source (e.g., AWS S3, GCP).
* **Dataset Name** – Provide a friendly name for your dataset.
* **Dataset Path** – Specify the full path to your dataset (e.g., `s3://bucket/file.zip`).
* **Dataset Description** – Optional field for describing your dataset.
* **Secret** – If AWS/GCP source, select the AWS/GCP credential secret required to access private buckets.
* **Region** – If AWS/GCP source, choose the AWS/GCP region where your bucket is located.
* **Dataset Type** – Specify the data format, such as **JSONL**.
**Select Existing Dataset**
You can reuse a previously uploaded dataset instead of creating a new one.
1. In the **Dataset Details** section, select **Use Existing Dataset**.
2. A dropdown will appear listing all datasets available under your organization.
3. Choose the dataset you want to attach to this training job.
4. Once selected, key information such as **Dataset Name**, **Source**, **Path**, and **Region** will auto-populate based on the saved configuration.
5. Review the prefilled values to ensure the dataset is still valid and accessible.
6. After selection, proceed to configure **Dataset Configuration** parameters.
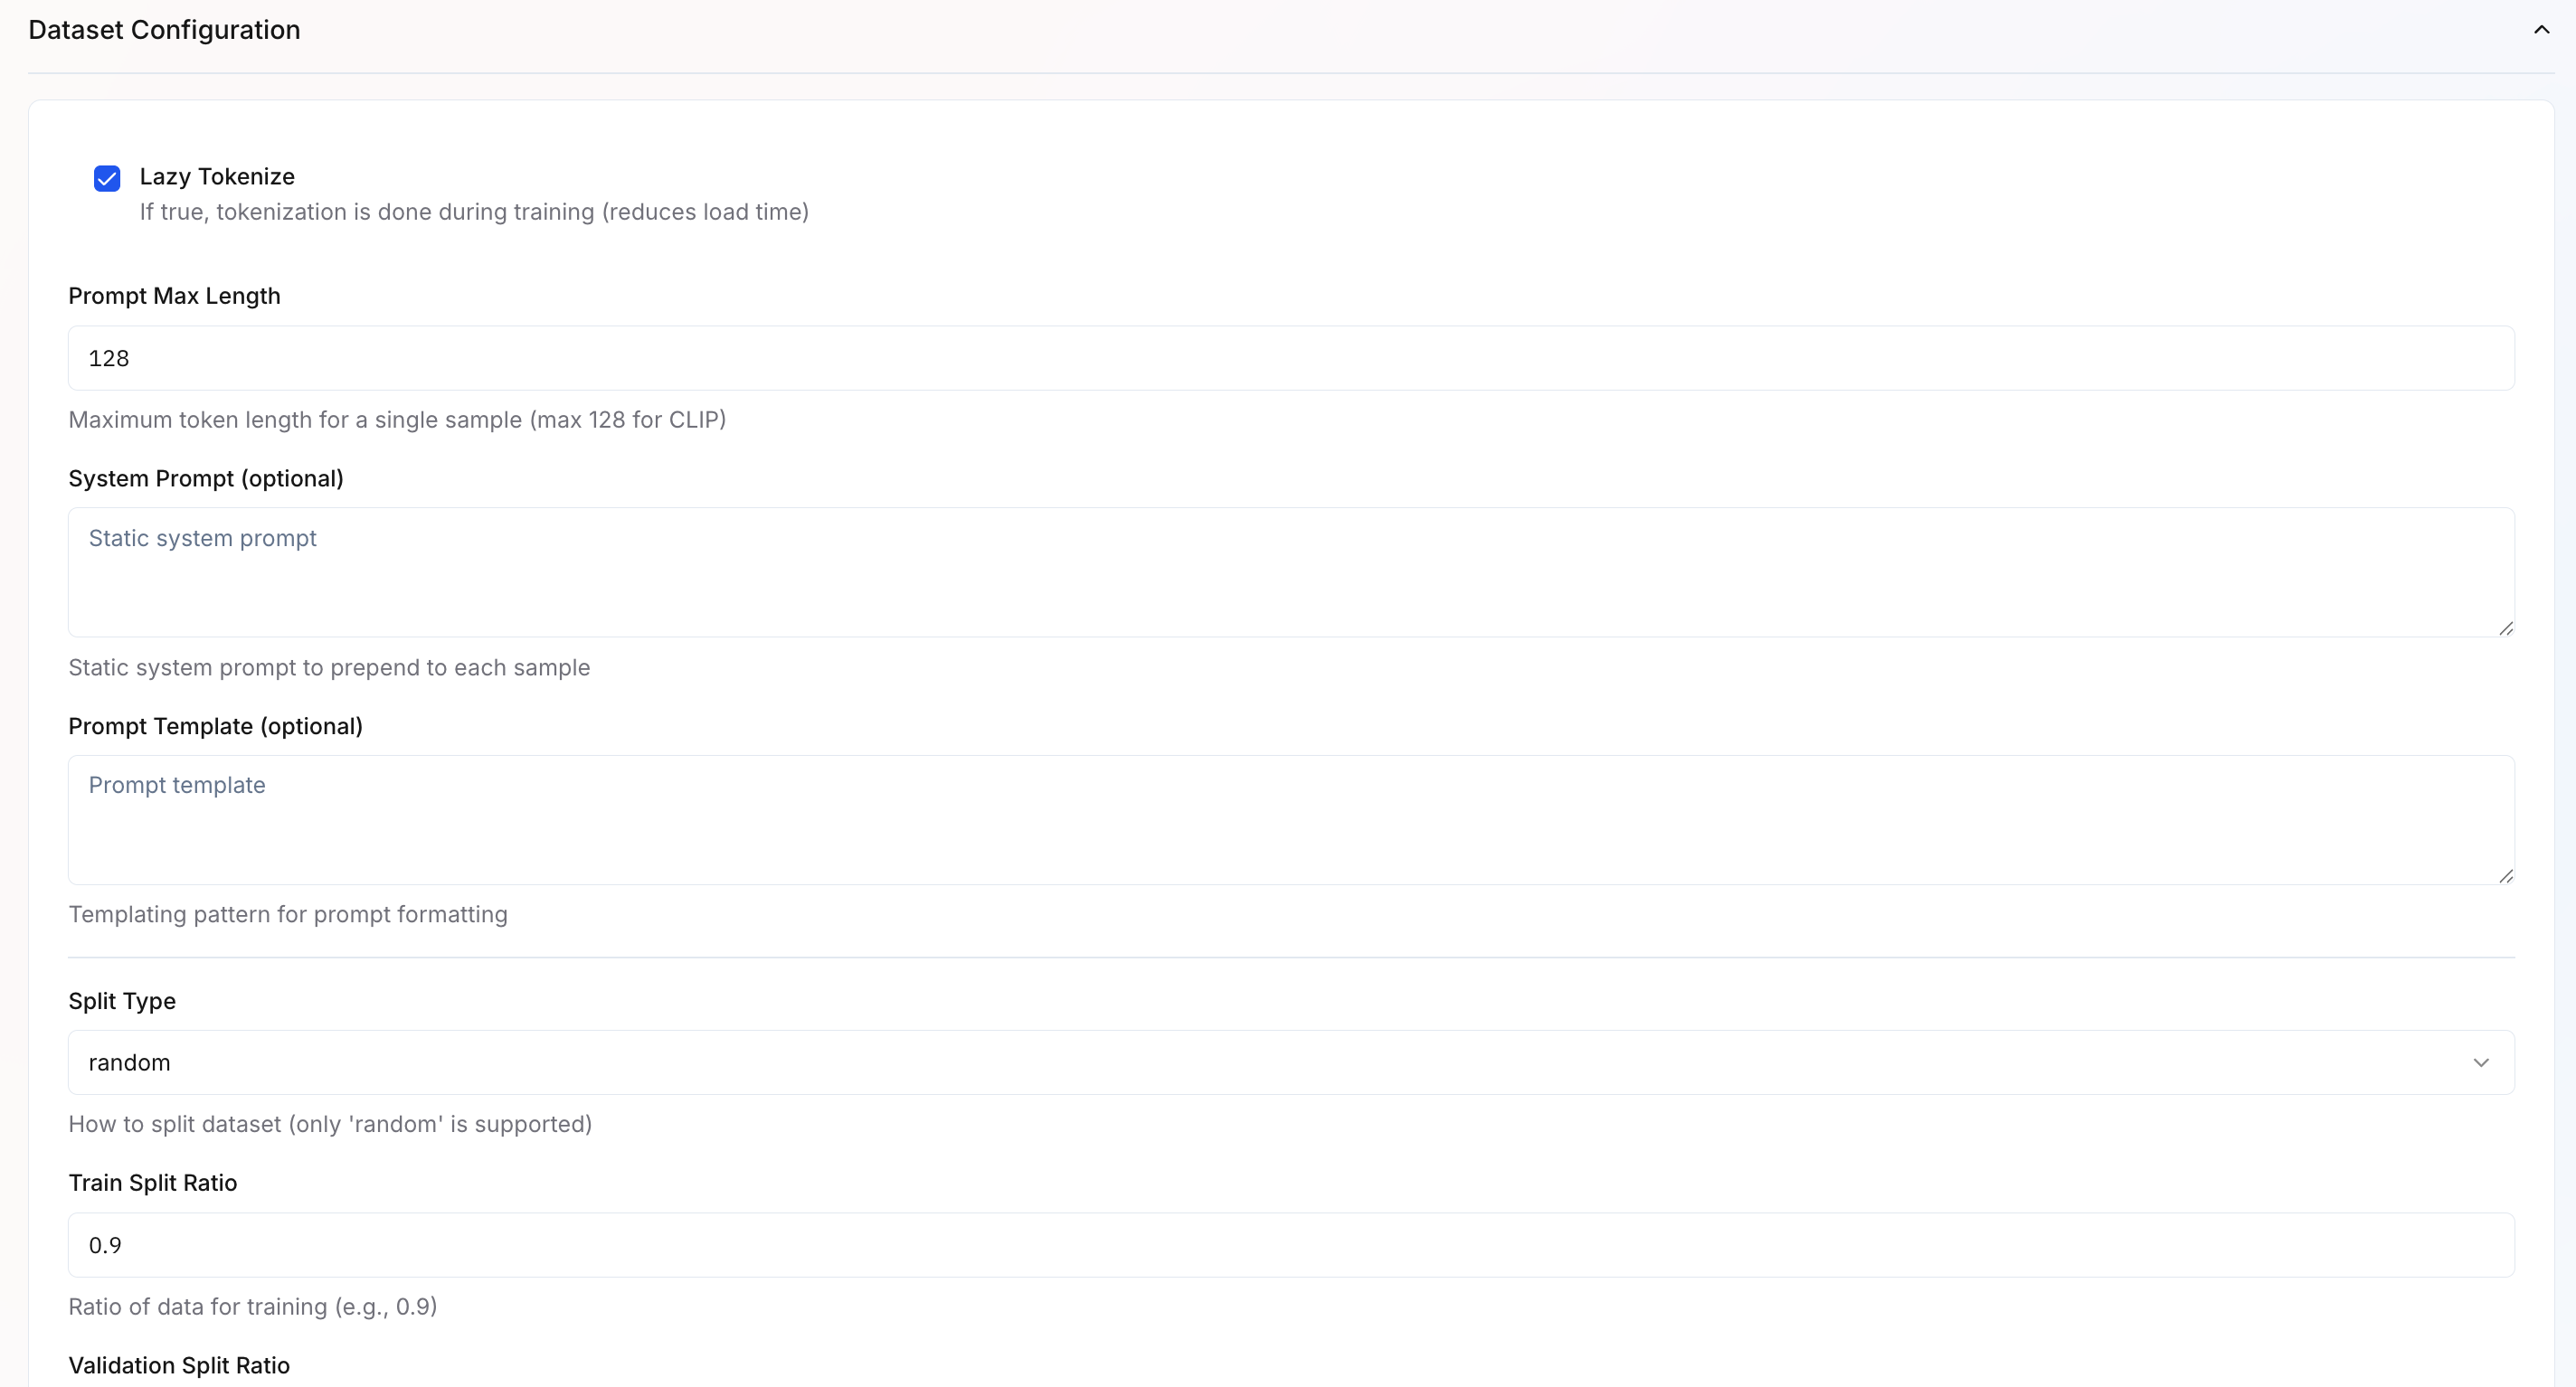 * **Lazy Tokenize** – If enabled, tokenization happens during training to reduce load time.
* **Prompt Max Length** – Sets the maximum token length per sample (default: 128 for CLIP).
* **System Prompt** – Optional static prompt prepended to every sample.
* **Prompt Template** – Optional templating format for structured prompt creation.
* **Split Type** – Defines how the dataset is split. Currently, only "random" is supported.
* **Train Split Ratio** – Specifies how much data to use for training (default: 0.9).
* **Validation Split Ratio** – Remaining portion used for validation (default: 0.1).
* **Lazy Tokenize** – If enabled, tokenization happens during training to reduce load time.
* **Prompt Max Length** – Sets the maximum token length per sample (default: 128 for CLIP).
* **System Prompt** – Optional static prompt prepended to every sample.
* **Prompt Template** – Optional templating format for structured prompt creation.
* **Split Type** – Defines how the dataset is split. Currently, only "random" is supported.
* **Train Split Ratio** – Specifies how much data to use for training (default: 0.9).
* **Validation Split Ratio** – Remaining portion used for validation (default: 0.1).
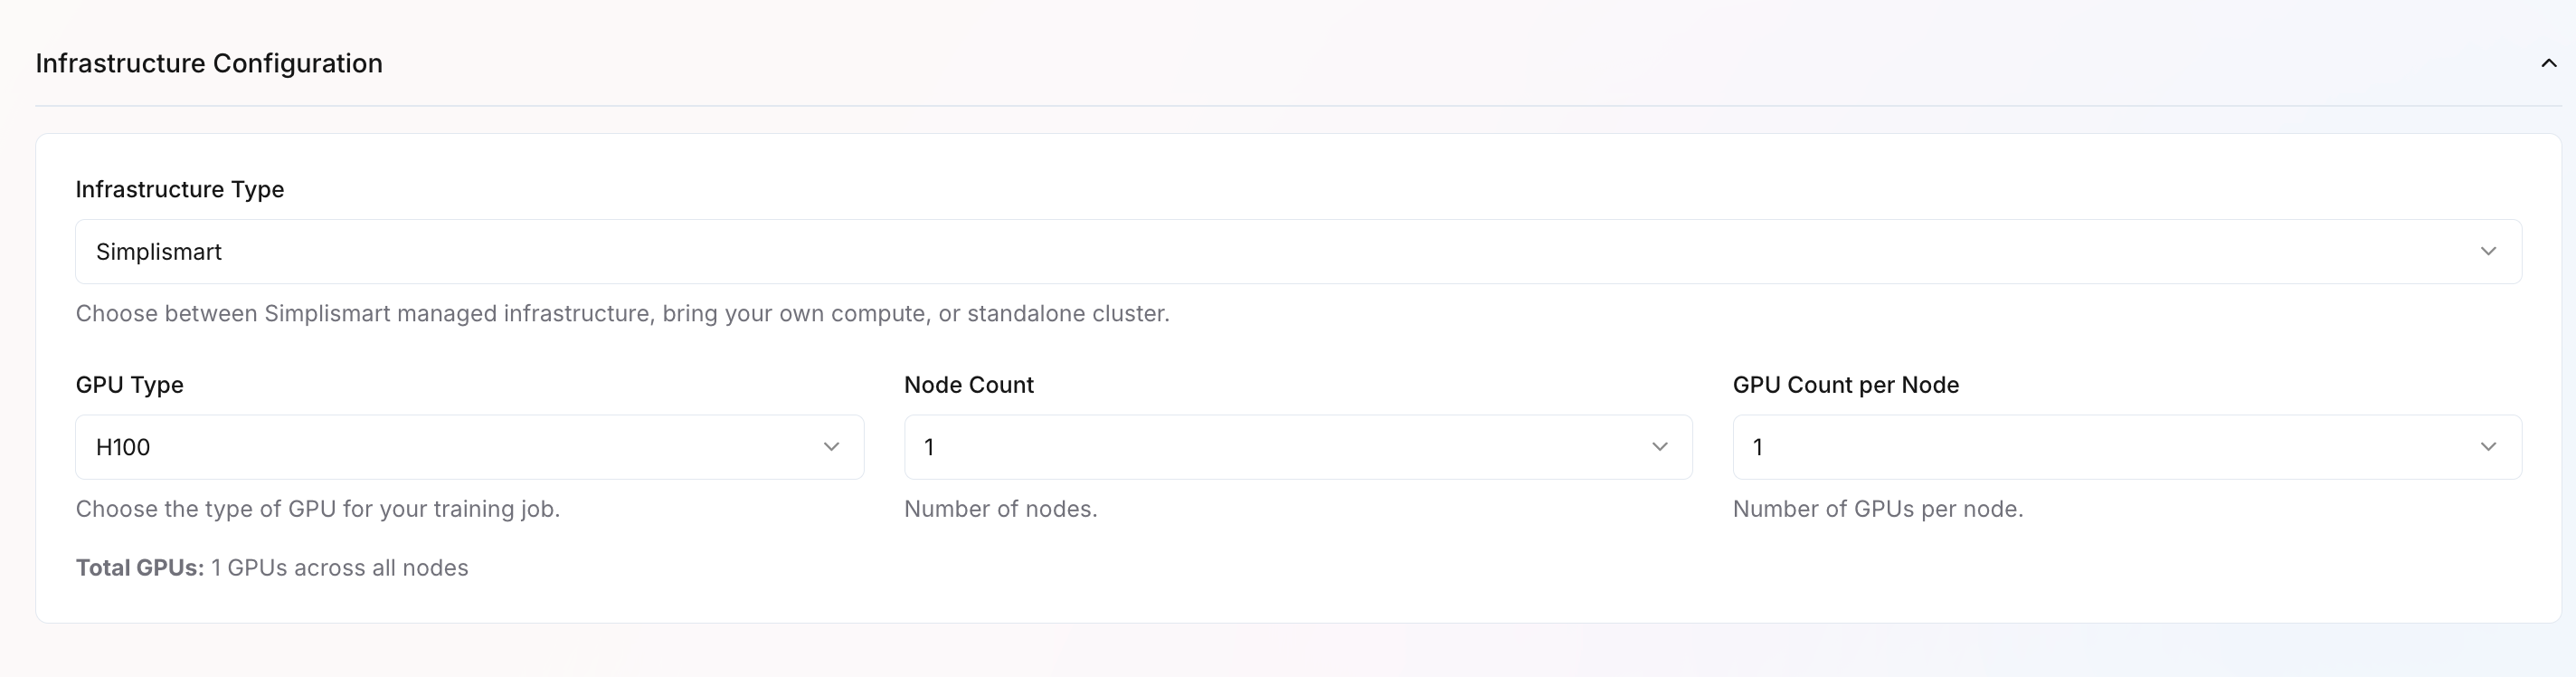 * **Infrastructure Type** – Choose where the training job runs: Simplismart-managed infrastructure, your own compute, or a standalone cluster.
* **GPU Type** – Select the GPU type (e.g., H100, A100, L40).
* **Node Count** – Specify the number of nodes to allocate. (default 1 for CLIP training)
* **GPU Count per Node** – Define the number of GPUs per node. (default 1 for CLIP training)
* **Infrastructure Type** – Choose where the training job runs: Simplismart-managed infrastructure, your own compute, or a standalone cluster.
* **GPU Type** – Select the GPU type (e.g., H100, A100, L40).
* **Node Count** – Specify the number of nodes to allocate. (default 1 for CLIP training)
* **GPU Count per Node** – Define the number of GPUs per node. (default 1 for CLIP training)
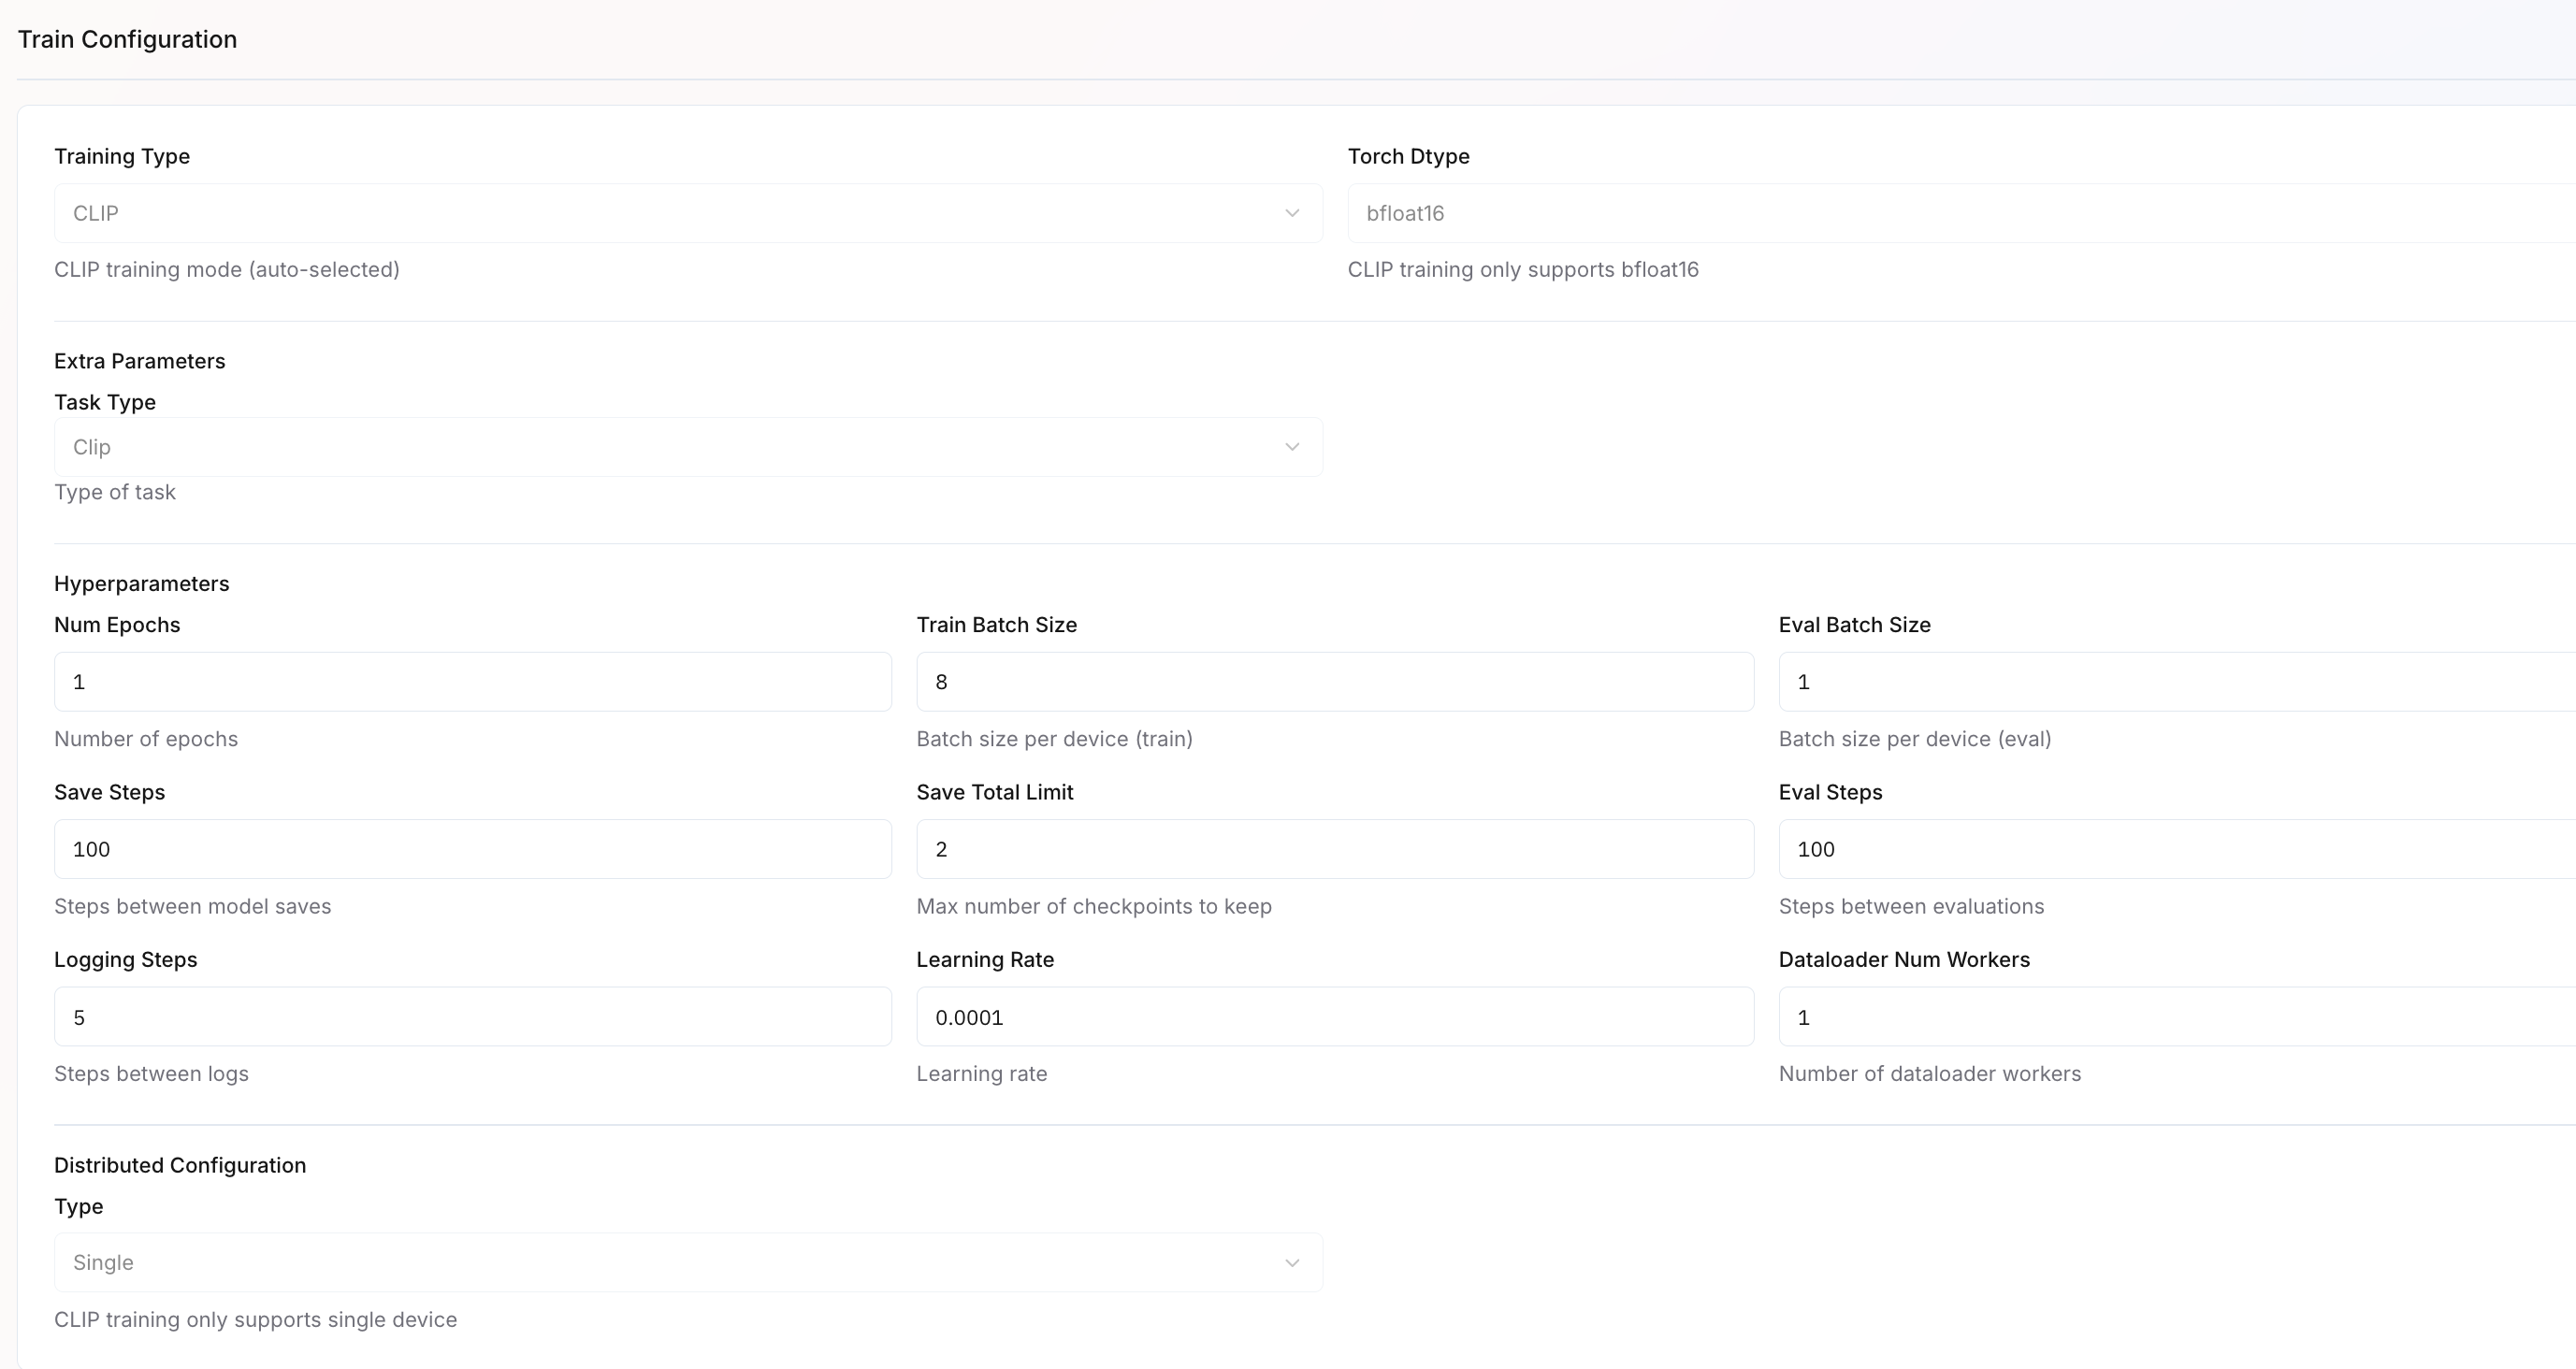 Configure your training parameters based on your use case:
| Parameter | Description | Default Value / Example |
| ------------------------------ | ----------------------------------------------------- | ------------------------------ |
| Training Type | Auto-selected based on the chosen model (e.g., CLIP). | CLIP |
| Torch Dtype | Precision type used during training. | bfloat16 |
| Num Epochs | Number of epochs to train for. | |
| Train Batch Size | Batch size per device during training. | 8 |
| Eval Batch Size | Batch size per device during evaluation. | 1 |
| Save Steps | Defines how often model checkpoints are saved. | 100 |
| Save Total Limit | Sets how many checkpoints to retain. | 2 |
| Eval Steps | Determines how frequently evaluations are run. | 100 |
| Logging Steps | Frequency at which logs are recorded. | 5 |
| Learning Rate | Sets the learning rate for the optimizer. | 0.00001 |
| Dataloader Num Workers | Number of parallel workers for loading data. | 1 |
| Distributed Configuration Type | Defines training mode. | Single (for the CLIP training) |
1. Review all settings carefully
2. Click `Create Job` to start training
3. Monitor training progress in the `My Trainings` > `Your Training Job` > `Metrics` tab.
Metrics are updated in real-time as your training progresses. Use these metrics to evaluate whether your model is learning effectively.
## Next Steps
Once training completes successfully, you can [compile and deploy](/training-suite/deploy-fine-tuned-model) your CLIP model for inference.
Configure your training parameters based on your use case:
| Parameter | Description | Default Value / Example |
| ------------------------------ | ----------------------------------------------------- | ------------------------------ |
| Training Type | Auto-selected based on the chosen model (e.g., CLIP). | CLIP |
| Torch Dtype | Precision type used during training. | bfloat16 |
| Num Epochs | Number of epochs to train for. | |
| Train Batch Size | Batch size per device during training. | 8 |
| Eval Batch Size | Batch size per device during evaluation. | 1 |
| Save Steps | Defines how often model checkpoints are saved. | 100 |
| Save Total Limit | Sets how many checkpoints to retain. | 2 |
| Eval Steps | Determines how frequently evaluations are run. | 100 |
| Logging Steps | Frequency at which logs are recorded. | 5 |
| Learning Rate | Sets the learning rate for the optimizer. | 0.00001 |
| Dataloader Num Workers | Number of parallel workers for loading data. | 1 |
| Distributed Configuration Type | Defines training mode. | Single (for the CLIP training) |
1. Review all settings carefully
2. Click `Create Job` to start training
3. Monitor training progress in the `My Trainings` > `Your Training Job` > `Metrics` tab.
Metrics are updated in real-time as your training progresses. Use these metrics to evaluate whether your model is learning effectively.
## Next Steps
Once training completes successfully, you can [compile and deploy](/training-suite/deploy-fine-tuned-model) your CLIP model for inference.