> ## Documentation Index
> Fetch the complete documentation index at: https://docs.simplismart.ai/llms.txt
> Use this file to discover all available pages before exploring further.
# Deploy Container
> Configure and launch a container deployment on Simplismart
Deployments are scoped to the active workspace. If your organisation has more than one workspace, use the workspace toggle in the breadcrumb navigation to switch to the target workspace before continuing. If you only have the **Default** workspace, you can skip this step. New deployments will be created under the `Default` workspace only. See [Workspaces](/model-suite/settings/workspaces) for details.
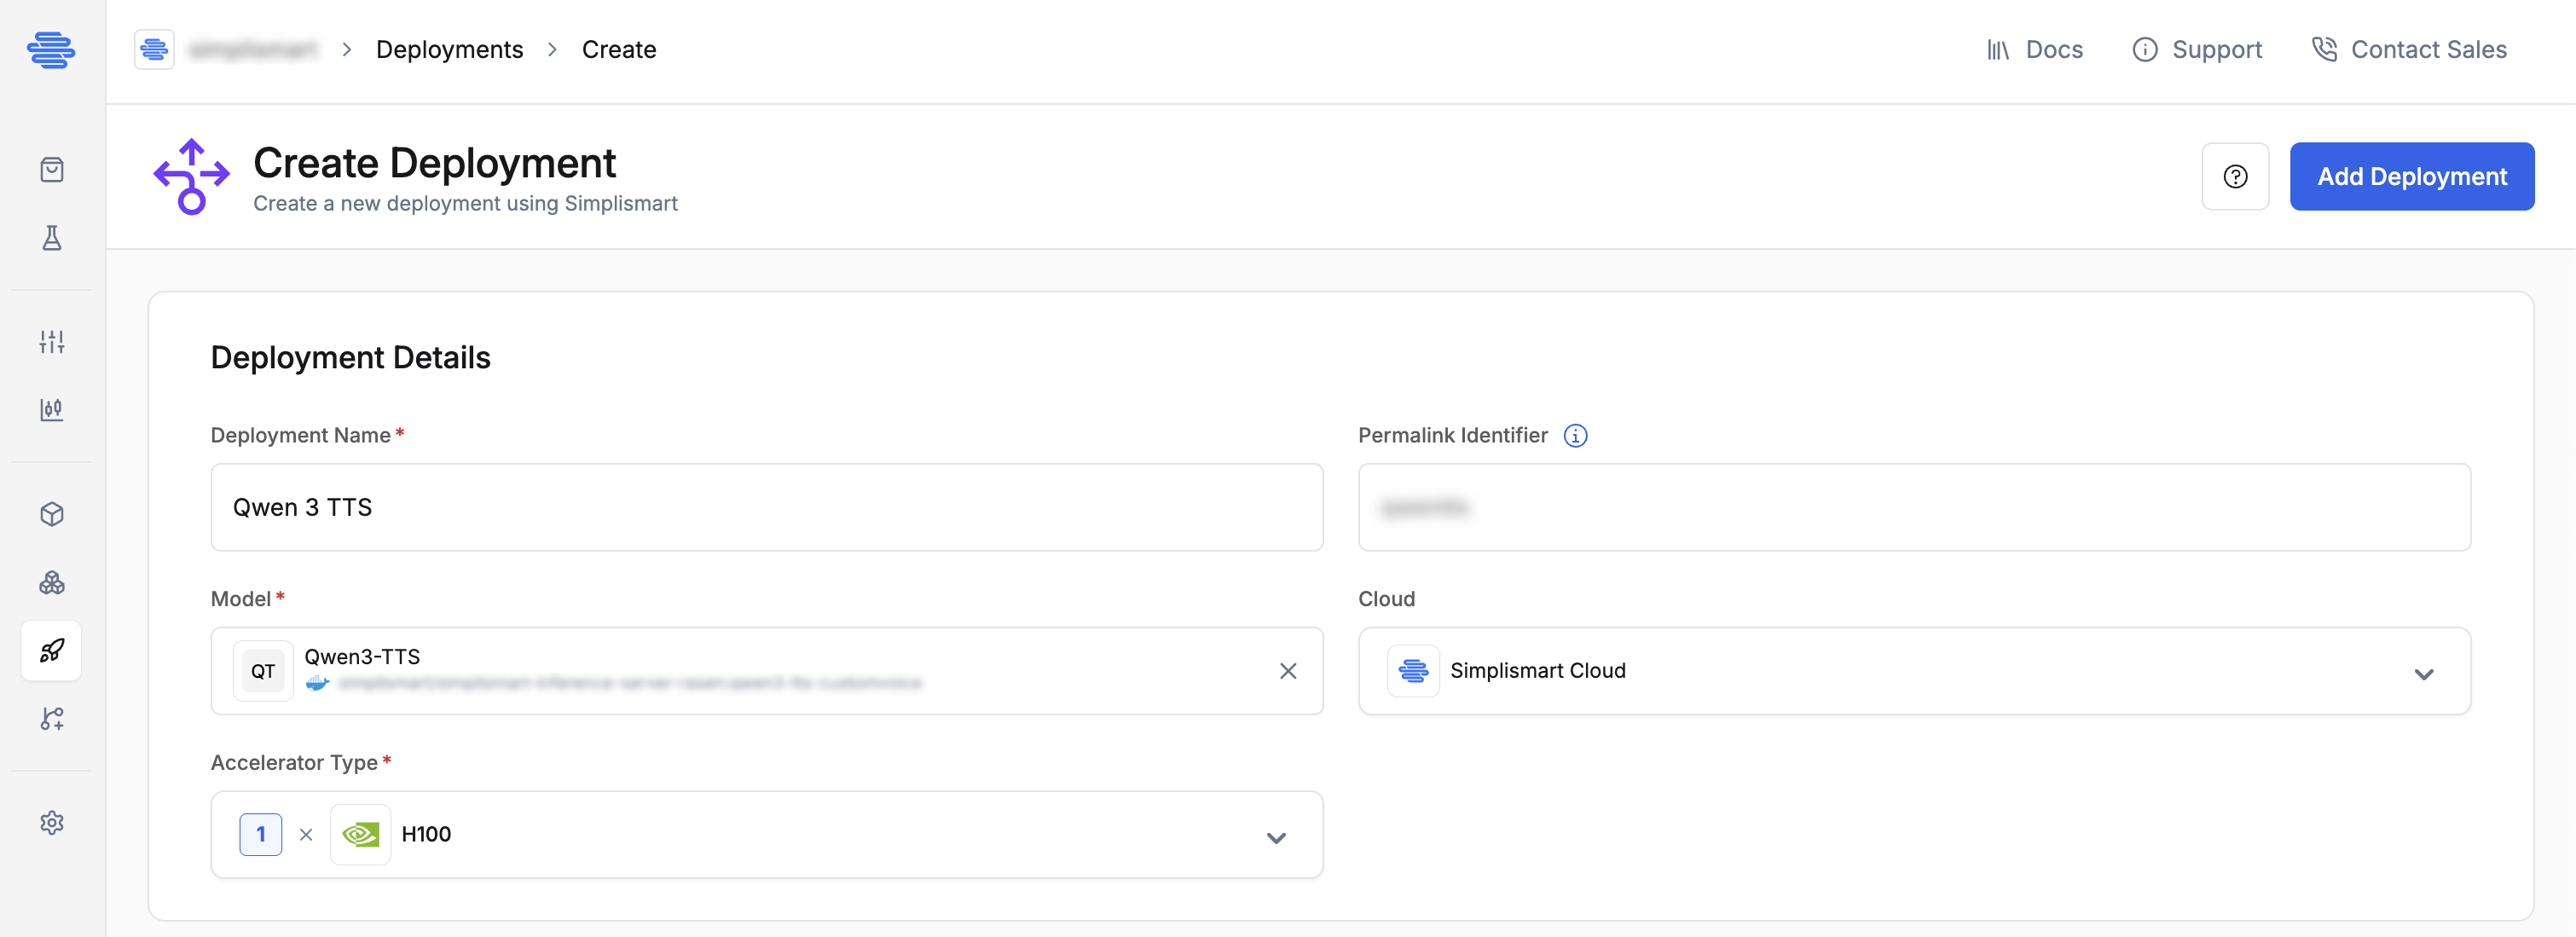
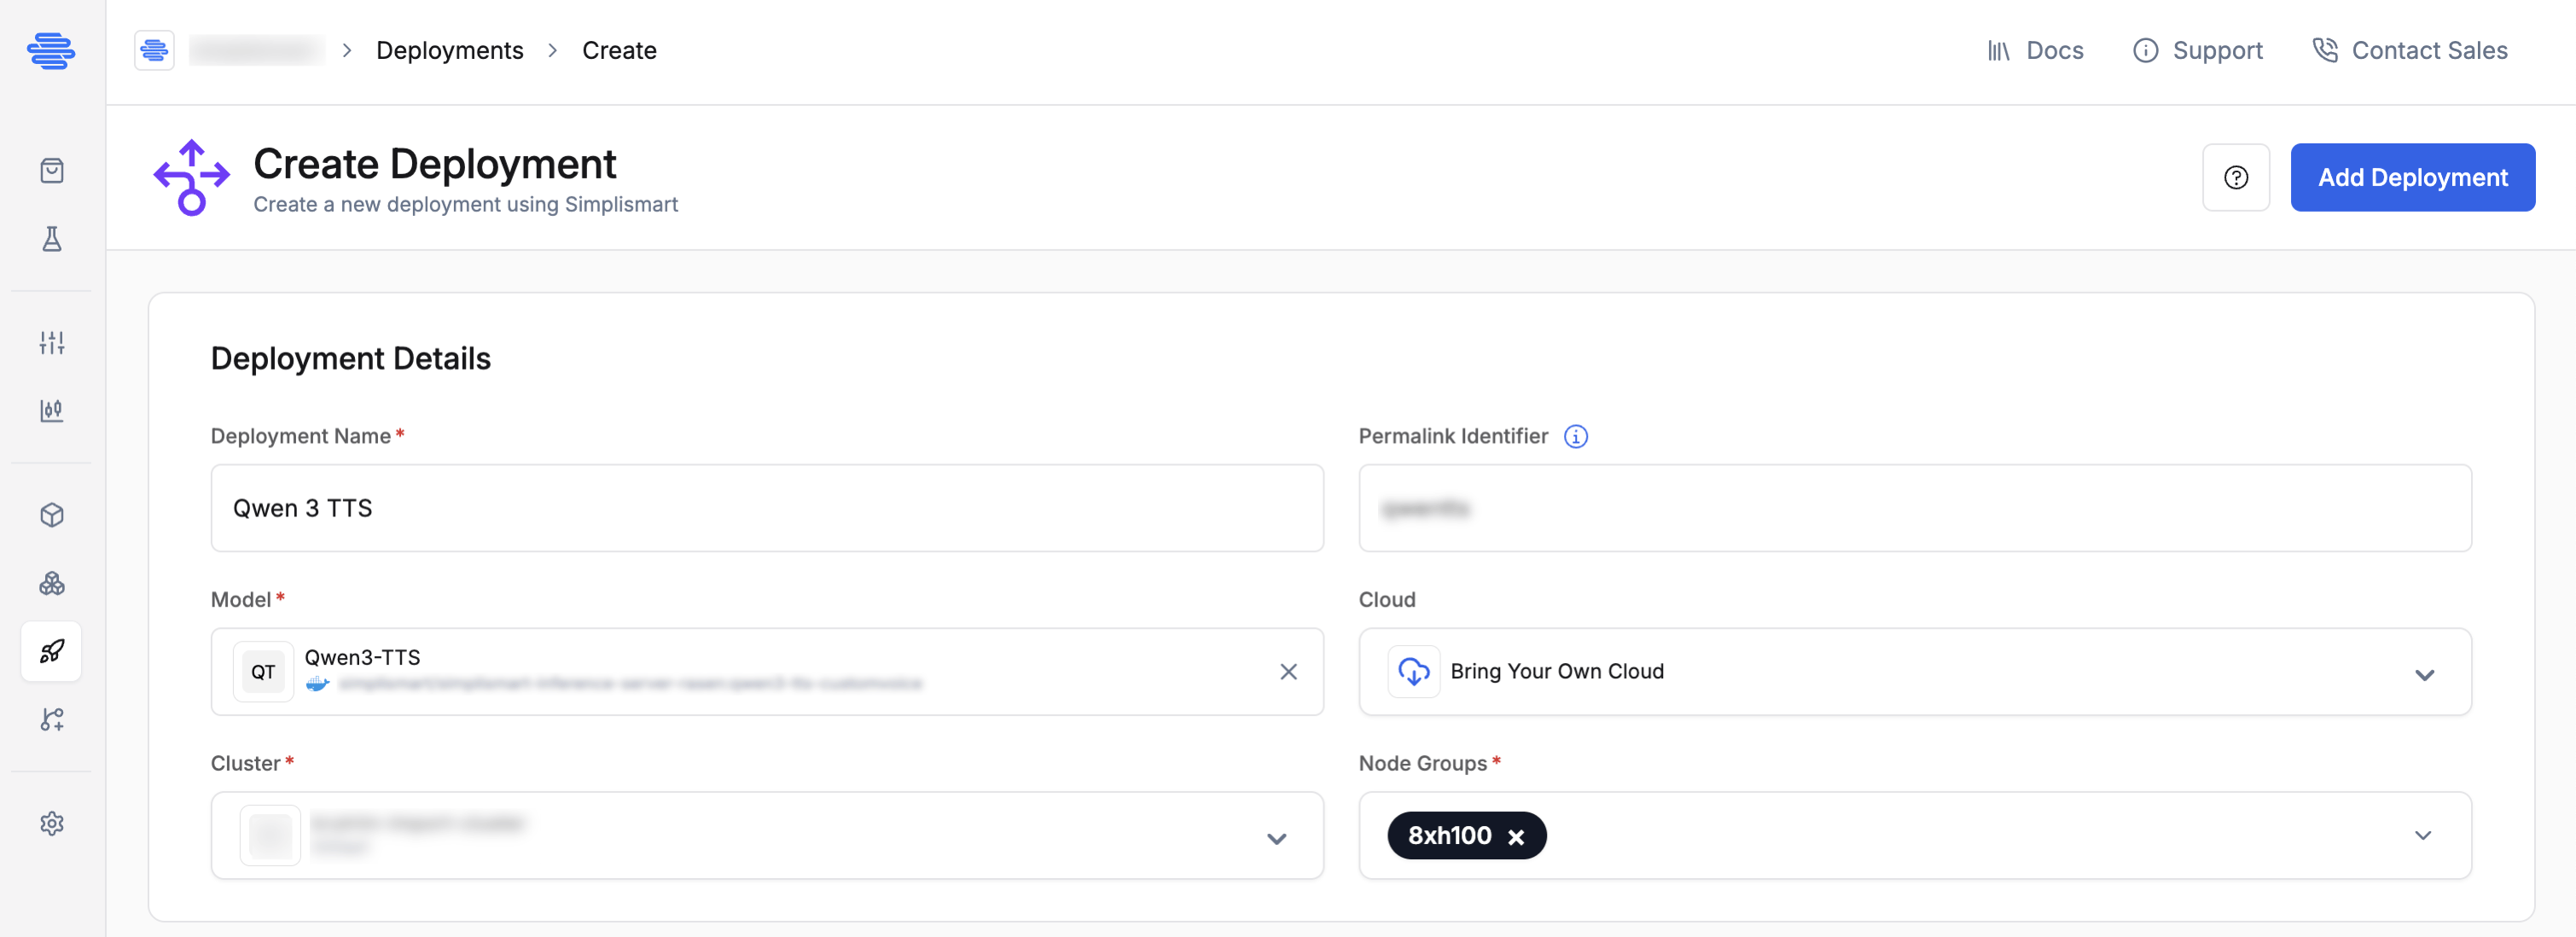
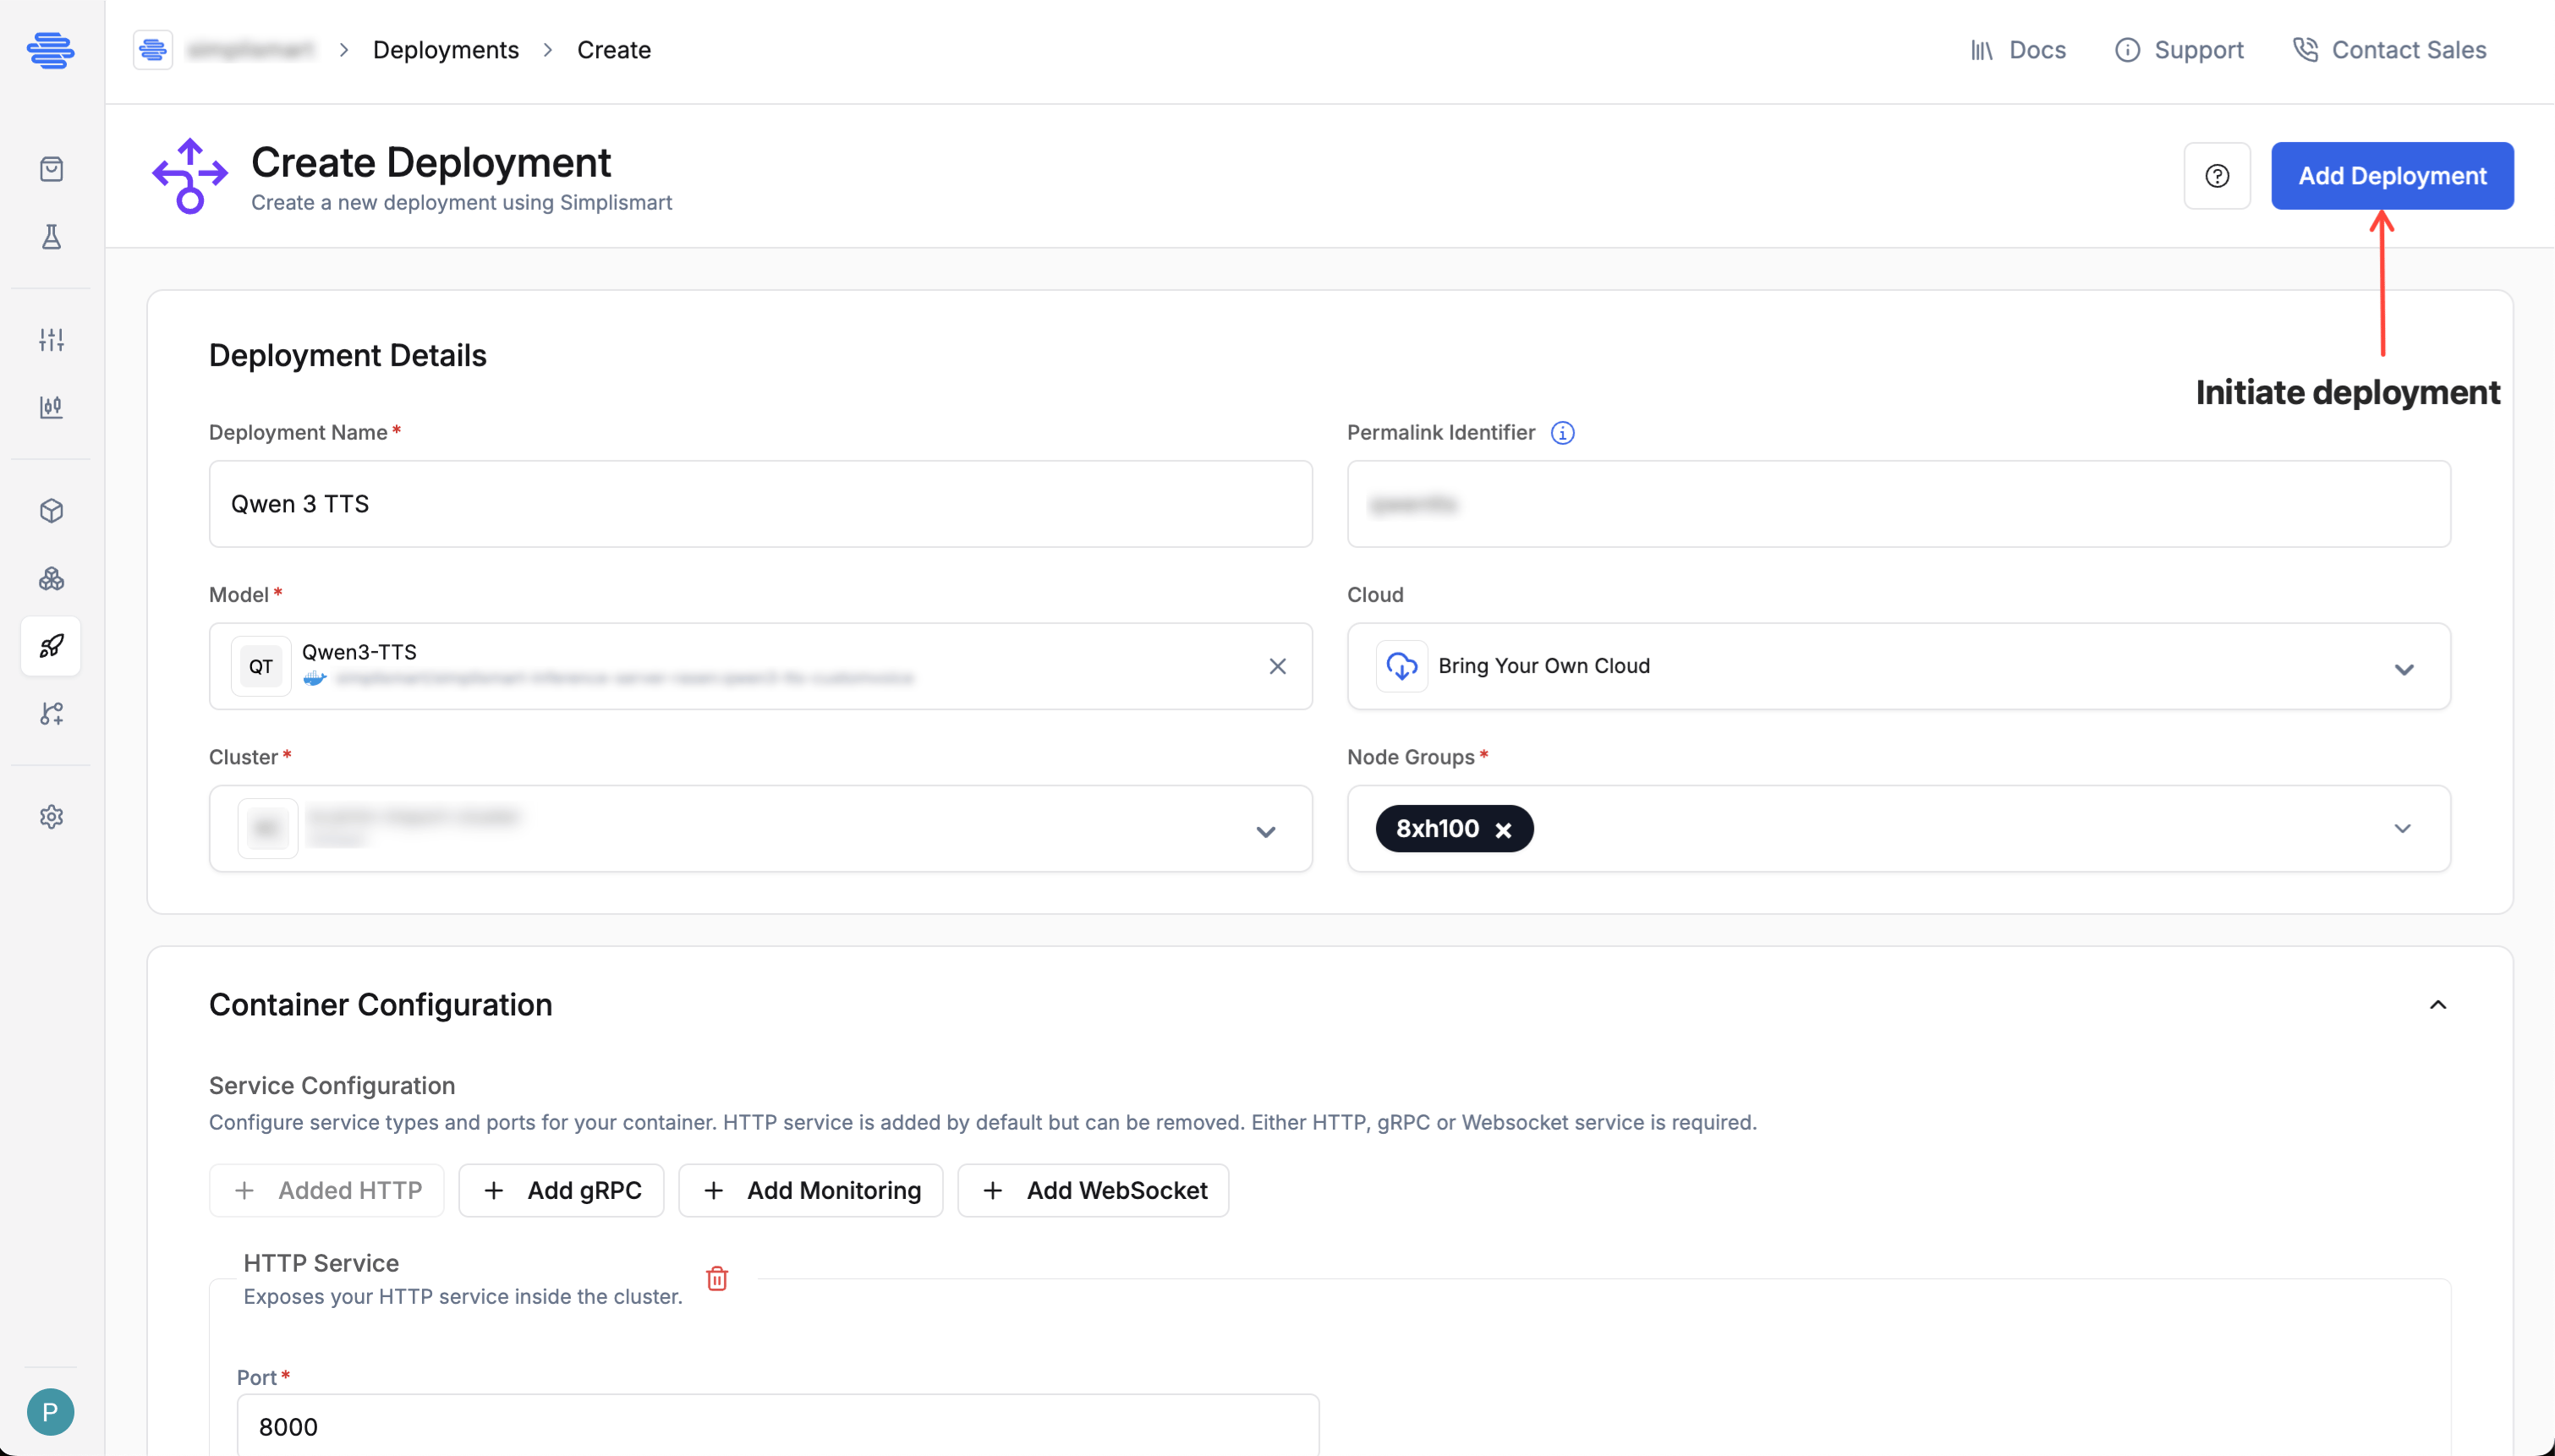
From the main menu, select the [**Deployments**](https://app.simplismart.ai/deployments) tab and click **Create** to start a new deployment.
Fill in the following fields:
* **Deployment Name**: Provide a unique name for your deployment.
* **Model**: Choose the model you want to deploy from the dropdown.
* **Cloud**: Select **Simplismart Cloud** to deploy as a [Dedicated Endpoint](/inference/dedicated-endpoint), or **BYOC** to deploy on your own [cluster](/model-suite/integrations/cloud-account).
If you haven't added your container yet, start with [Add Your Container](/model-suite/add-container) before proceeding.
**For dedicated deployments** please ensure you have enough [quota](/model-suite/settings/quotas) of the desired resources.
Choose the desired accelerator type based on your model size and SLA requirements.
To deploy on a GPU type not listed or for CPU-only deployments, email [support@simplismart.tech](mailto:support@simplismart.tech).
 If you already configured ports, health checks, environment variables, or a command override in the **[Add Model](/model-suite/add-container)** step, those values are pre-filled here and can be overridden. The fields exclusive to this step are **Enable Auth** and **File Mount**.
**Service Configuration**
Configure service types and ports for your container. You can add multiple service types, but only one of each type. HTTP service is added by default. At least one of **HTTP**, **gRPC**, or **WebSocket** is required.
Each service has a **Public Access** toggle. When enabled, the service is exposed externally and accessible via public endpoints. When disabled, it is accessible only within the cluster.
* **HTTP Service**: Exposes your application over HTTP. Set the port your server listens on (e.g. `8000`). Added by default; can be removed if you use gRPC or WebSocket instead.
If you already configured ports, health checks, environment variables, or a command override in the **[Add Model](/model-suite/add-container)** step, those values are pre-filled here and can be overridden. The fields exclusive to this step are **Enable Auth** and **File Mount**.
**Service Configuration**
Configure service types and ports for your container. You can add multiple service types, but only one of each type. HTTP service is added by default. At least one of **HTTP**, **gRPC**, or **WebSocket** is required.
Each service has a **Public Access** toggle. When enabled, the service is exposed externally and accessible via public endpoints. When disabled, it is accessible only within the cluster.
* **HTTP Service**: Exposes your application over HTTP. Set the port your server listens on (e.g. `8000`). Added by default; can be removed if you use gRPC or WebSocket instead.
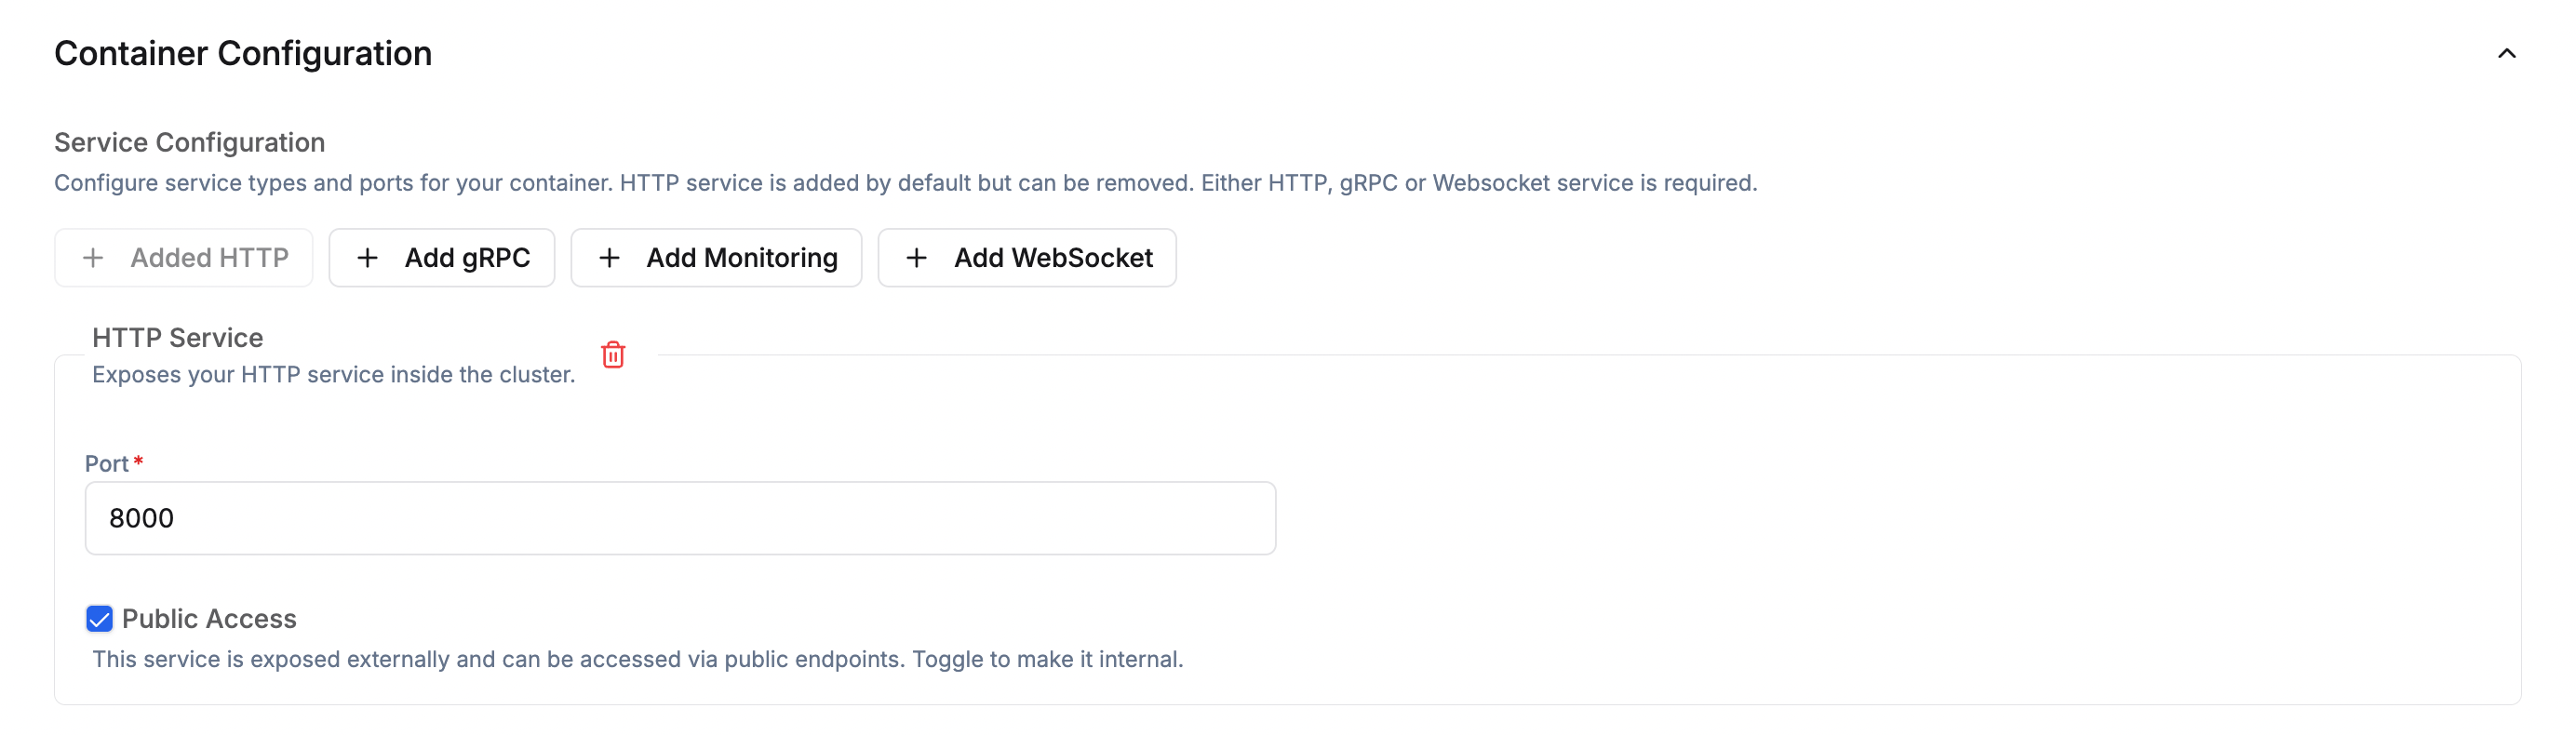 * **gRPC Service** (Optional): Enable for high-performance RPC workloads. It requires a port distinct from the HTTP service port (e.g. `9000`) and can be combined with HTTP and Monitoring services.
 * **Monitoring Service** (Optional): Exposes a metrics endpoint for monitoring tools such as Prometheus. Requires a **Port** (e.g. `9090`) and a **Path** (e.g. `/metrics`). Can be combined with HTTP or gRPC services.
 * **WebSocket Service** (Optional): Enable for WebSocket-based model serving (e.g. real-time streaming). Set the port (e.g. `8001`).
WebSocket is exclusive and no other service types can be configured when WebSocket is selected.
* **WebSocket Service** (Optional): Enable for WebSocket-based model serving (e.g. real-time streaming). Set the port (e.g. `8001`).
WebSocket is exclusive and no other service types can be configured when WebSocket is selected.
 **Health Check Configuration**
Configure health check settings for your container deployment.
* **Health Check Path**: Endpoint your app exposes for health probes (e.g. `/health`).
* **Port**: Must match your HTTP/gRPC service port (e.g. `8000`).
* **Initial Delay**: Wait time before the first health check (e.g. `30s`).
* **Period**: How frequently health checks run (e.g. `10s`).
* **Timeout**: Maximum time to wait for a health check response (e.g. `5s`).
**Health Check Configuration**
Configure health check settings for your container deployment.
* **Health Check Path**: Endpoint your app exposes for health probes (e.g. `/health`).
* **Port**: Must match your HTTP/gRPC service port (e.g. `8000`).
* **Initial Delay**: Wait time before the first health check (e.g. `30s`).
* **Period**: How frequently health checks run (e.g. `10s`).
* **Timeout**: Maximum time to wait for a health check response (e.g. `5s`).
 **Environment Variables (Optional)**
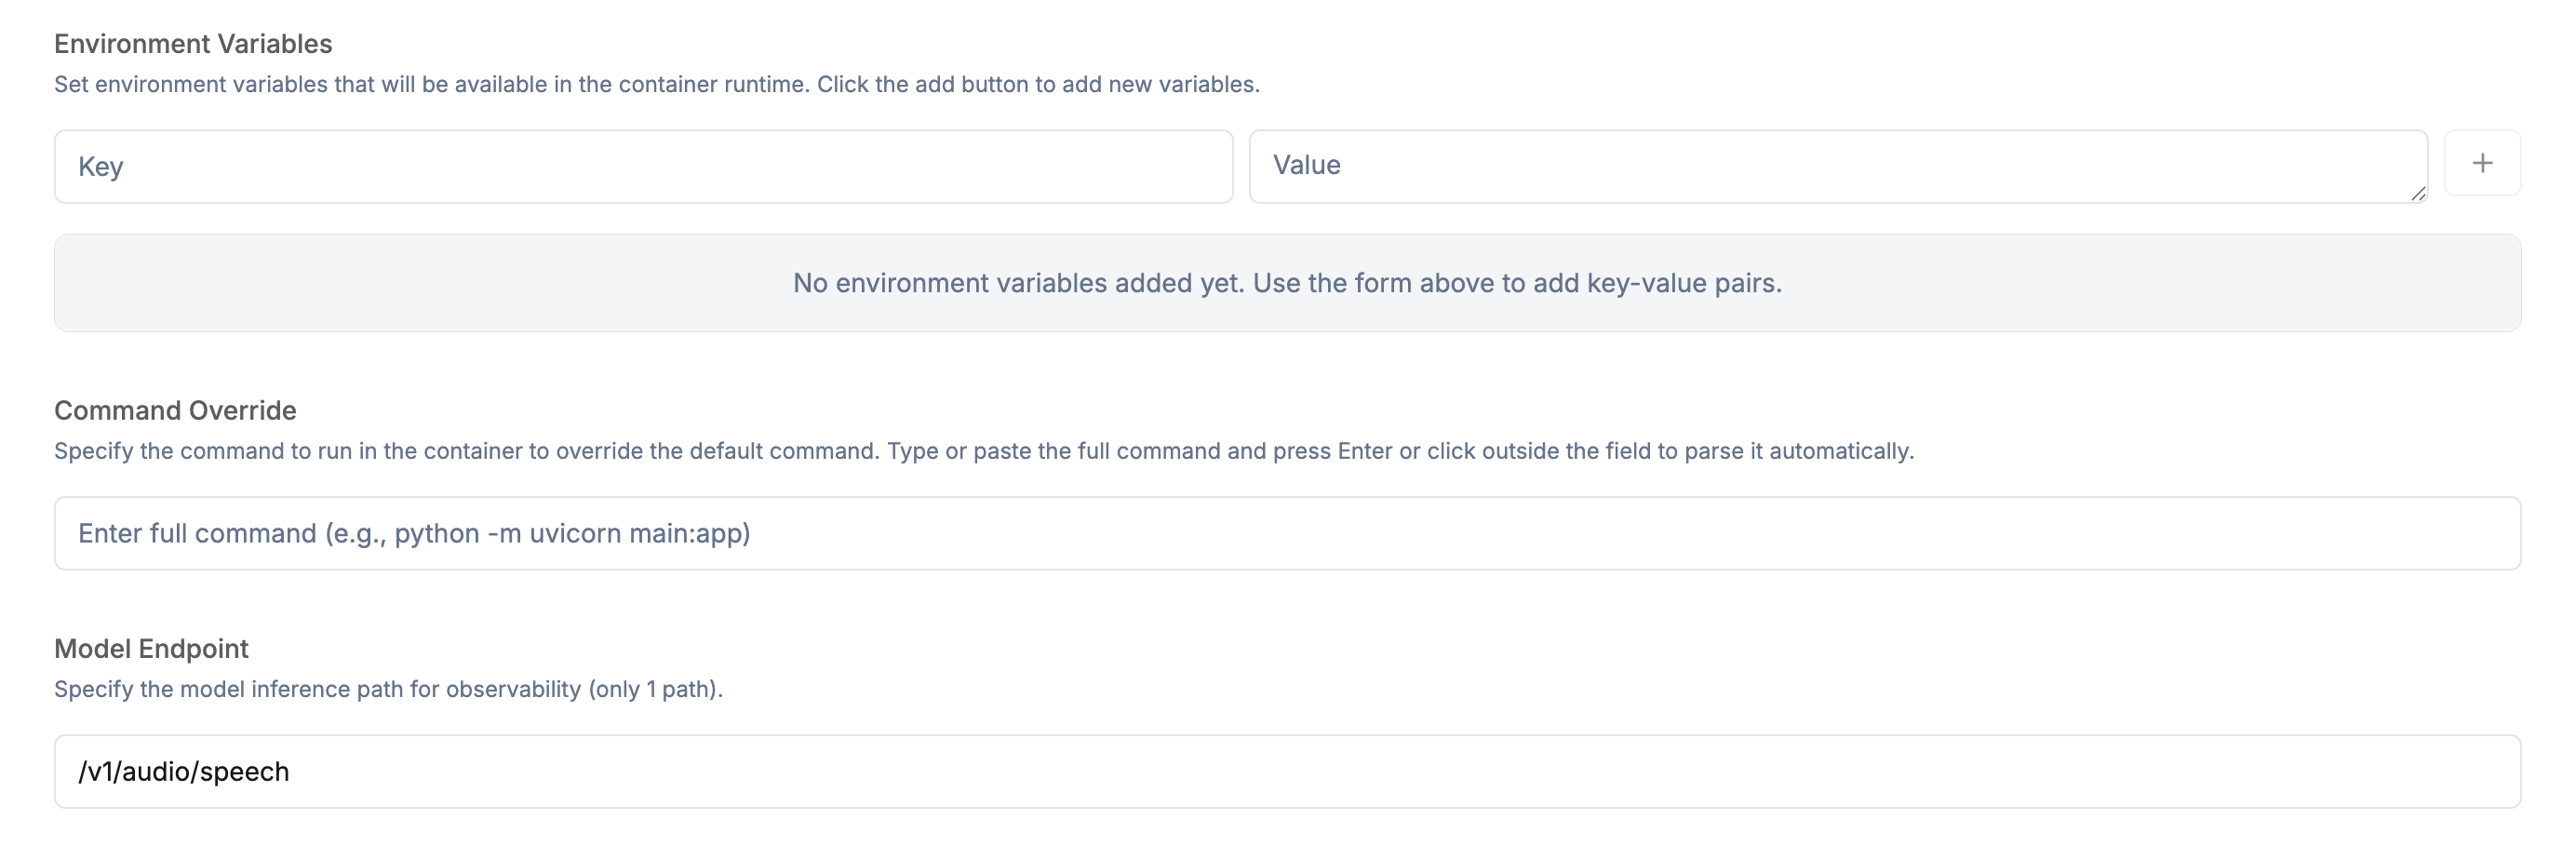
Set runtime environment variables. Add key-value pairs using the `+` button.
**Command Override (Optional)**
Override the container's default startup command. Type or paste the full command and press **Enter** or click outside the field to parse it automatically (e.g. `python -m uvicorn main:app`).
**Model Endpoint**
Set the path your model server exposes for inference requests (e.g. `/v1/completions`). This field is **required** when using a WebSocket service (e.g. `/v1/audio/speech`).
**Environment Variables (Optional)**
Set runtime environment variables. Add key-value pairs using the `+` button.
**Command Override (Optional)**
Override the container's default startup command. Type or paste the full command and press **Enter** or click outside the field to parse it automatically (e.g. `python -m uvicorn main:app`).
**Model Endpoint**
Set the path your model server exposes for inference requests (e.g. `/v1/completions`). This field is **required** when using a WebSocket service (e.g. `/v1/audio/speech`).
 **Enable Auth**
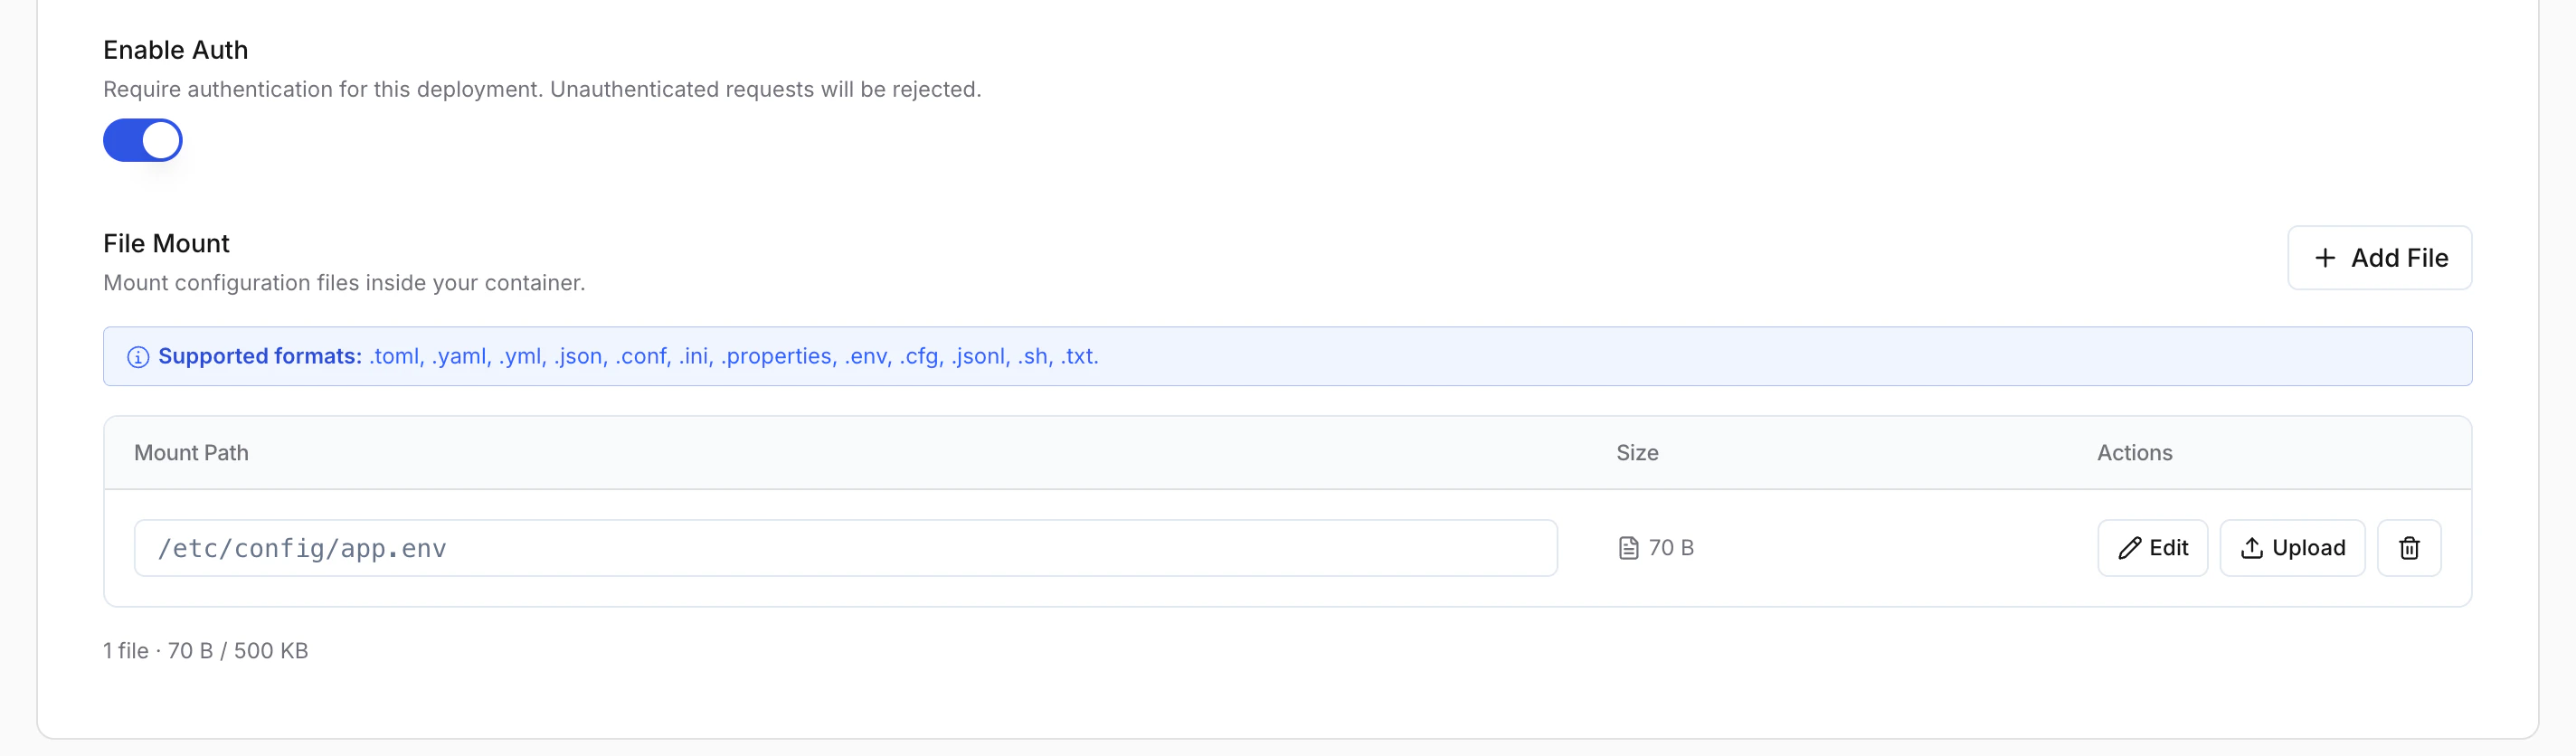
Toggle **Enable Auth** to require a [Simplismart API token](/model-suite/settings/api-keys) on every request to this deployment's endpoint. Unauthenticated requests will be rejected.
**File Mount**
Mount configuration files or secrets inside your container at runtime. Click **+ Add File**, specify the **Mount Path**, then upload your file.
* **Supported formats**: `.toml`, `.yaml`, `.yml`, `.json`, `.conf`, `.ini`, `.properties`, `.env`, `.cfg`, `.jsonl`, `.sh`, `.txt`
* **Total size limit**: 500 KB across all mounted files
* Each mounted file can be **edited inline** or **re-uploaded** using the Actions column.
**Enable Auth**
Toggle **Enable Auth** to require a [Simplismart API token](/model-suite/settings/api-keys) on every request to this deployment's endpoint. Unauthenticated requests will be rejected.
**File Mount**
Mount configuration files or secrets inside your container at runtime. Click **+ Add File**, specify the **Mount Path**, then upload your file.
* **Supported formats**: `.toml`, `.yaml`, `.yml`, `.json`, `.conf`, `.ini`, `.properties`, `.env`, `.cfg`, `.jsonl`, `.sh`, `.txt`
* **Total size limit**: 500 KB across all mounted files
* Each mounted file can be **edited inline** or **re-uploaded** using the Actions column.
 The following system directories cannot be used as mount paths: `/sys`, `/proc`, `/dev`, `/root`, `/boot`, `/bin`, `/sbin`, `/lib`, `/lib64`.
Use a path under `/home`, `/tmp`, `/var/tmp`, `/opt`, `/srv`, or a subdirectory of `/etc` (e.g. `/etc/myapp/config.txt`).
SSH access lets you connect directly to a running container in your deployment, which is useful for debugging, inspecting logs, or running ad-hoc commands without rebuilding and redeploying.
The following system directories cannot be used as mount paths: `/sys`, `/proc`, `/dev`, `/root`, `/boot`, `/bin`, `/sbin`, `/lib`, `/lib64`.
Use a path under `/home`, `/tmp`, `/var/tmp`, `/opt`, `/srv`, or a subdirectory of `/etc` (e.g. `/etc/myapp/config.txt`).
SSH access lets you connect directly to a running container in your deployment, which is useful for debugging, inspecting logs, or running ad-hoc commands without rebuilding and redeploying.
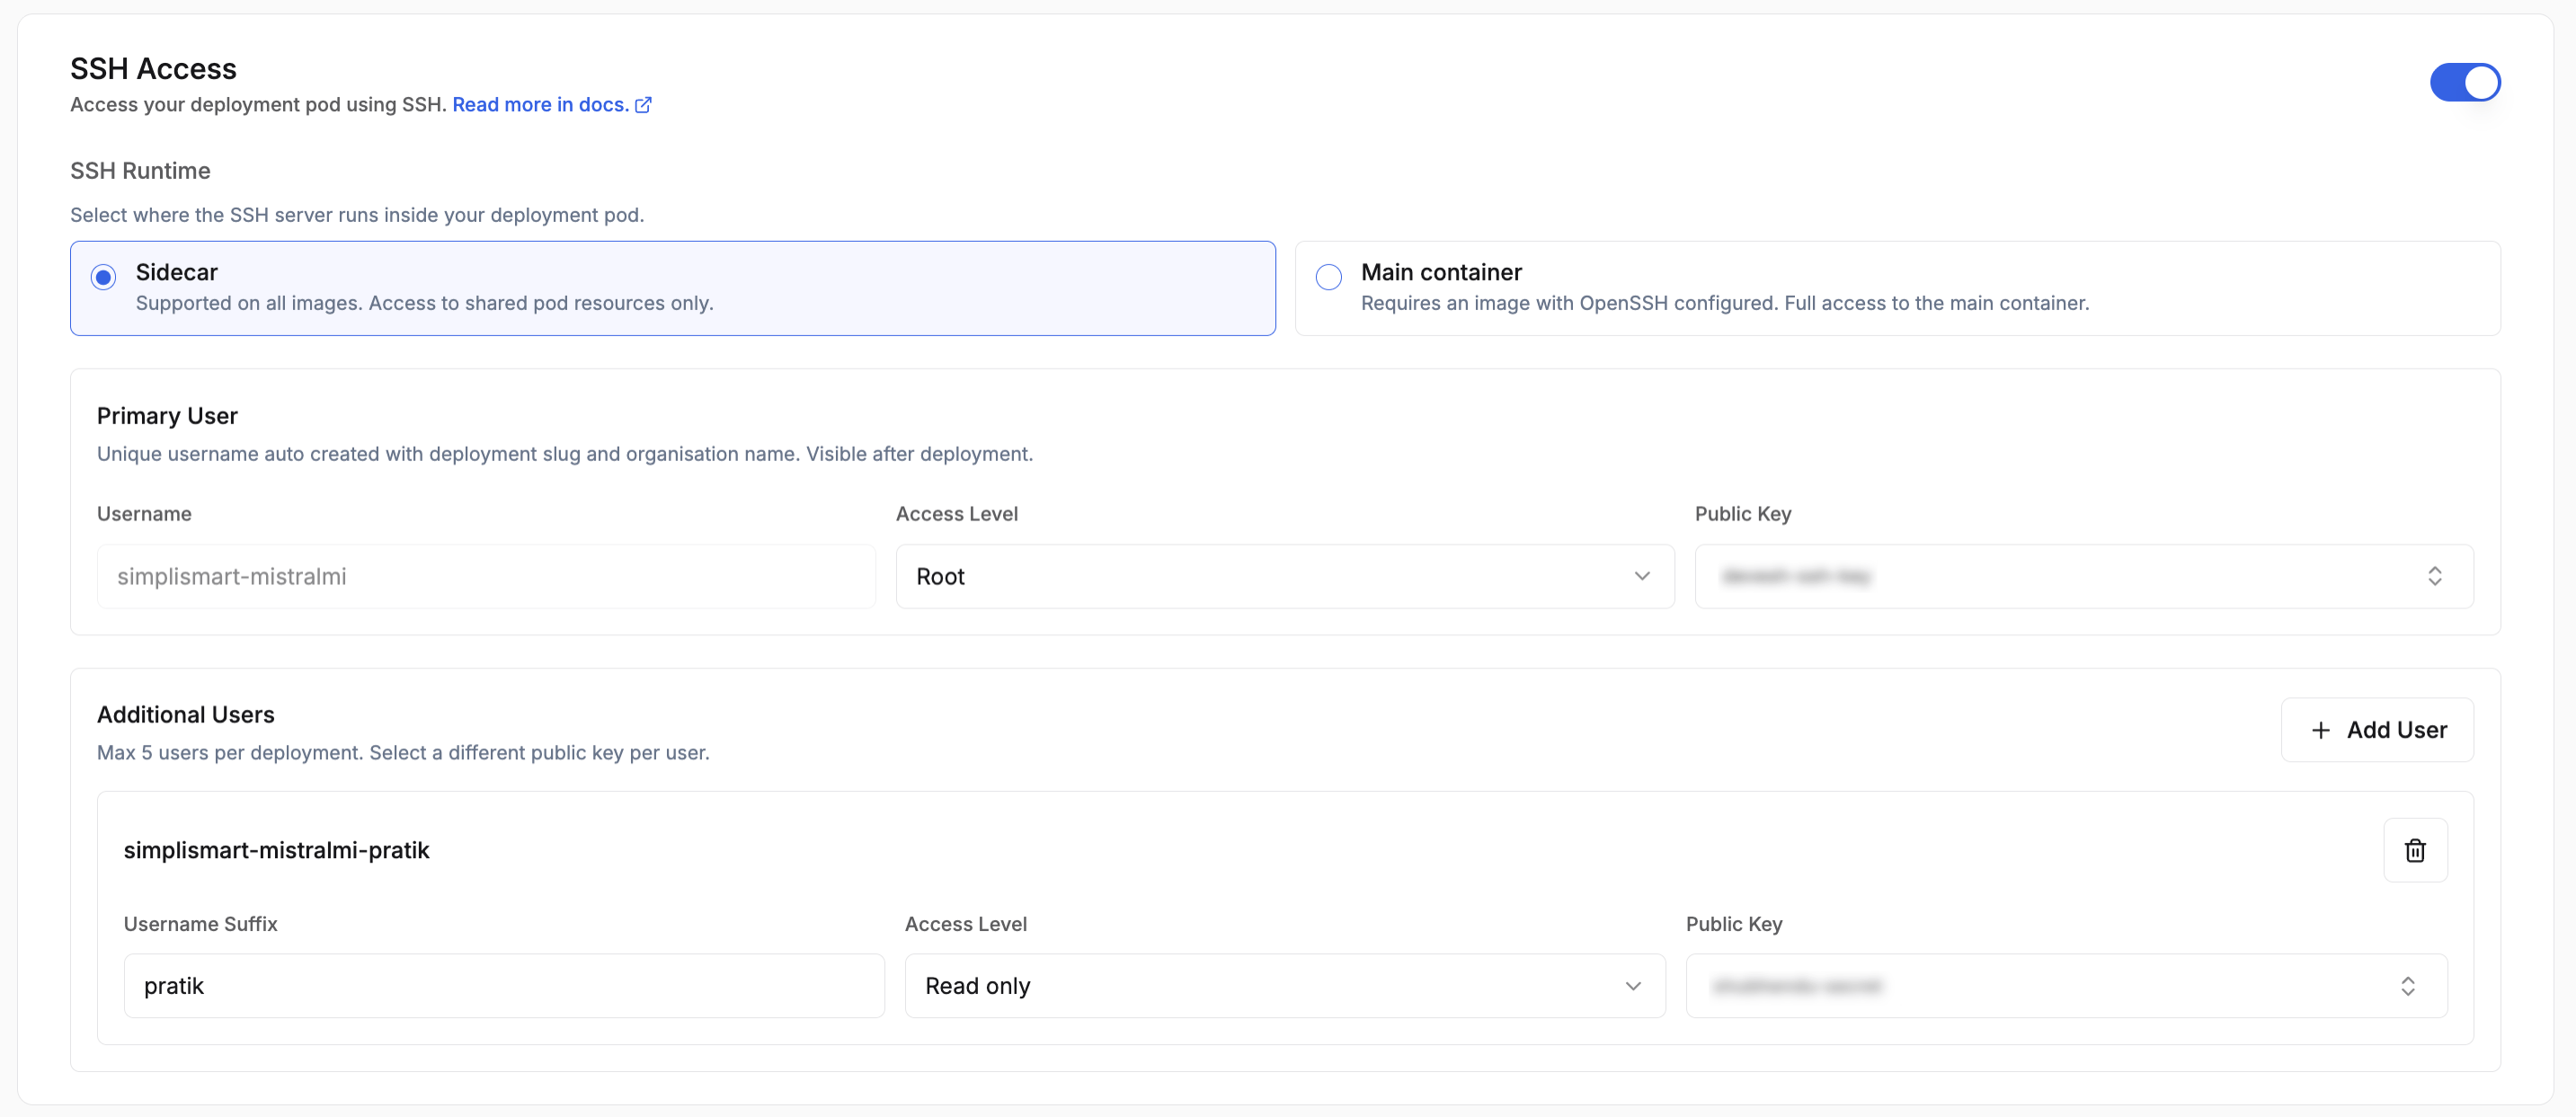 Toggle **SSH Access** on during deployment creation to configure it. You can add up to 5 users per deployment, choose the SSH runtime (sidecar or main container), and assign an SSH key secret to each user.
For runtime options, bringing your own image, generating a key pair, and connecting to a running deployment, see the [SSH Access guide](/model-suite/deployments/ssh-access).
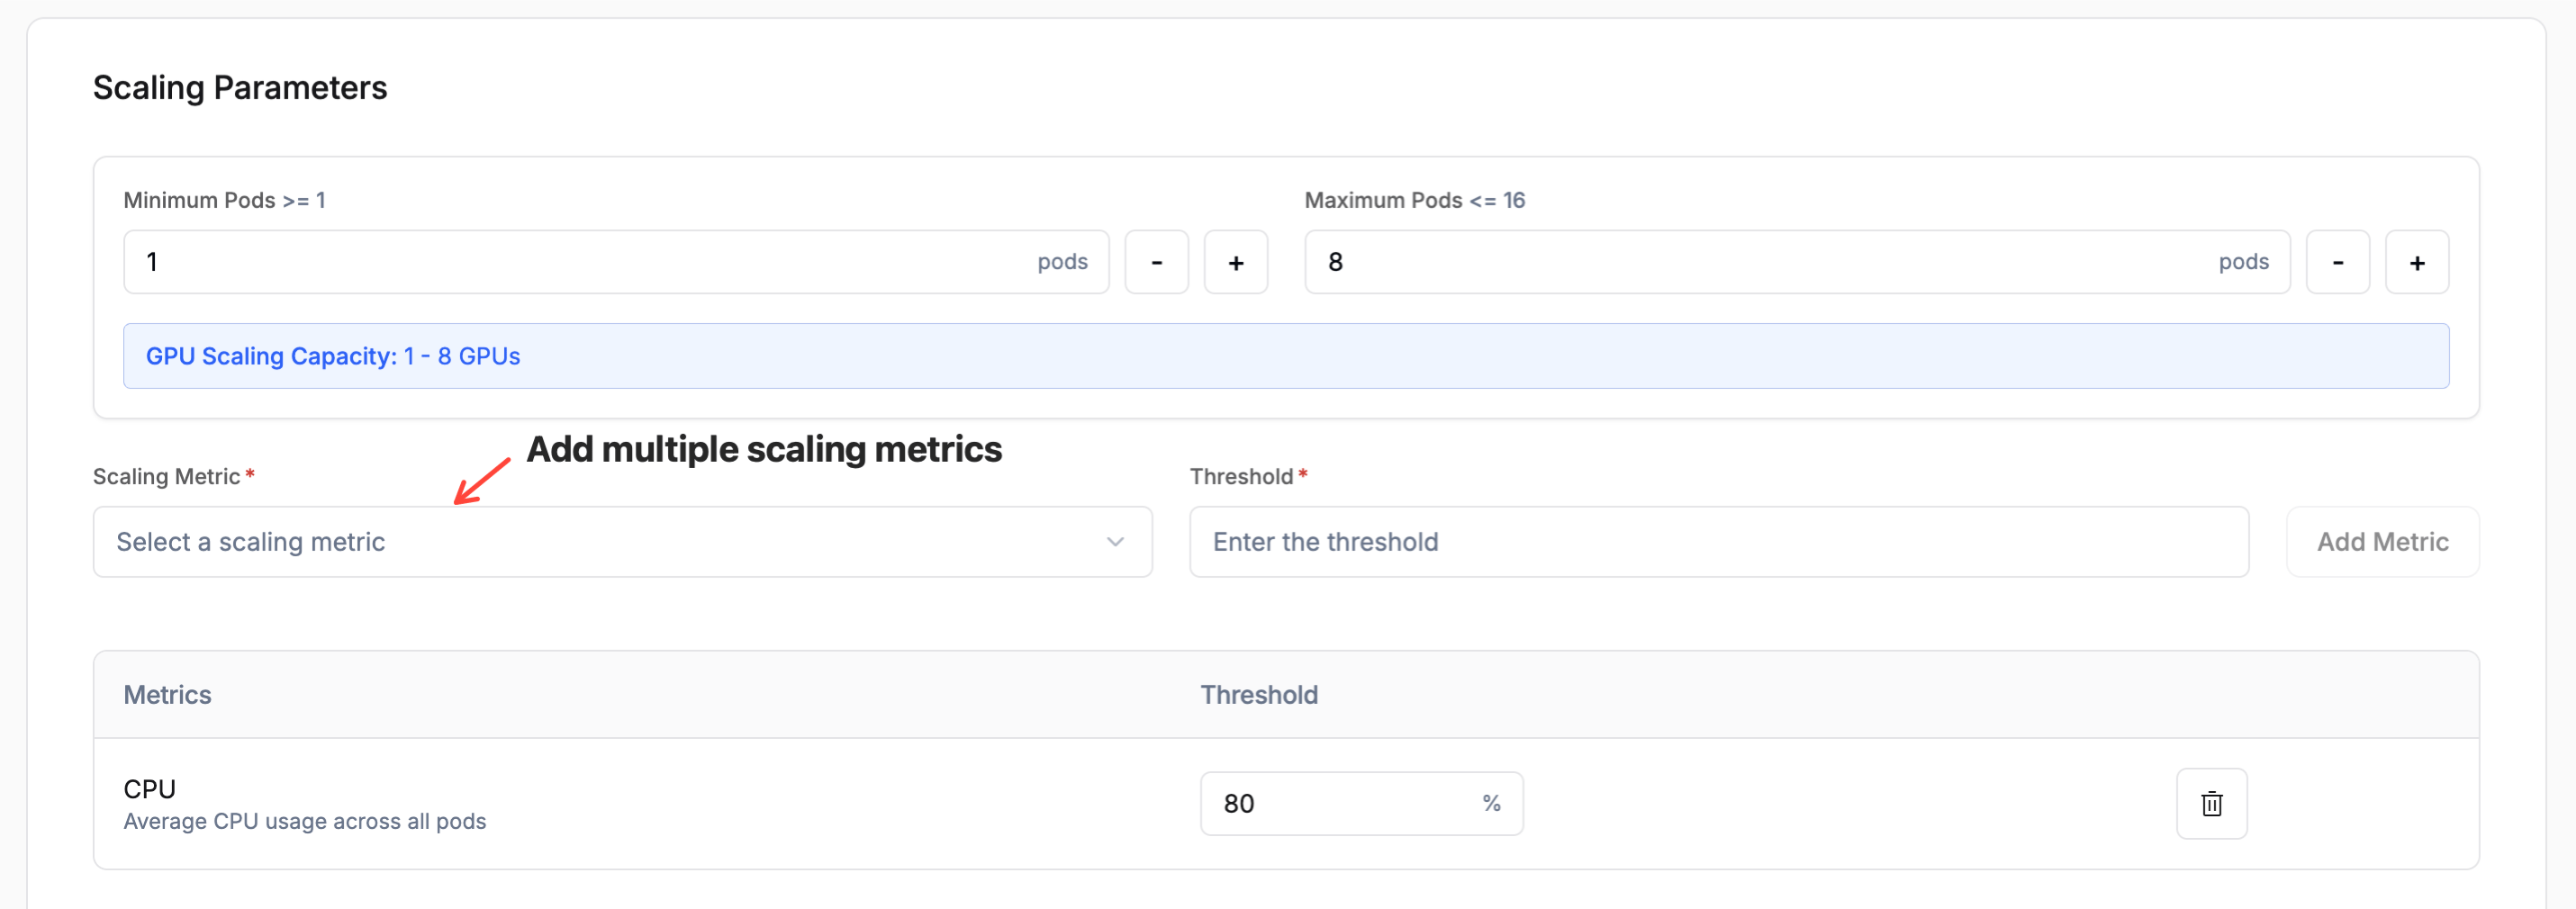
Define how your deployment scales based on demand:
* **Range**: Minimum and maximum number of instances. The limits are governed by your account quota.
* **Scaling Metric**: The metric used to trigger scaling. Choose from:
* **Memory Usage**: Average memory usage across all pods.
* **Latency**: Response time per request.
* **Throughput**: Number of requests processed per second.
* **Concurrency**: Number of concurrent requests being processed.
Available scaling metrics may vary depending on the model type.
* **Threshold**: The metric value that triggers a scaling event for both scale-out and scale-in (e.g. scale out at 80% memory, scale in when it drops back below the threshold).
Toggle **SSH Access** on during deployment creation to configure it. You can add up to 5 users per deployment, choose the SSH runtime (sidecar or main container), and assign an SSH key secret to each user.
For runtime options, bringing your own image, generating a key pair, and connecting to a running deployment, see the [SSH Access guide](/model-suite/deployments/ssh-access).
Define how your deployment scales based on demand:
* **Range**: Minimum and maximum number of instances. The limits are governed by your account quota.
* **Scaling Metric**: The metric used to trigger scaling. Choose from:
* **Memory Usage**: Average memory usage across all pods.
* **Latency**: Response time per request.
* **Throughput**: Number of requests processed per second.
* **Concurrency**: Number of concurrent requests being processed.
Available scaling metrics may vary depending on the model type.
* **Threshold**: The metric value that triggers a scaling event for both scale-out and scale-in (e.g. scale out at 80% memory, scale in when it drops back below the threshold).
 **Advanced Options**
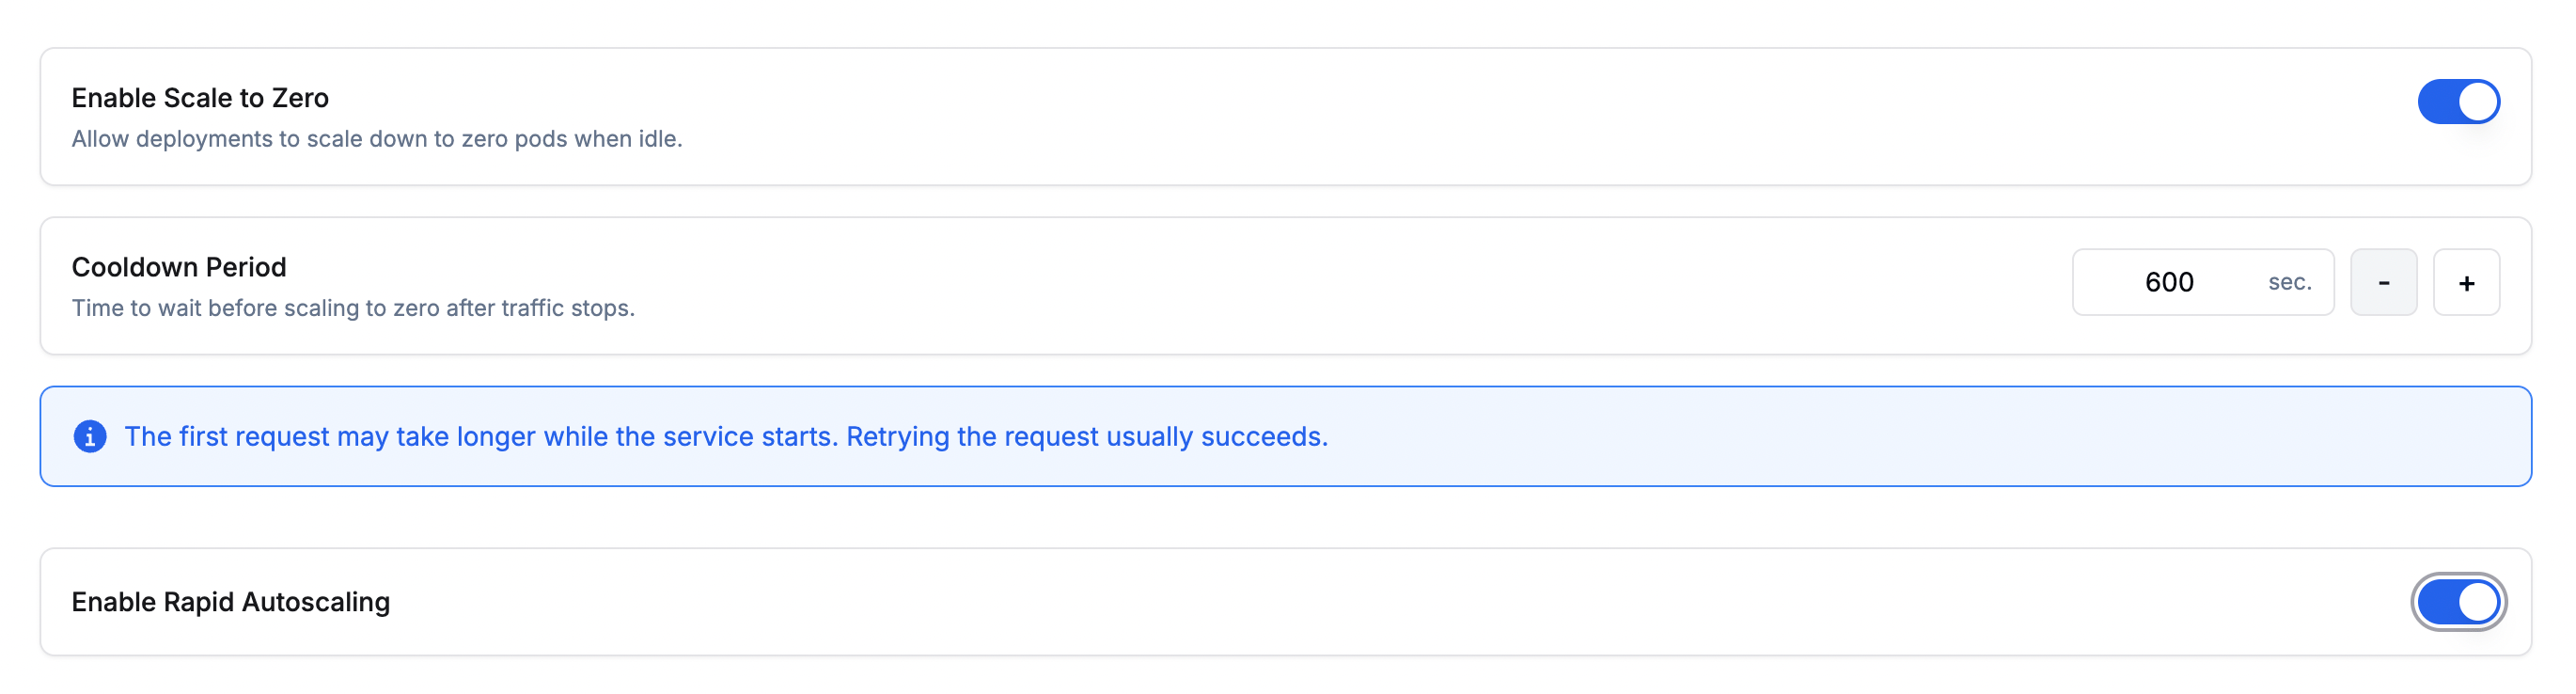
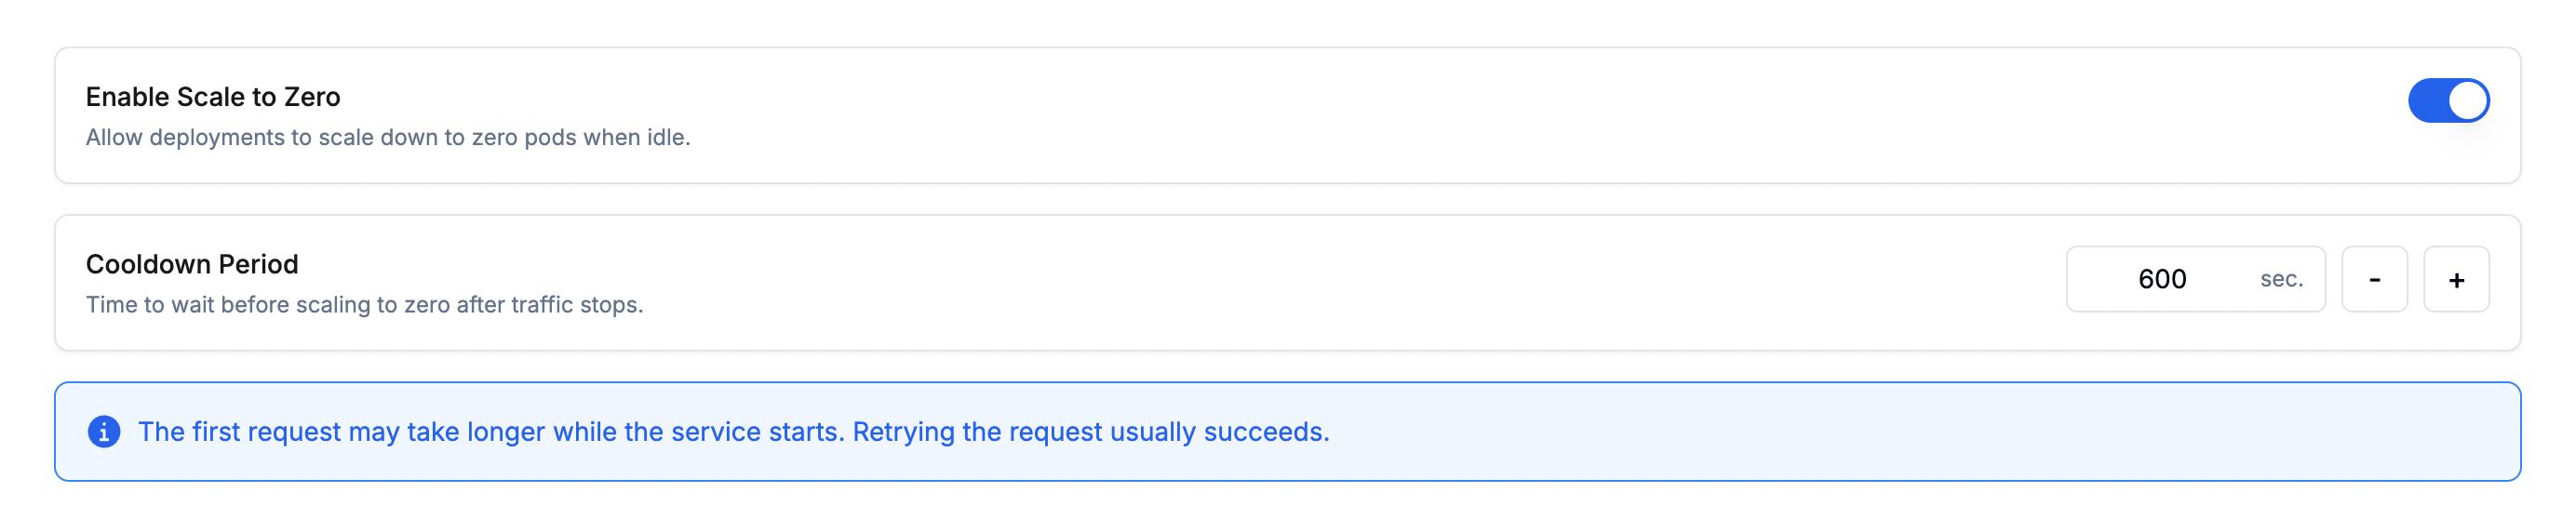
* **Enable Scale to Zero**: Scales the deployment down to zero instances when there is no incoming traffic, reducing idle costs. When traffic resumes, the deployment scales back up automatically.
* **Cooldown Period**: The amount of time (in seconds) to wait after traffic stops before scaling down to zero. A longer cooldown avoids premature scale-downs during brief traffic lulls.
**Enable Rapid Autoscaling**
Rapid Autoscaling allows your deployment to scale out significantly faster during sudden traffic bursts.
Rapid Autoscaling is available on Simplismart Cloud (Dedicated) deployments only. To enable it, contact [support@simplismart.tech](mailto:support@simplismart.tech).
**Advanced Options**
* **Enable Scale to Zero**: Scales the deployment down to zero instances when there is no incoming traffic, reducing idle costs. When traffic resumes, the deployment scales back up automatically.
* **Cooldown Period**: The amount of time (in seconds) to wait after traffic stops before scaling down to zero. A longer cooldown avoids premature scale-downs during brief traffic lulls.
**Enable Rapid Autoscaling**
Rapid Autoscaling allows your deployment to scale out significantly faster during sudden traffic bursts.
Rapid Autoscaling is available on Simplismart Cloud (Dedicated) deployments only. To enable it, contact [support@simplismart.tech](mailto:support@simplismart.tech).
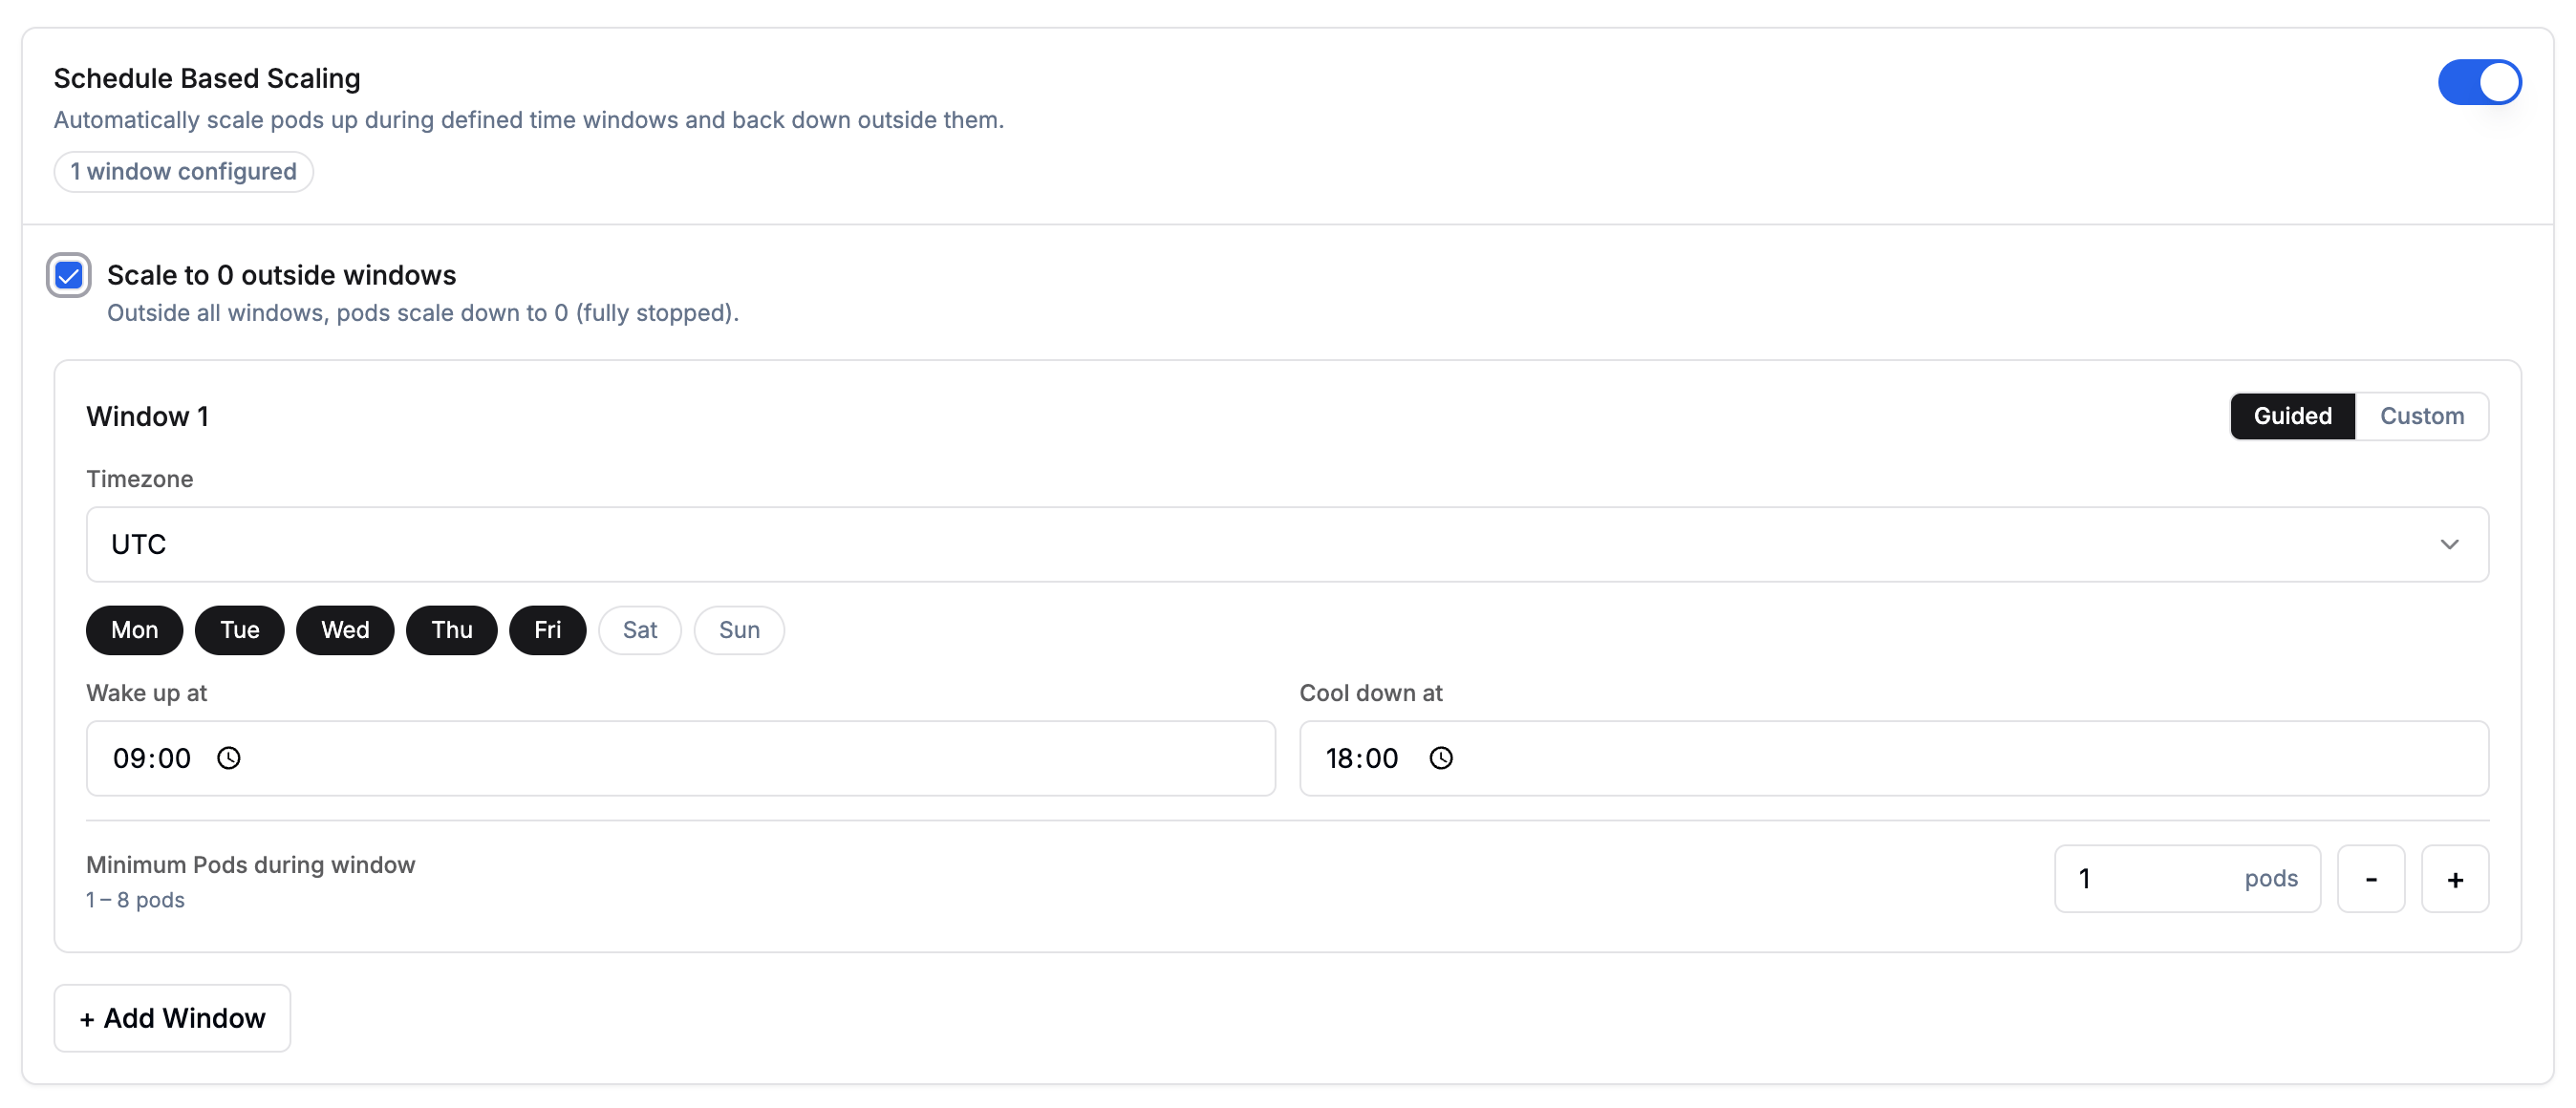
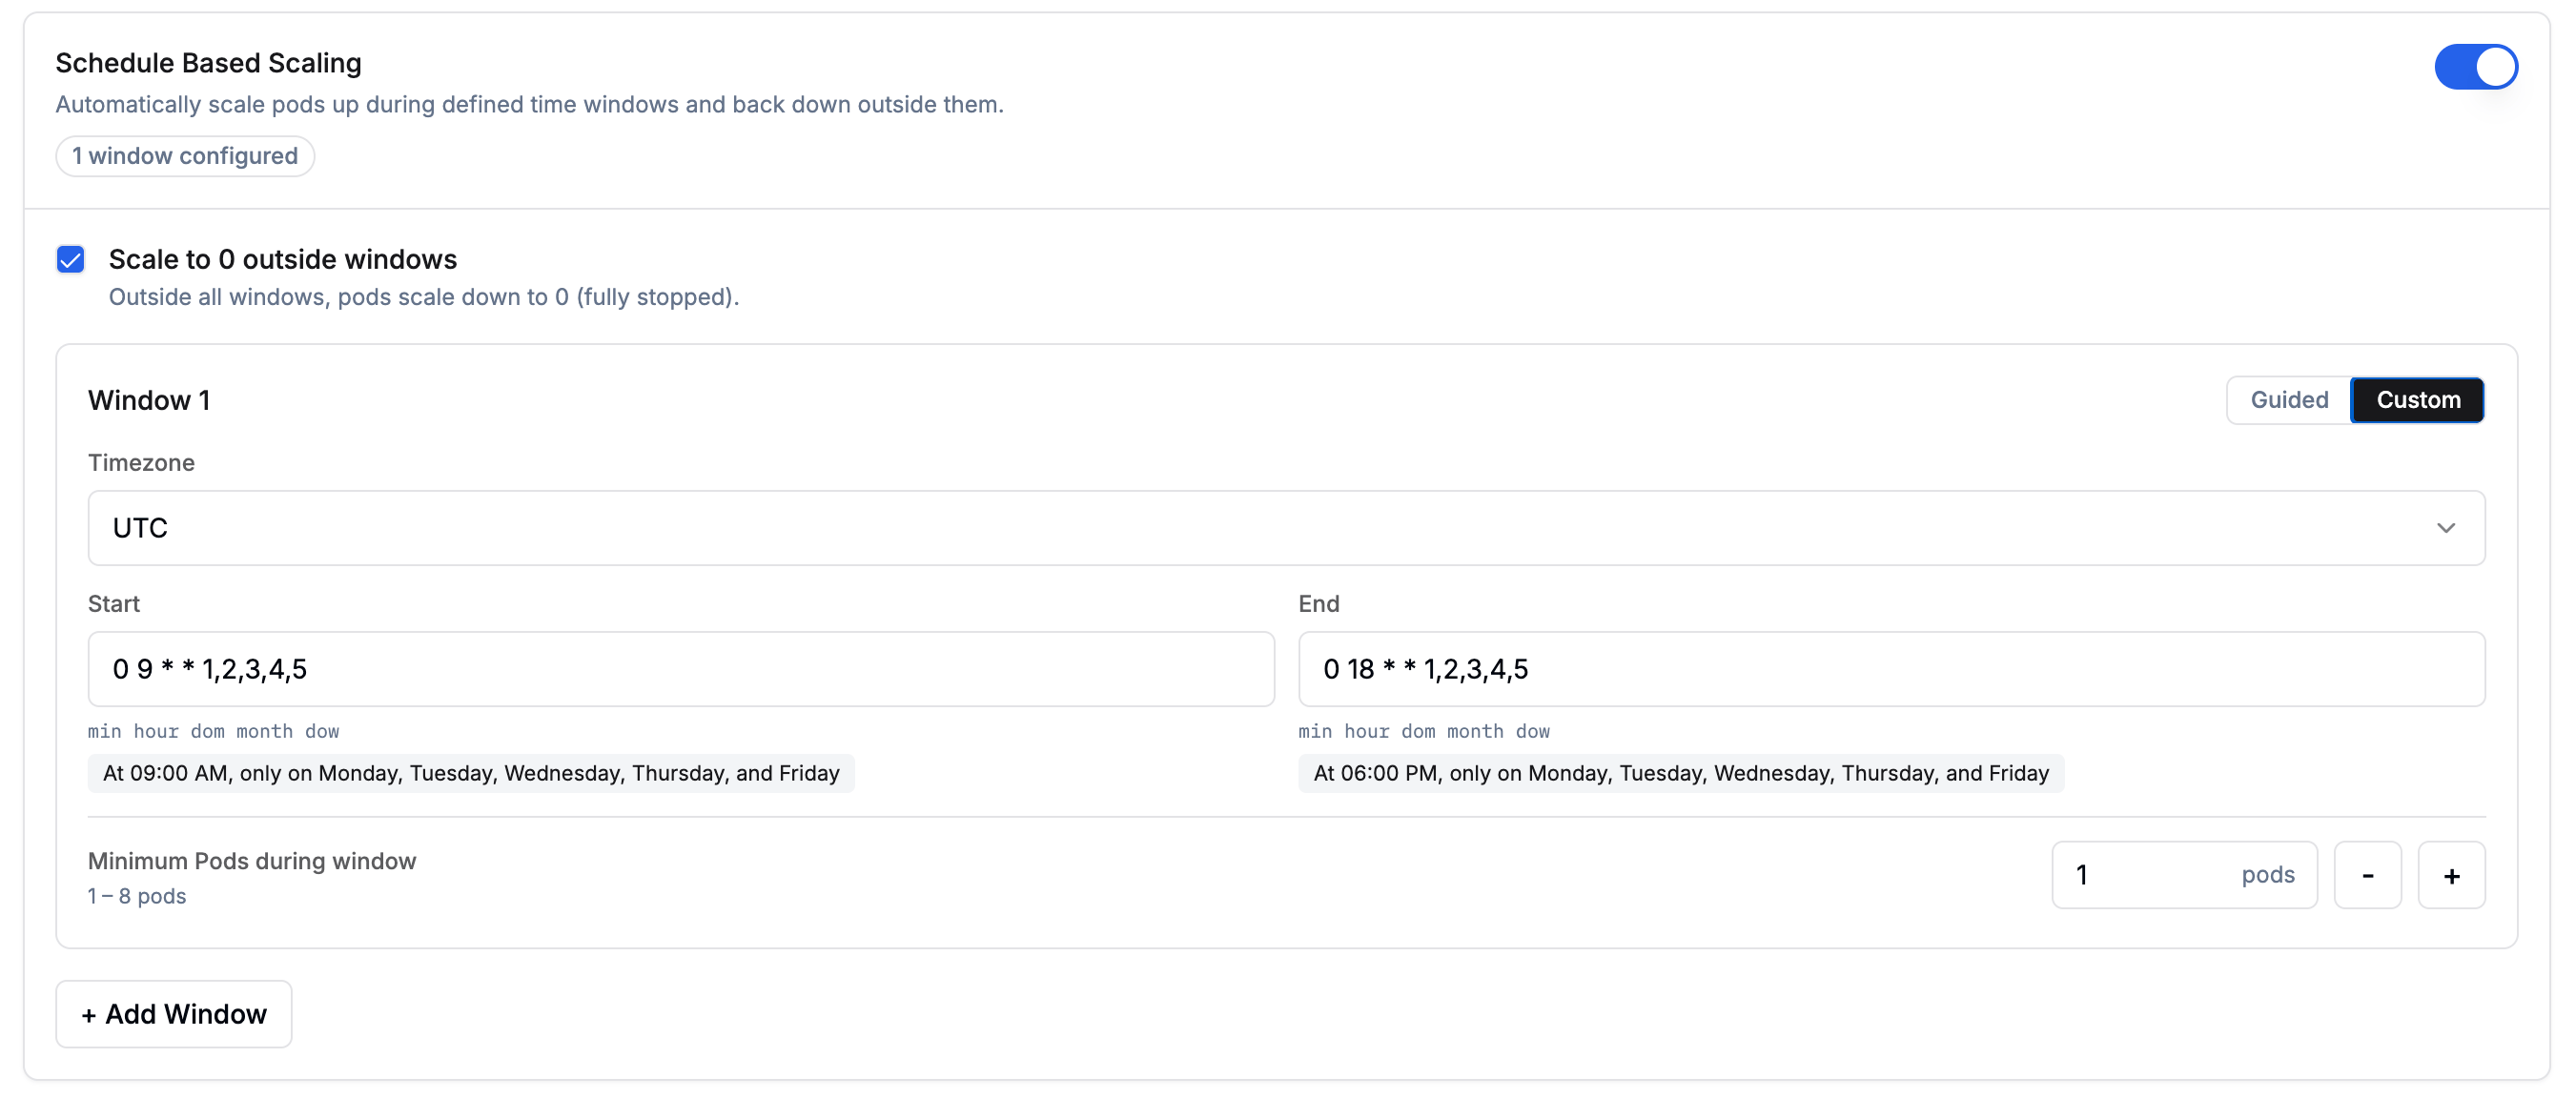
 Enable **Schedule Based Scaling** when you know your traffic pattern in advance. For example, if most of your load arrives on weekdays during office hours, you can define time windows for those periods and let the deployment scale to zero, or fall back to a lower replica count, outside them.
**Schedule Based Scaling** and **Enable Scale to Zero** (in the Advanced Options of Scaling Parameters) are mutually exclusive. Use the **Scale to 0 outside windows** option below if you want pods to scale to zero on a schedule.
**Scale to 0 outside windows**
Choose what happens outside your configured windows:
| Setting | Outside windows | Endpoint behaviour |
| ------------ | ------------------------------------------------------------------------ | ----------------------------------------------------------------- |
| **Enabled** | Deployment runs **0 pods**. It wakes up at the start of the next window. | Returns **503 Service Unavailable** until the next window starts. |
| **Disabled** | Deployment falls back to your standard min/max replicas. | Continues to serve traffic. |
Pick **Disabled** if the endpoint must accept requests outside windows.
**Configuring windows**
Each window defines a time range during which a guaranteed minimum number of pods is maintained. Click **+ Add Window** to add more windows. When multiple rules are active (schedule windows, overlapping windows, standard scaling), whichever produces the **higher pod count** wins at any given time. The cool-down period is fixed at **5 minutes** and cannot be modified.
Each window can be configured using either the **Guided** visual picker or **Custom** cron expressions:
Use the visual picker to configure your schedule:
* **Timezone**: the timezone for interpreting wake-up and cool-down times.
* **Days**: select one or more days of the week (Mon–Sun).
* **Wake up at**: the time at which pods scale up to the configured minimum.
* **Cool down at**: the time at which pods begin scaling down.
* **Minimum Pods during window**: number of pods guaranteed during the window (1–8).
Enable **Schedule Based Scaling** when you know your traffic pattern in advance. For example, if most of your load arrives on weekdays during office hours, you can define time windows for those periods and let the deployment scale to zero, or fall back to a lower replica count, outside them.
**Schedule Based Scaling** and **Enable Scale to Zero** (in the Advanced Options of Scaling Parameters) are mutually exclusive. Use the **Scale to 0 outside windows** option below if you want pods to scale to zero on a schedule.
**Scale to 0 outside windows**
Choose what happens outside your configured windows:
| Setting | Outside windows | Endpoint behaviour |
| ------------ | ------------------------------------------------------------------------ | ----------------------------------------------------------------- |
| **Enabled** | Deployment runs **0 pods**. It wakes up at the start of the next window. | Returns **503 Service Unavailable** until the next window starts. |
| **Disabled** | Deployment falls back to your standard min/max replicas. | Continues to serve traffic. |
Pick **Disabled** if the endpoint must accept requests outside windows.
**Configuring windows**
Each window defines a time range during which a guaranteed minimum number of pods is maintained. Click **+ Add Window** to add more windows. When multiple rules are active (schedule windows, overlapping windows, standard scaling), whichever produces the **higher pod count** wins at any given time. The cool-down period is fixed at **5 minutes** and cannot be modified.
Each window can be configured using either the **Guided** visual picker or **Custom** cron expressions:
Use the visual picker to configure your schedule:
* **Timezone**: the timezone for interpreting wake-up and cool-down times.
* **Days**: select one or more days of the week (Mon–Sun).
* **Wake up at**: the time at which pods scale up to the configured minimum.
* **Cool down at**: the time at which pods begin scaling down.
* **Minimum Pods during window**: number of pods guaranteed during the window (1–8).
 Enter cron expressions directly for more flexibility:
* **Timezone**: the timezone for interpreting the cron schedule.
* **Start**: cron expression for when pods scale up (e.g. `0 9 * * 1,2,3,4,5` for 09:00 AM on weekdays).
* **End**: cron expression for when pods scale down (e.g. `0 18 * * 1,2,3,4,5` for 06:00 PM on weekdays).
* **Minimum Pods during window**: number of pods guaranteed during the window (1–8).
A human-readable summary of each cron expression is shown below the input field.
Enter cron expressions directly for more flexibility:
* **Timezone**: the timezone for interpreting the cron schedule.
* **Start**: cron expression for when pods scale up (e.g. `0 9 * * 1,2,3,4,5` for 09:00 AM on weekdays).
* **End**: cron expression for when pods scale down (e.g. `0 18 * * 1,2,3,4,5` for 06:00 PM on weekdays).
* **Minimum Pods during window**: number of pods guaranteed during the window (1–8).
A human-readable summary of each cron expression is shown below the input field.
 Fine-tune how aggressively your deployment scales up and down by configuring policies and stabilization windows for each direction. This controls the *rate* of pod changes once the scaling metrics cross their configured thresholds.
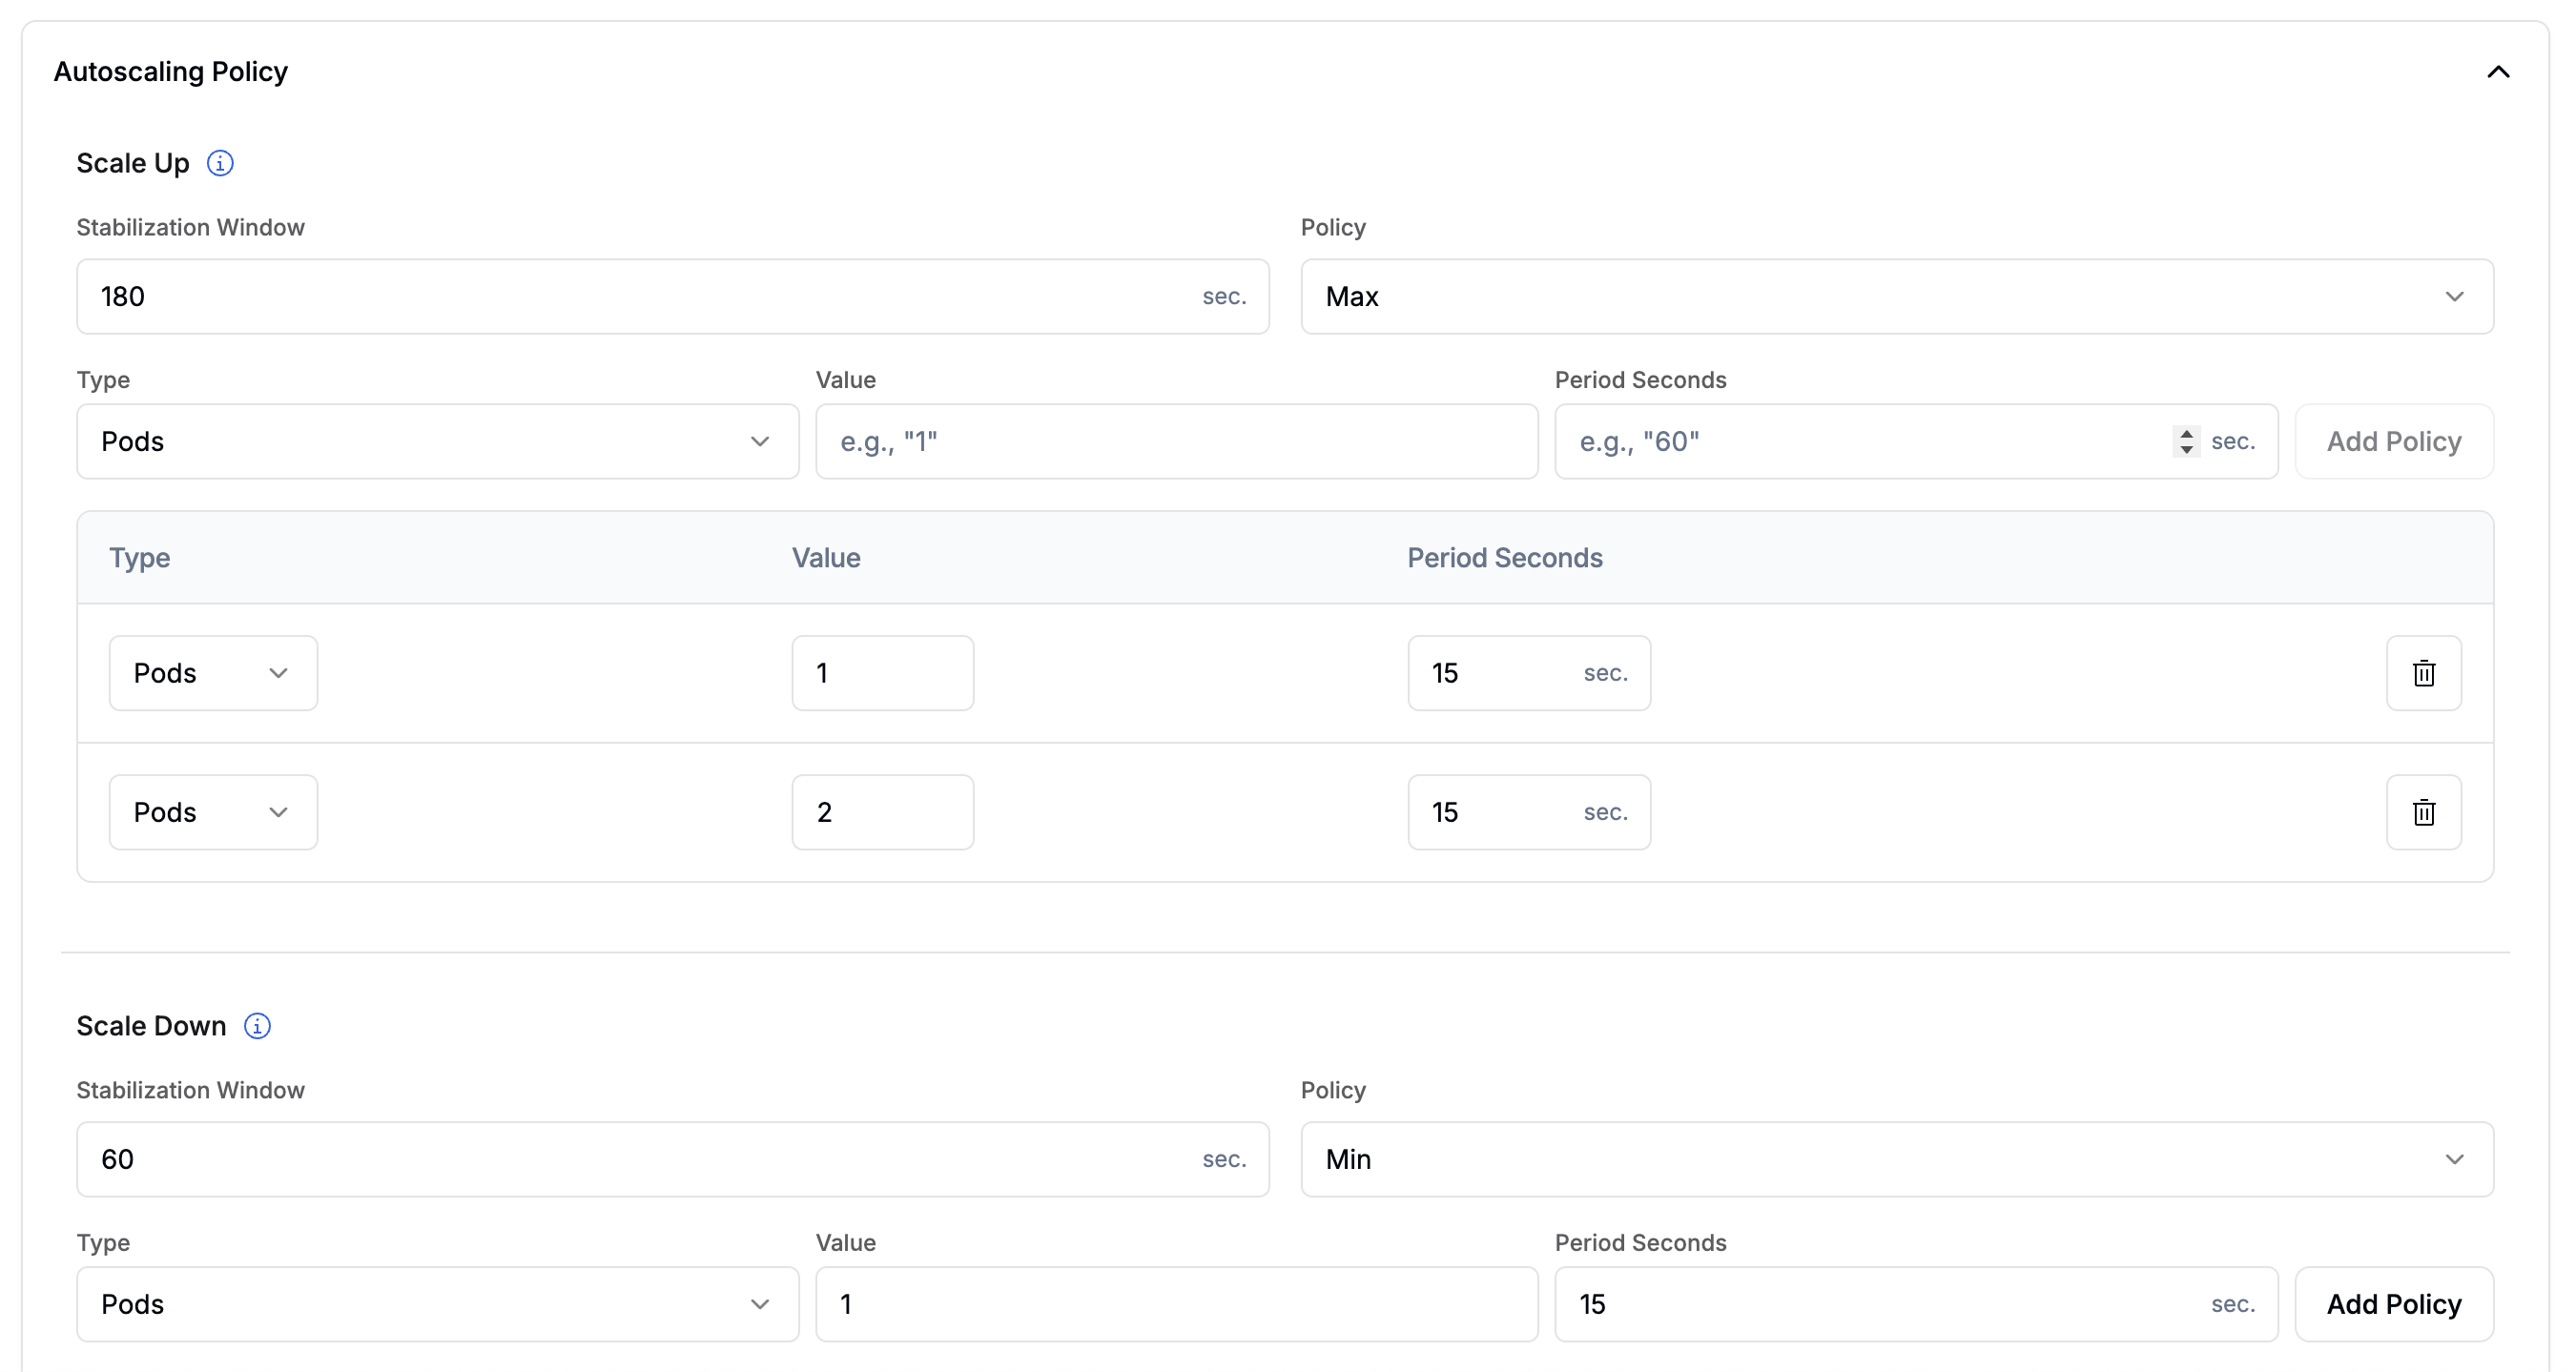 **Scale Up**
Controls how quickly new pods are added when demand rises above the scaling threshold.
* **Stabilization Window**: the look-back period (in seconds) used to smooth out scaling decisions. Default: `60` s. Range: 0–3600 s.
* **Select Policy**: when multiple policies are configured, determines which one wins:
* **Max** (default): picks the policy that allows the most pods to be added.
* **Min**: picks the policy that allows the fewest pods to be added.
* **Disabled**: disables scale-up entirely.
* **Policies**: one or more rate-limiting rules. Click **Add Policy** to configure:
* **Type**: `Pods` (fixed number per period) or `Percent` (percentage of current count, max 100).
* **Value**: the number of pods or percentage to add per period.
* **Period Seconds**: the duration of each evaluation window (1–1800 s).
When multiple policies are active, **Select Policy = Max** picks the policy that allows the largest increase.
**Scale Down**
Controls how gradually pods are removed when demand drops below the threshold.
* **Stabilization Window**: the look-back period (in seconds) before pods are removed. Default: `180` s. Range: 0–3600 s.
* **Select Policy**: when multiple policies are configured, determines which one wins:
* **Min** (default): picks the policy that removes the fewest pods.
* **Max**: picks the policy that removes the most pods.
* **Disabled**: disables scale-down entirely.
* **Policies**: same fields as Scale Up.
When multiple policies are active, **Select Policy = Min** picks the policy that removes the fewest pods. This ensures scale-down is gradual even if metrics drop sharply.
Autoscaling Policy is an advanced configuration. If left unconfigured, standard min/max replica scaling based on the configured scaling metrics applies without rate limiting.
Mount a persistent volume into your deployment to provide model weights or data files that the container reads at runtime.
* **Mount Path**: The path inside the container where the volume is mounted (e.g. `/mnt/models`).
* **Size (Gi)**: The size of the volume in gibibytes.
Storage volumes are provisioned at deployment creation time. Changing the mount path or size requires redeploying.
**Scale Up**
Controls how quickly new pods are added when demand rises above the scaling threshold.
* **Stabilization Window**: the look-back period (in seconds) used to smooth out scaling decisions. Default: `60` s. Range: 0–3600 s.
* **Select Policy**: when multiple policies are configured, determines which one wins:
* **Max** (default): picks the policy that allows the most pods to be added.
* **Min**: picks the policy that allows the fewest pods to be added.
* **Disabled**: disables scale-up entirely.
* **Policies**: one or more rate-limiting rules. Click **Add Policy** to configure:
* **Type**: `Pods` (fixed number per period) or `Percent` (percentage of current count, max 100).
* **Value**: the number of pods or percentage to add per period.
* **Period Seconds**: the duration of each evaluation window (1–1800 s).
When multiple policies are active, **Select Policy = Max** picks the policy that allows the largest increase.
**Scale Down**
Controls how gradually pods are removed when demand drops below the threshold.
* **Stabilization Window**: the look-back period (in seconds) before pods are removed. Default: `180` s. Range: 0–3600 s.
* **Select Policy**: when multiple policies are configured, determines which one wins:
* **Min** (default): picks the policy that removes the fewest pods.
* **Max**: picks the policy that removes the most pods.
* **Disabled**: disables scale-down entirely.
* **Policies**: same fields as Scale Up.
When multiple policies are active, **Select Policy = Min** picks the policy that removes the fewest pods. This ensures scale-down is gradual even if metrics drop sharply.
Autoscaling Policy is an advanced configuration. If left unconfigured, standard min/max replica scaling based on the configured scaling metrics applies without rate limiting.
Mount a persistent volume into your deployment to provide model weights or data files that the container reads at runtime.
* **Mount Path**: The path inside the container where the volume is mounted (e.g. `/mnt/models`).
* **Size (Gi)**: The size of the volume in gibibytes.
Storage volumes are provisioned at deployment creation time. Changing the mount path or size requires redeploying.
 Add key-value tags to organize and filter your deployments. Tags are useful for tracking environment, team, or cost-center metadata.
* Click **+ Add Tag** to add a new key-value pair.
* Tags can be used to filter deployments on the Deployments page.
Add key-value tags to organize and filter your deployments. Tags are useful for tracking environment, team, or cost-center metadata.
* Click **+ Add Tag** to add a new key-value pair.
* Tags can be used to filter deployments on the Deployments page.
 Click **Deploy Model** to initiate the deployment process.
* Check the right side of the screen to see the creation status of your deployment.
* Monitor the deployment status to know when the model is ready for use.
* The status will show `deployed` once done. Your model is now ready for use.
Click **Deploy Model** to initiate the deployment process.
* Check the right side of the screen to see the creation status of your deployment.
* Monitor the deployment status to know when the model is ready for use.
* The status will show `deployed` once done. Your model is now ready for use.
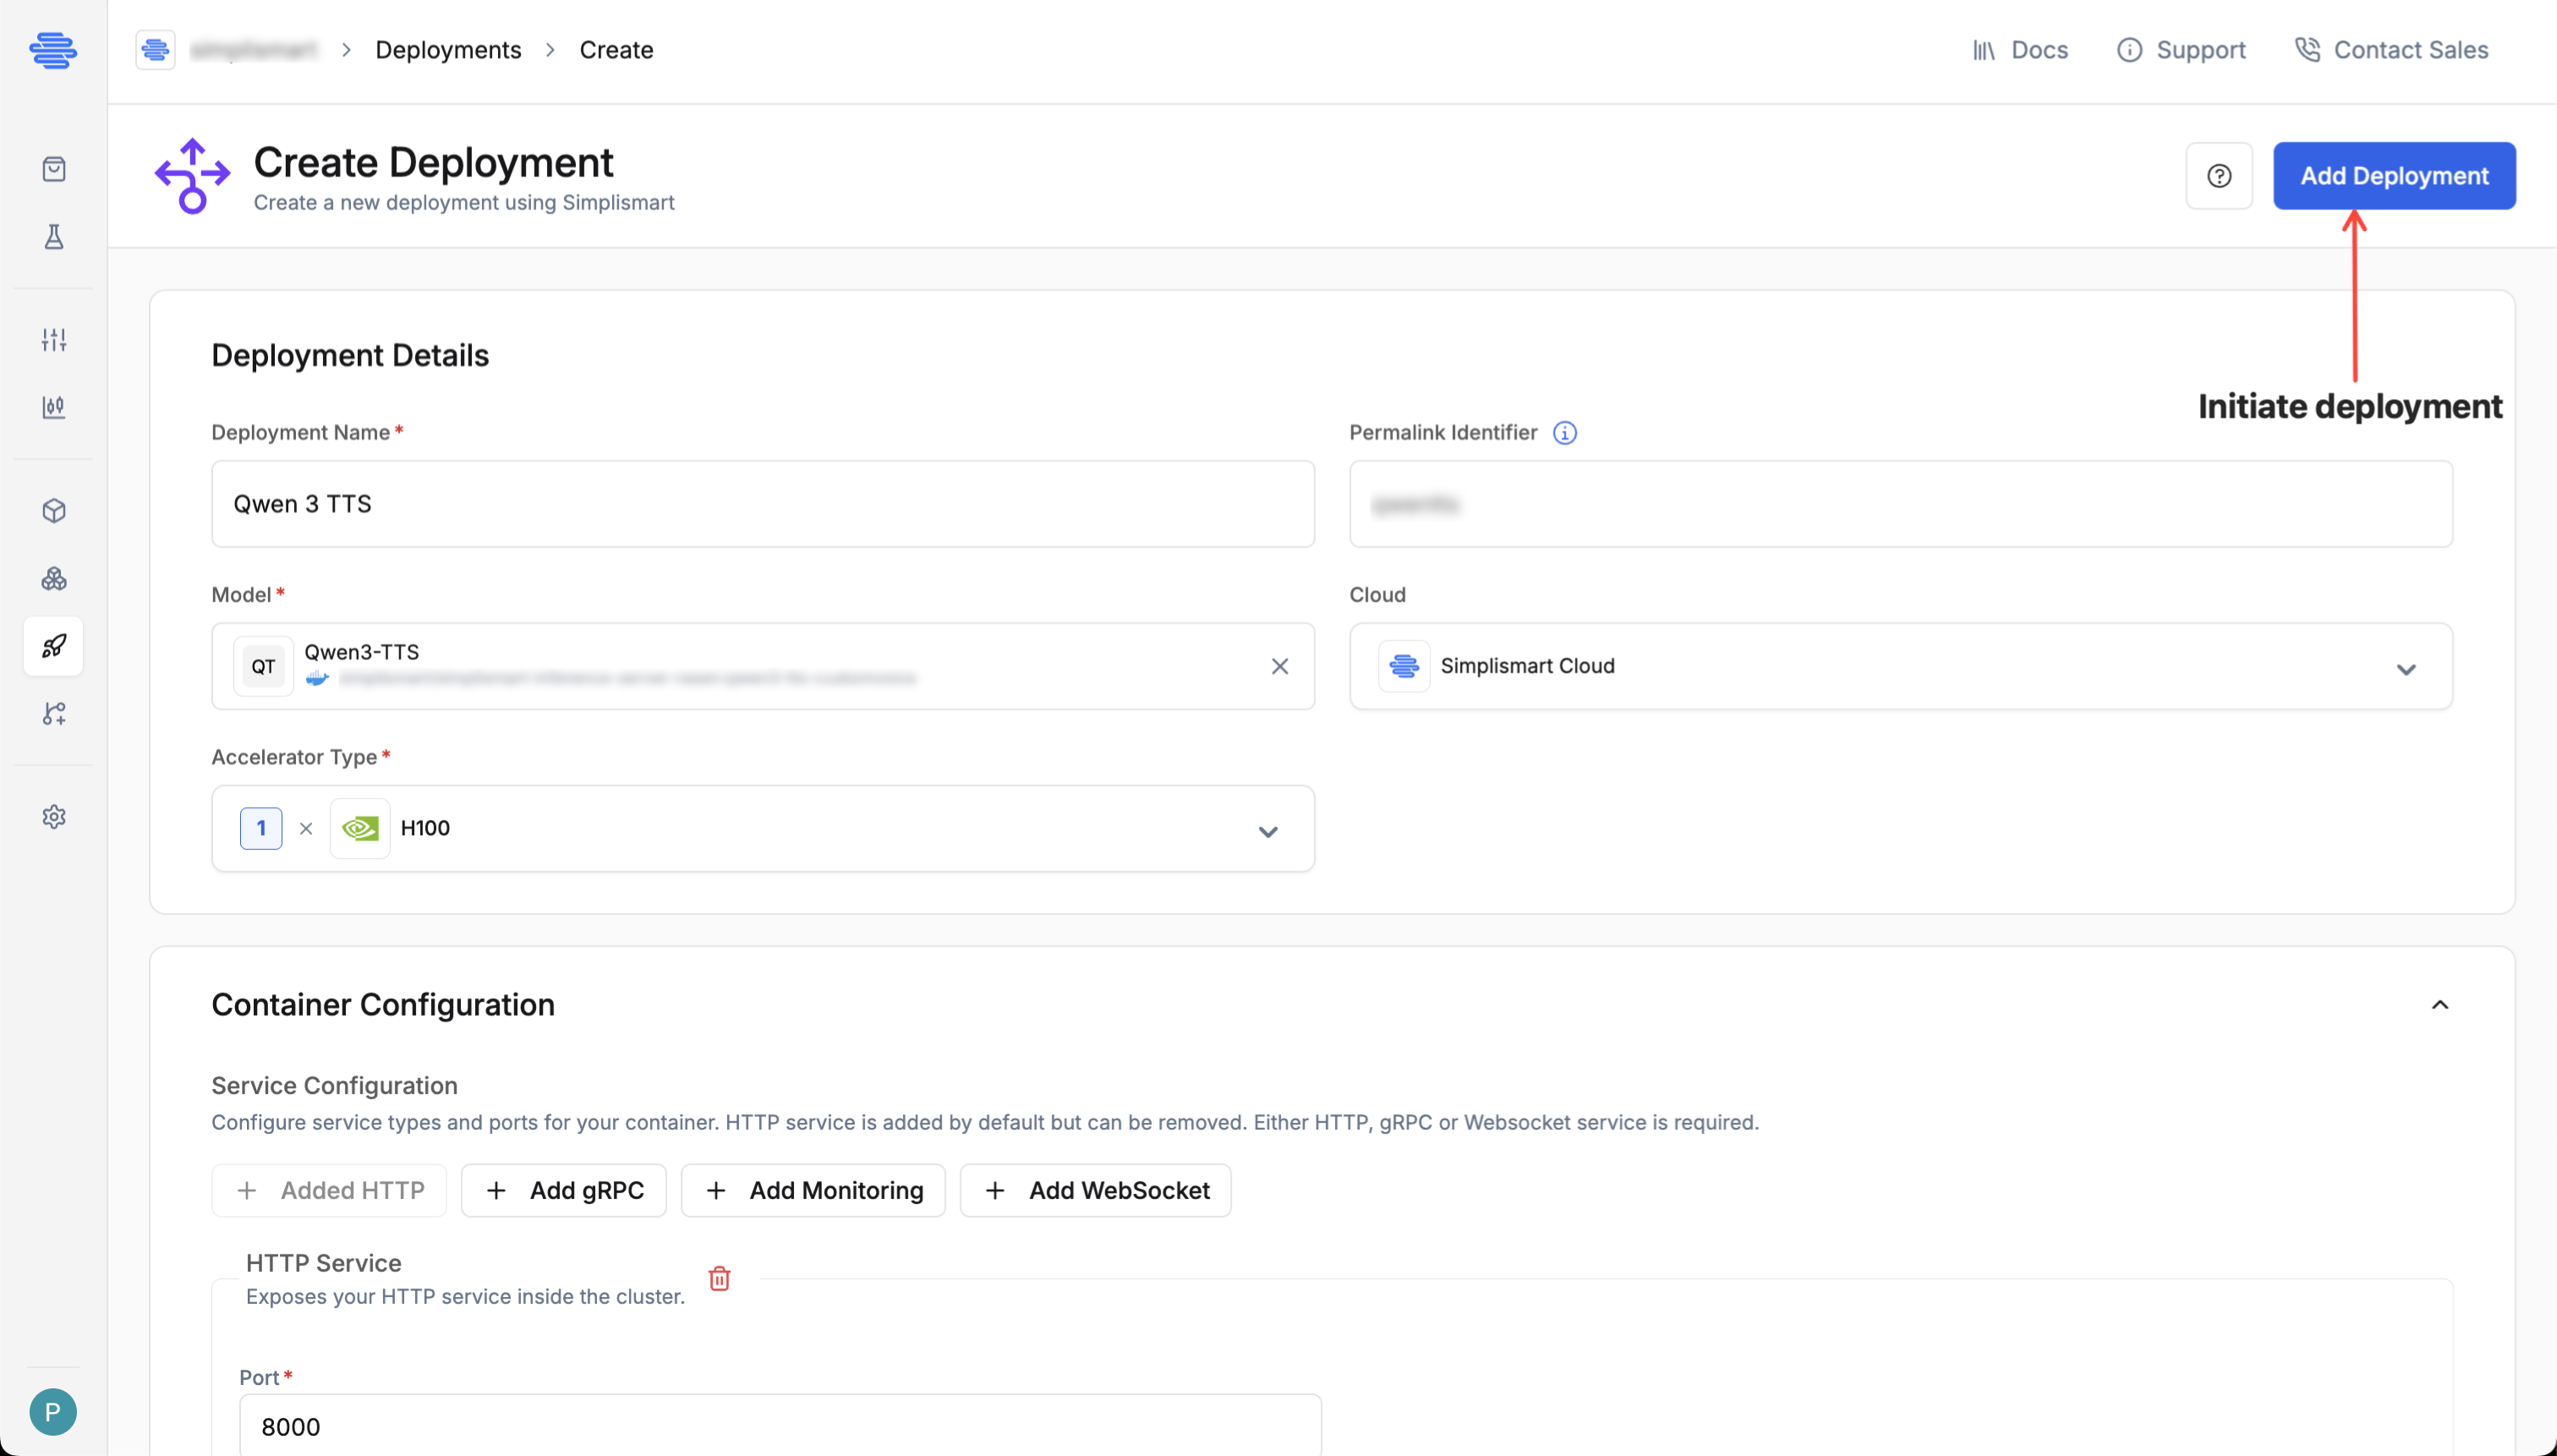 **For BYOC deployments** it is mandatory to have a linked cloud account and an active cluster with the required resources.
Select the cluster and the required node group based on the model.
* **Cluster**: Select the target [cluster](/model-suite/clusters).
* **Node Group**: Select the node group based on the GPU type and compute specs required by your model (e.g., A100, H100, T4).
This ensures compatibility and optimal resource allocation during deployment.
**For BYOC deployments** it is mandatory to have a linked cloud account and an active cluster with the required resources.
Select the cluster and the required node group based on the model.
* **Cluster**: Select the target [cluster](/model-suite/clusters).
* **Node Group**: Select the node group based on the GPU type and compute specs required by your model (e.g., A100, H100, T4).
This ensures compatibility and optimal resource allocation during deployment.
 If you already configured ports, health checks, environment variables, or a command override in the **[Add Model](/model-suite/add-container)** step, those values are pre-filled here and can be overridden. The fields exclusive to this step are **Enable Auth** and **File Mount**.
**Service Configuration**
Configure service types and ports for your container. You can add multiple service types, but only one of each type. HTTP service is added by default. At least one of **HTTP**, **gRPC**, or **WebSocket** is required.
Each service has a **Public Access** toggle. When enabled, the service is exposed externally and accessible via public endpoints. When disabled, it is accessible only within the cluster.
* **HTTP Service**: Exposes your application over HTTP. Set the port your server listens on (e.g. `8000`). Added by default; can be removed if you use gRPC or WebSocket instead.
* **gRPC Service** (Optional): Enable for high-performance RPC workloads. It requires a port distinct from the HTTP service port (e.g. `9000`) and can be combined with HTTP and Monitoring services.
* **Monitoring Service** (Optional): Exposes a metrics endpoint for monitoring tools such as Prometheus. Requires a **Port** (e.g. `9090`) and a **Path** (e.g. `/metrics`). Can be combined with HTTP or gRPC services.
* **WebSocket Service** (Optional): Enable for WebSocket-based model serving (e.g. real-time streaming). Set the port (e.g. `8001`).
WebSocket is exclusive and no other service types can be configured when WebSocket is selected.
**Health Check Configuration**
Configure health check settings for your container deployment.
* **Health Check Path**: Endpoint your app exposes for health probes (e.g. `/health`).
* **Port**: Must match your HTTP/gRPC service port (e.g. `8000`).
* **Initial Delay**: Wait time before the first health check (e.g. `30s`).
* **Period**: How frequently health checks run (e.g. `10s`).
* **Timeout**: Maximum time to wait for a health check response (e.g. `5s`).
**Environment Variables (Optional)**
Set runtime environment variables. Add key-value pairs using the `+` button.
**Command Override (Optional)**
Override the container's default startup command. Type or paste the full command and press **Enter** or click outside the field to parse it automatically (e.g. `python -m uvicorn main:app`).
**Model Endpoint**
Set the path your model server exposes for inference requests (e.g. `/v1/completions`). This field is **required** when using a WebSocket service (e.g. `/v1/audio/speech`).
**Enable Auth**
Toggle **Enable Auth** to require a [Simplismart API token](/model-suite/settings/api-keys) on every request to this deployment's endpoint. Unauthenticated requests will be rejected.
**File Mount**
Mount configuration files or secrets inside your container at runtime. Click **+ Add File**, specify the **Mount Path**, then upload your file.
* **Supported formats**: `.toml`, `.yaml`, `.yml`, `.json`, `.conf`, `.ini`, `.properties`, `.env`, `.cfg`, `.jsonl`, `.sh`, `.txt`
* **Total size limit**: 500 KB across all mounted files
* Each mounted file can be **edited inline** or **re-uploaded** using the Actions column.
The following system directories cannot be used as mount paths: `/sys`, `/proc`, `/dev`, `/root`, `/boot`, `/bin`, `/sbin`, `/lib`, `/lib64`.
Use a path under `/home`, `/tmp`, `/var/tmp`, `/opt`, `/srv`, or a subdirectory of `/etc` (e.g. `/etc/myapp/config.txt`).
Choose the appropriate CPU and memory resources based on the selected node group.
If you already configured ports, health checks, environment variables, or a command override in the **[Add Model](/model-suite/add-container)** step, those values are pre-filled here and can be overridden. The fields exclusive to this step are **Enable Auth** and **File Mount**.
**Service Configuration**
Configure service types and ports for your container. You can add multiple service types, but only one of each type. HTTP service is added by default. At least one of **HTTP**, **gRPC**, or **WebSocket** is required.
Each service has a **Public Access** toggle. When enabled, the service is exposed externally and accessible via public endpoints. When disabled, it is accessible only within the cluster.
* **HTTP Service**: Exposes your application over HTTP. Set the port your server listens on (e.g. `8000`). Added by default; can be removed if you use gRPC or WebSocket instead.
* **gRPC Service** (Optional): Enable for high-performance RPC workloads. It requires a port distinct from the HTTP service port (e.g. `9000`) and can be combined with HTTP and Monitoring services.
* **Monitoring Service** (Optional): Exposes a metrics endpoint for monitoring tools such as Prometheus. Requires a **Port** (e.g. `9090`) and a **Path** (e.g. `/metrics`). Can be combined with HTTP or gRPC services.
* **WebSocket Service** (Optional): Enable for WebSocket-based model serving (e.g. real-time streaming). Set the port (e.g. `8001`).
WebSocket is exclusive and no other service types can be configured when WebSocket is selected.
**Health Check Configuration**
Configure health check settings for your container deployment.
* **Health Check Path**: Endpoint your app exposes for health probes (e.g. `/health`).
* **Port**: Must match your HTTP/gRPC service port (e.g. `8000`).
* **Initial Delay**: Wait time before the first health check (e.g. `30s`).
* **Period**: How frequently health checks run (e.g. `10s`).
* **Timeout**: Maximum time to wait for a health check response (e.g. `5s`).
**Environment Variables (Optional)**
Set runtime environment variables. Add key-value pairs using the `+` button.
**Command Override (Optional)**
Override the container's default startup command. Type or paste the full command and press **Enter** or click outside the field to parse it automatically (e.g. `python -m uvicorn main:app`).
**Model Endpoint**
Set the path your model server exposes for inference requests (e.g. `/v1/completions`). This field is **required** when using a WebSocket service (e.g. `/v1/audio/speech`).
**Enable Auth**
Toggle **Enable Auth** to require a [Simplismart API token](/model-suite/settings/api-keys) on every request to this deployment's endpoint. Unauthenticated requests will be rejected.
**File Mount**
Mount configuration files or secrets inside your container at runtime. Click **+ Add File**, specify the **Mount Path**, then upload your file.
* **Supported formats**: `.toml`, `.yaml`, `.yml`, `.json`, `.conf`, `.ini`, `.properties`, `.env`, `.cfg`, `.jsonl`, `.sh`, `.txt`
* **Total size limit**: 500 KB across all mounted files
* Each mounted file can be **edited inline** or **re-uploaded** using the Actions column.
The following system directories cannot be used as mount paths: `/sys`, `/proc`, `/dev`, `/root`, `/boot`, `/bin`, `/sbin`, `/lib`, `/lib64`.
Use a path under `/home`, `/tmp`, `/var/tmp`, `/opt`, `/srv`, or a subdirectory of `/etc` (e.g. `/etc/myapp/config.txt`).
Choose the appropriate CPU and memory resources based on the selected node group.
 * **CPU Request**: Minimum guaranteed CPU for the container.
* **CPU Limit**: Maximum CPU the container can use. Throttled if exceeded.
* **Memory Request**: Minimum guaranteed memory.
* **Memory Limit**: Maximum memory allowed. Exceeding it results in termination (OOM error).
Define how your deployment scales based on demand:
* **Range**: Minimum and maximum number of instances. The limits are governed by your account quota.
* **Scaling Metric**: The metric used to trigger scaling. Choose from:
* **Memory Usage**: Average memory usage across all pods.
* **Latency**: Response time per request.
* **Throughput**: Number of requests processed per second.
* **Concurrency**: Number of concurrent requests being processed.
Available scaling metrics may vary depending on the model type.
* **Threshold**: The metric value that triggers a scaling event for both scale-out and scale-in (e.g. scale out at 80% memory, scale in when it drops back below the threshold).
**Advanced Options**
* **Enable Scale to Zero**: Scales the deployment down to zero instances when there is no incoming traffic, reducing idle costs. When traffic resumes, the deployment scales back up automatically.
* **Cooldown Period**: The amount of time (in seconds) to wait after traffic stops before scaling down to zero. A longer cooldown avoids premature scale-downs during brief traffic lulls.
* **CPU Request**: Minimum guaranteed CPU for the container.
* **CPU Limit**: Maximum CPU the container can use. Throttled if exceeded.
* **Memory Request**: Minimum guaranteed memory.
* **Memory Limit**: Maximum memory allowed. Exceeding it results in termination (OOM error).
Define how your deployment scales based on demand:
* **Range**: Minimum and maximum number of instances. The limits are governed by your account quota.
* **Scaling Metric**: The metric used to trigger scaling. Choose from:
* **Memory Usage**: Average memory usage across all pods.
* **Latency**: Response time per request.
* **Throughput**: Number of requests processed per second.
* **Concurrency**: Number of concurrent requests being processed.
Available scaling metrics may vary depending on the model type.
* **Threshold**: The metric value that triggers a scaling event for both scale-out and scale-in (e.g. scale out at 80% memory, scale in when it drops back below the threshold).
**Advanced Options**
* **Enable Scale to Zero**: Scales the deployment down to zero instances when there is no incoming traffic, reducing idle costs. When traffic resumes, the deployment scales back up automatically.
* **Cooldown Period**: The amount of time (in seconds) to wait after traffic stops before scaling down to zero. A longer cooldown avoids premature scale-downs during brief traffic lulls.
 Enable **Schedule Based Scaling** when you know your traffic pattern in advance. For example, if most of your load arrives on weekdays during office hours, you can define time windows for those periods and let the deployment scale to zero, or fall back to a lower replica count, outside them.
**Schedule Based Scaling** and **Enable Scale to Zero** (in the Advanced Options of Scaling Parameters) are mutually exclusive. Use the **Scale to 0 outside windows** option below if you want pods to scale to zero on a schedule.
**Scale to 0 outside windows**
Choose what happens outside your configured windows:
| Setting | Outside windows | Endpoint behaviour |
| ------------ | ------------------------------------------------------------------------ | ----------------------------------------------------------------- |
| **Enabled** | Deployment runs **0 pods**. It wakes up at the start of the next window. | Returns **503 Service Unavailable** until the next window starts. |
| **Disabled** | Deployment falls back to your standard min/max replicas. | Continues to serve traffic. |
Pick **Disabled** if the endpoint must accept requests outside windows.
**Configuring windows**
Each window defines a time range during which a guaranteed minimum number of pods is maintained. Click **+ Add Window** to add more windows. When multiple rules are active (schedule windows, overlapping windows, standard scaling), whichever produces the **higher pod count** wins at any given time. The cool-down period is fixed at **5 minutes** and cannot be modified.
Each window can be configured using either the **Guided** visual picker or **Custom** cron expressions:
Use the visual picker to configure your schedule:
* **Timezone**: the timezone for interpreting wake-up and cool-down times.
* **Days**: select one or more days of the week (Mon–Sun).
* **Wake up at**: the time at which pods scale up to the configured minimum.
* **Cool down at**: the time at which pods begin scaling down.
* **Minimum Pods during window**: number of pods guaranteed during the window (1–8).
Enter cron expressions directly for more flexibility:
* **Timezone**: the timezone for interpreting the cron schedule.
* **Start**: cron expression for when pods scale up (e.g. `0 9 * * 1,2,3,4,5` for 09:00 AM on weekdays).
* **End**: cron expression for when pods scale down (e.g. `0 18 * * 1,2,3,4,5` for 06:00 PM on weekdays).
* **Minimum Pods during window**: number of pods guaranteed during the window (1–8).
A human-readable summary of each cron expression is shown below the input field.
Fine-tune how aggressively your deployment scales up and down by configuring policies and stabilization windows for each direction. This controls the *rate* of pod changes once the scaling metrics cross their configured thresholds.
**Scale Up**
Controls how quickly new pods are added when demand rises above the scaling threshold.
* **Stabilization Window**: the look-back period (in seconds) used to smooth out scaling decisions. Default: `60` s. Range: 0–3600 s.
* **Select Policy**: when multiple policies are configured, determines which one wins:
* **Max** (default): picks the policy that allows the most pods to be added.
* **Min**: picks the policy that allows the fewest pods to be added.
* **Disabled**: disables scale-up entirely.
* **Policies**: one or more rate-limiting rules. Click **Add Policy** to configure:
* **Type**: `Pods` (fixed number per period) or `Percent` (percentage of current count, max 100).
* **Value**: the number of pods or percentage to add per period.
* **Period Seconds**: the duration of each evaluation window (1–1800 s).
When multiple policies are active, **Select Policy = Max** picks the policy that allows the largest increase.
**Scale Down**
Controls how gradually pods are removed when demand drops below the threshold.
* **Stabilization Window**: the look-back period (in seconds) before pods are removed. Default: `180` s. Range: 0–3600 s.
* **Select Policy**: when multiple policies are configured, determines which one wins:
* **Min** (default): picks the policy that removes the fewest pods.
* **Max**: picks the policy that removes the most pods.
* **Disabled**: disables scale-down entirely.
* **Policies**: same fields as Scale Up.
When multiple policies are active, **Select Policy = Min** picks the policy that removes the fewest pods. This ensures scale-down is gradual even if metrics drop sharply.
Autoscaling Policy is an advanced configuration. If left unconfigured, standard min/max replica scaling based on the configured scaling metrics applies without rate limiting.
Add key-value tags to organize and filter your deployments. Tags are useful for tracking environment, team, or cost-center metadata.
* Click **+ Add Tag** to add a new key-value pair.
* Tags can be used to filter deployments on the Deployments page.
Click **Deploy Model** to initiate the deployment process.
* Check the right side of the screen to see the creation status of your deployment.
* Monitor the deployment status to know when the model is ready for use.
* The status will show `deployed` once done. Your model is now ready for use.
Enable **Schedule Based Scaling** when you know your traffic pattern in advance. For example, if most of your load arrives on weekdays during office hours, you can define time windows for those periods and let the deployment scale to zero, or fall back to a lower replica count, outside them.
**Schedule Based Scaling** and **Enable Scale to Zero** (in the Advanced Options of Scaling Parameters) are mutually exclusive. Use the **Scale to 0 outside windows** option below if you want pods to scale to zero on a schedule.
**Scale to 0 outside windows**
Choose what happens outside your configured windows:
| Setting | Outside windows | Endpoint behaviour |
| ------------ | ------------------------------------------------------------------------ | ----------------------------------------------------------------- |
| **Enabled** | Deployment runs **0 pods**. It wakes up at the start of the next window. | Returns **503 Service Unavailable** until the next window starts. |
| **Disabled** | Deployment falls back to your standard min/max replicas. | Continues to serve traffic. |
Pick **Disabled** if the endpoint must accept requests outside windows.
**Configuring windows**
Each window defines a time range during which a guaranteed minimum number of pods is maintained. Click **+ Add Window** to add more windows. When multiple rules are active (schedule windows, overlapping windows, standard scaling), whichever produces the **higher pod count** wins at any given time. The cool-down period is fixed at **5 minutes** and cannot be modified.
Each window can be configured using either the **Guided** visual picker or **Custom** cron expressions:
Use the visual picker to configure your schedule:
* **Timezone**: the timezone for interpreting wake-up and cool-down times.
* **Days**: select one or more days of the week (Mon–Sun).
* **Wake up at**: the time at which pods scale up to the configured minimum.
* **Cool down at**: the time at which pods begin scaling down.
* **Minimum Pods during window**: number of pods guaranteed during the window (1–8).
Enter cron expressions directly for more flexibility:
* **Timezone**: the timezone for interpreting the cron schedule.
* **Start**: cron expression for when pods scale up (e.g. `0 9 * * 1,2,3,4,5` for 09:00 AM on weekdays).
* **End**: cron expression for when pods scale down (e.g. `0 18 * * 1,2,3,4,5` for 06:00 PM on weekdays).
* **Minimum Pods during window**: number of pods guaranteed during the window (1–8).
A human-readable summary of each cron expression is shown below the input field.
Fine-tune how aggressively your deployment scales up and down by configuring policies and stabilization windows for each direction. This controls the *rate* of pod changes once the scaling metrics cross their configured thresholds.
**Scale Up**
Controls how quickly new pods are added when demand rises above the scaling threshold.
* **Stabilization Window**: the look-back period (in seconds) used to smooth out scaling decisions. Default: `60` s. Range: 0–3600 s.
* **Select Policy**: when multiple policies are configured, determines which one wins:
* **Max** (default): picks the policy that allows the most pods to be added.
* **Min**: picks the policy that allows the fewest pods to be added.
* **Disabled**: disables scale-up entirely.
* **Policies**: one or more rate-limiting rules. Click **Add Policy** to configure:
* **Type**: `Pods` (fixed number per period) or `Percent` (percentage of current count, max 100).
* **Value**: the number of pods or percentage to add per period.
* **Period Seconds**: the duration of each evaluation window (1–1800 s).
When multiple policies are active, **Select Policy = Max** picks the policy that allows the largest increase.
**Scale Down**
Controls how gradually pods are removed when demand drops below the threshold.
* **Stabilization Window**: the look-back period (in seconds) before pods are removed. Default: `180` s. Range: 0–3600 s.
* **Select Policy**: when multiple policies are configured, determines which one wins:
* **Min** (default): picks the policy that removes the fewest pods.
* **Max**: picks the policy that removes the most pods.
* **Disabled**: disables scale-down entirely.
* **Policies**: same fields as Scale Up.
When multiple policies are active, **Select Policy = Min** picks the policy that removes the fewest pods. This ensures scale-down is gradual even if metrics drop sharply.
Autoscaling Policy is an advanced configuration. If left unconfigured, standard min/max replica scaling based on the configured scaling metrics applies without rate limiting.
Add key-value tags to organize and filter your deployments. Tags are useful for tracking environment, team, or cost-center metadata.
* Click **+ Add Tag** to add a new key-value pair.
* Tags can be used to filter deployments on the Deployments page.
Click **Deploy Model** to initiate the deployment process.
* Check the right side of the screen to see the creation status of your deployment.
* Monitor the deployment status to know when the model is ready for use.
* The status will show `deployed` once done. Your model is now ready for use.
 ## Monitoring and Access
After the deployment is created, Simplismart continuously probes your container using the **Health Check Path**, **Port**, **Period**, and **Timeout** you configured in [Container Configuration](#container-configuration). The deployment is marked **Healthy** once those probes succeed consistently. Until then, the endpoint does not accept traffic.
Health checks keep running for the lifetime of the deployment. If a pod stops responding, Simplismart stops routing traffic to it and may replace it.
### Health states
The status shown on the deployment page reflects the current health of your deployment:
| State | What it means |
| ---------------------------- | -------------------------------------------------------------------------------------------------------- |
| **Progressing** | Pods are coming up. The deployment is not yet ready to serve traffic. |
| **Healthy** | The deployment is live and accepting inference requests. |
| **Progressing with timeout** | The deployment has not become ready within the expected window. Check the **Events** tab to investigate. |
| **Not present** | The deployment has been stopped or deleted. |
| **Unknown** | Status could not be determined. Usually transient; if it persists, contact support. |
When the deployment is **Healthy**, it is ready to accept inference requests:
* **Health Status**: Shows **Healthy** on the deployment page.
* **Deployment URL**: Direct link to your running deployment. Use the **API** tab to find the endpoint URL and a pre-generated inference script. See [Inference & Monitoring](/model-suite/deployments/inference-and-monitoring) for a full walkthrough.
* **Events Tab**: Tracks lifecycle events such as health transitions, scale-out, scale-in, and instance restarts. Start here when debugging unexpected behaviour.
### Managing Your Deployment
Once your deployment is live, you can manage it from the **Deployments** page:
1. Open the **Deployments** tab from the main menu.
2. Select the deployment you want to modify.
3. Click the kebab menu (`⋮`) in the top-right of the deployment card and choose **Pause**, **Edit**, **Clone**, or **Delete**.
## Monitoring and Access
After the deployment is created, Simplismart continuously probes your container using the **Health Check Path**, **Port**, **Period**, and **Timeout** you configured in [Container Configuration](#container-configuration). The deployment is marked **Healthy** once those probes succeed consistently. Until then, the endpoint does not accept traffic.
Health checks keep running for the lifetime of the deployment. If a pod stops responding, Simplismart stops routing traffic to it and may replace it.
### Health states
The status shown on the deployment page reflects the current health of your deployment:
| State | What it means |
| ---------------------------- | -------------------------------------------------------------------------------------------------------- |
| **Progressing** | Pods are coming up. The deployment is not yet ready to serve traffic. |
| **Healthy** | The deployment is live and accepting inference requests. |
| **Progressing with timeout** | The deployment has not become ready within the expected window. Check the **Events** tab to investigate. |
| **Not present** | The deployment has been stopped or deleted. |
| **Unknown** | Status could not be determined. Usually transient; if it persists, contact support. |
When the deployment is **Healthy**, it is ready to accept inference requests:
* **Health Status**: Shows **Healthy** on the deployment page.
* **Deployment URL**: Direct link to your running deployment. Use the **API** tab to find the endpoint URL and a pre-generated inference script. See [Inference & Monitoring](/model-suite/deployments/inference-and-monitoring) for a full walkthrough.
* **Events Tab**: Tracks lifecycle events such as health transitions, scale-out, scale-in, and instance restarts. Start here when debugging unexpected behaviour.
### Managing Your Deployment
Once your deployment is live, you can manage it from the **Deployments** page:
1. Open the **Deployments** tab from the main menu.
2. Select the deployment you want to modify.
3. Click the kebab menu (`⋮`) in the top-right of the deployment card and choose **Pause**, **Edit**, **Clone**, or **Delete**.
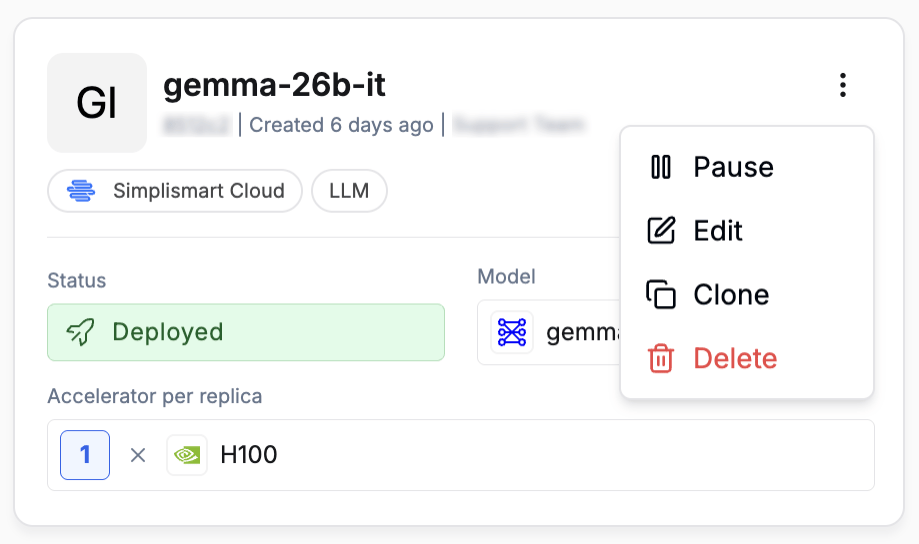 Adjust scaling, model, or tags without redeploying. Changes are applied as rolling updates.
Halts all running instances. The deployment configuration is preserved and can be resumed at any time.
Duplicates the current deployment's configuration as a starting point for a new deployment.
Permanently removes the deployment and all its instances. This action cannot be undone.
### Troubleshooting
* Verify your application implements the health check endpoint and responds within the configured timeout.
* For private images, ensure the registry secret has read access to the repository.
* Confirm the HTTP service port matches the port your application listens on.
Adjust scaling, model, or tags without redeploying. Changes are applied as rolling updates.
Halts all running instances. The deployment configuration is preserved and can be resumed at any time.
Duplicates the current deployment's configuration as a starting point for a new deployment.
Permanently removes the deployment and all its instances. This action cannot be undone.
### Troubleshooting
* Verify your application implements the health check endpoint and responds within the configured timeout.
* For private images, ensure the registry secret has read access to the repository.
* Confirm the HTTP service port matches the port your application listens on.