> ## Documentation Index
> Fetch the complete documentation index at: https://docs.simplismart.ai/llms.txt
> Use this file to discover all available pages before exploring further.
# Add Container
> Add a container image from Docker Hub, Depot, Nvidia NGC, Quay, or Amazon ECR to Simplismart
Simplismart supports containers from five registries: **Docker Hub**, **Depot**, **Nvidia NGC** (for NIM containers), **Quay**, and **Amazon ECR**. This page covers setting up credentials and adding your image. Once added, see [Deploy Your Container](/model-suite/deployments/deploy-container) to configure and launch the deployment.
## Prerequisites
* A container image hosted on Docker Hub, Depot, Nvidia NGC, Quay, or Amazon ECR.
* For **private images**: credentials configured in Simplismart (see [Setting Up Registry Credentials](#setting-up-registry-credentials)).
Public Docker Hub and Quay images do not require any credentials. You can skip the credentials section and go straight to [Adding Your Image](#adding-your-image).
## Setting Up Registry Credentials
Skip this section if you are using a public image.
Navigate to **Integrations** → [**Secrets**](https://app.simplismart.ai/integrations/secrets) in your Simplismart dashboard.
Click **Create Secret** and fill in the following fields:
* **Secret Name**: A descriptive name for this secret.
* **Secret Type**: Select **Docker Hub** from the dropdown.
* **Username**: Your Docker Hub username.
* **Access Token**: Your Docker Hub access token.
Click **Save**. The secret appears in your secrets list and can be selected when adding a private image.
Navigate to **Integrations** → [**Secrets**](https://app.simplismart.ai/integrations/secrets) in your Simplismart dashboard.
Click **Create Secret** and fill in the following fields:
* **Secret Name**: A descriptive name for this secret.
* **Secret Type**: Select **Depot** from the dropdown.
* **Username**: Enter `x-token` (this is always the username for Depot).
* **Access Token**: Your Depot access token.
Click **Save**. The secret appears in your secrets list.
Navigate to **Integrations** → [**Secrets**](https://app.simplismart.ai/integrations/secrets) in your Simplismart dashboard.
Click **Create Secret** and fill in the following fields:
* **Secret Name**: A descriptive name for this secret.
* **Secret Type**: Select **Nvidia Secret Docker** from the dropdown.
* **API Key**: Your NVIDIA NGC API key.
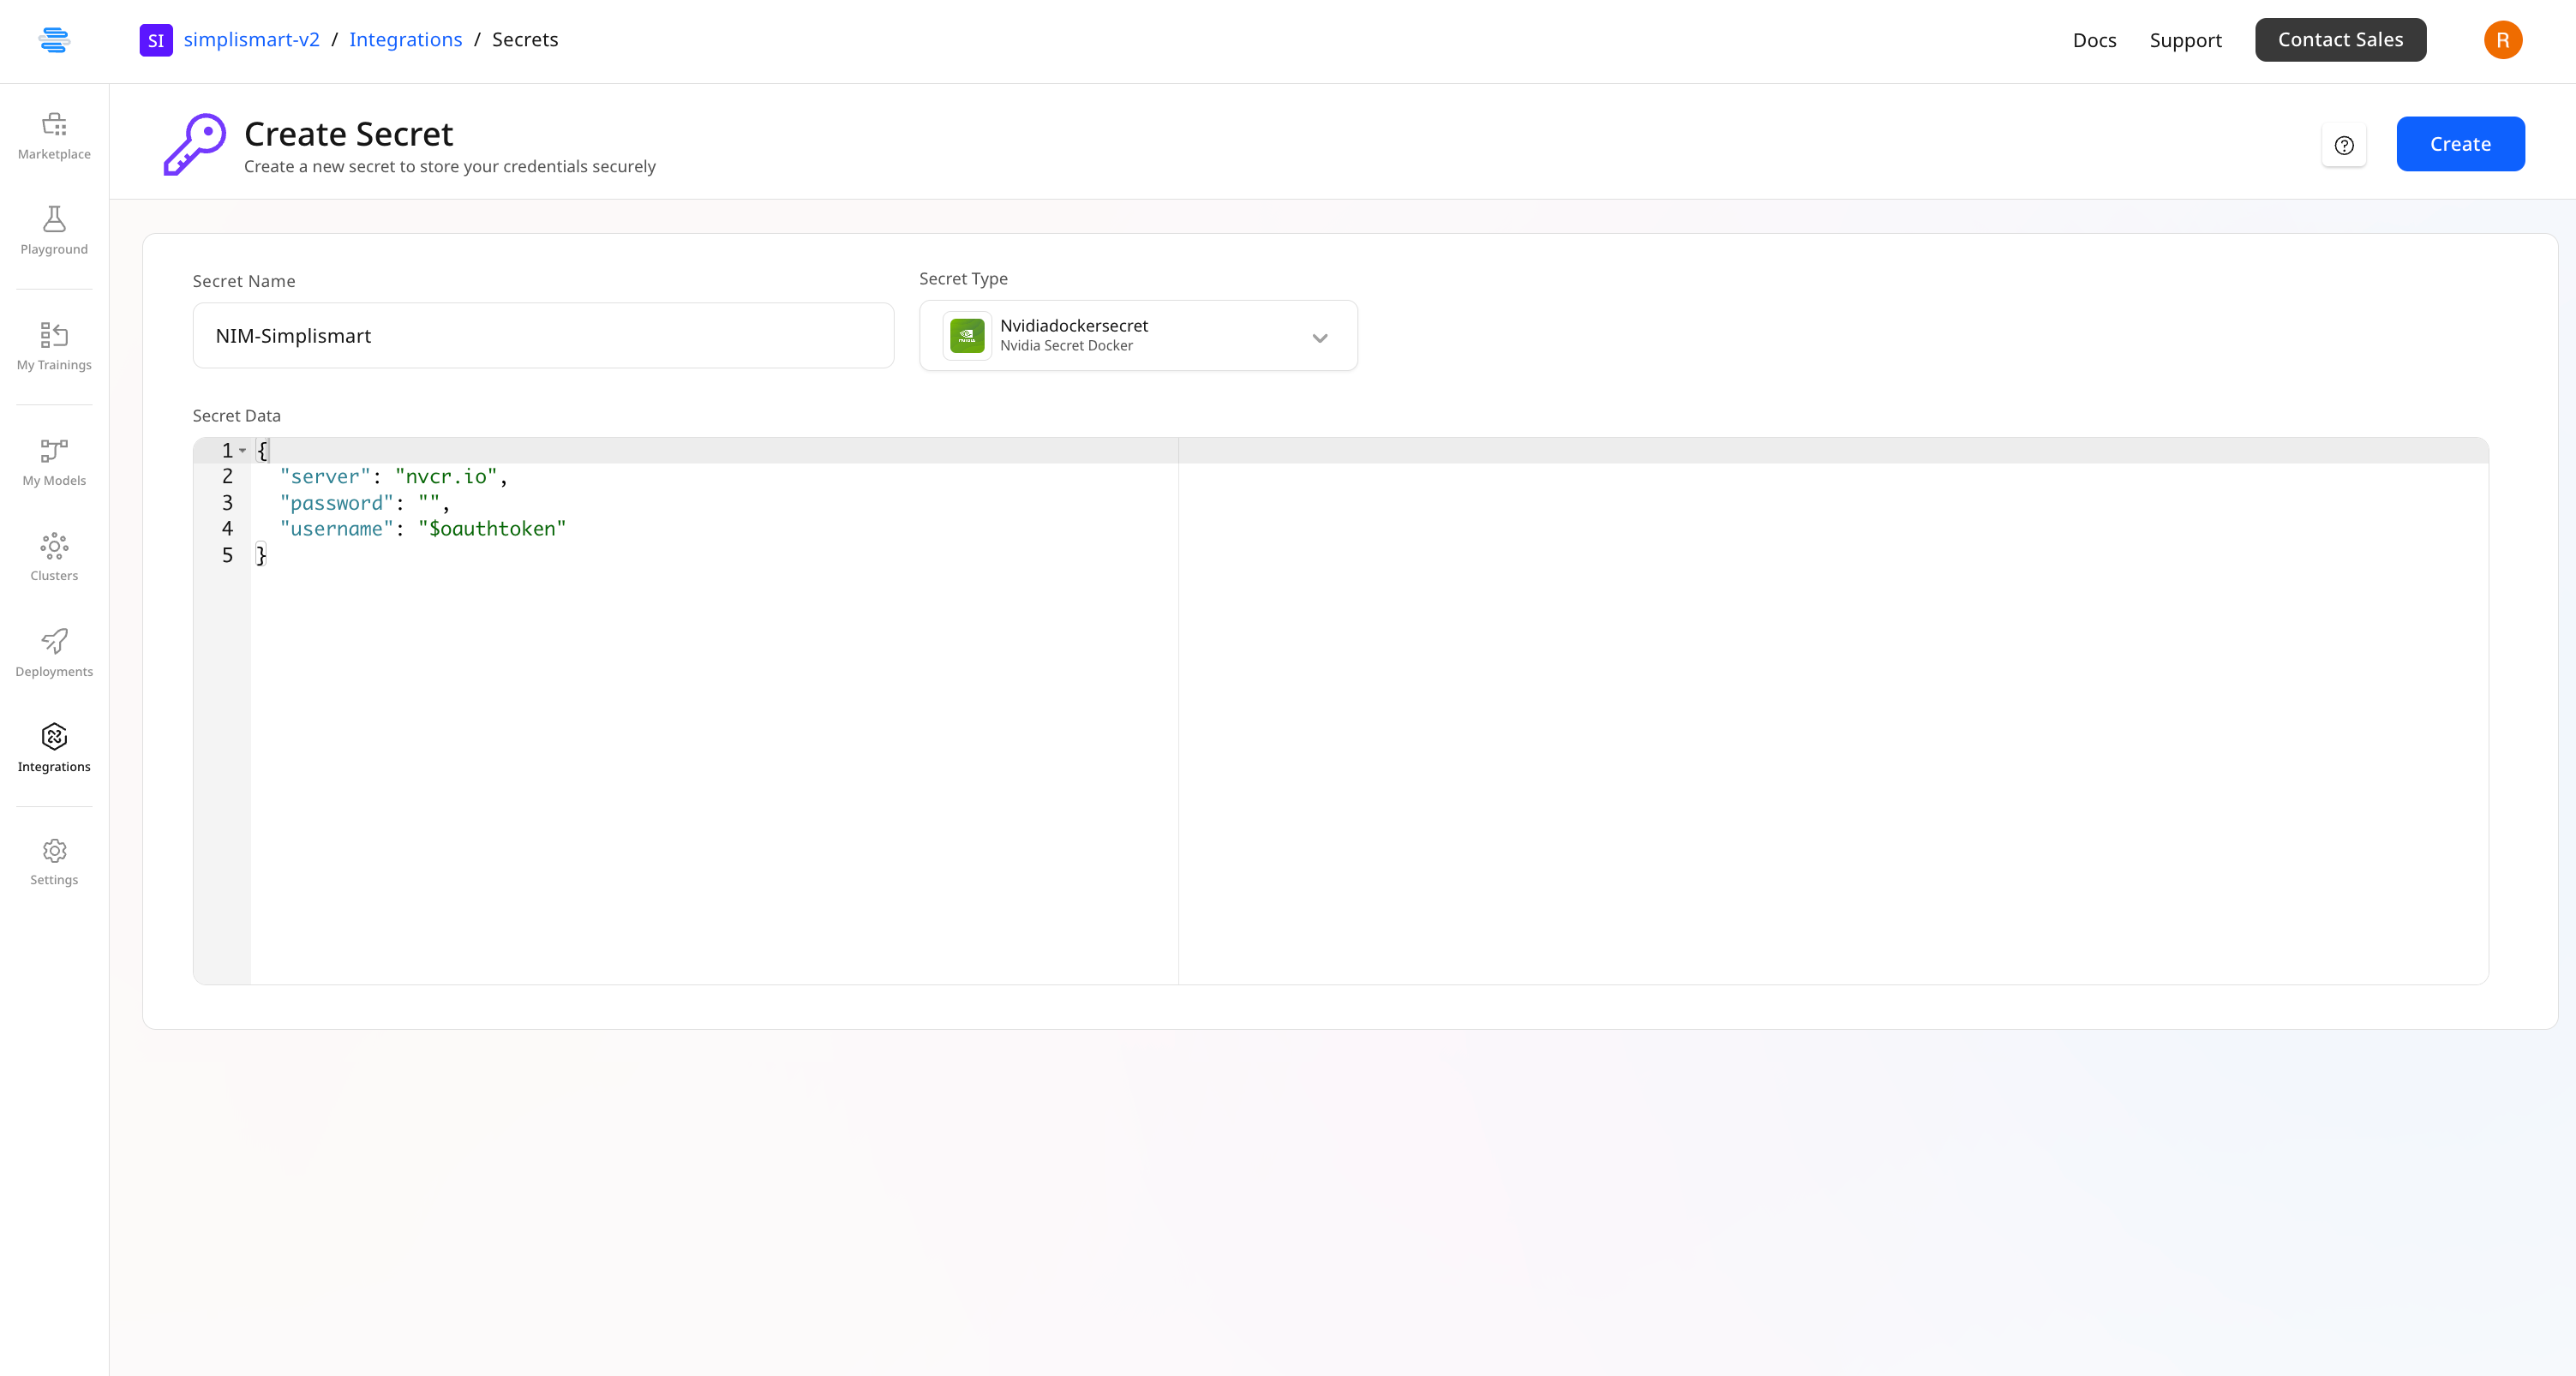 Click **Save**. The secret appears in your secrets list and can be selected when adding an NGC image.
Only **public** Quay images are currently supported. No credentials are required. You can skip to [Adding Your Image](#adding-your-image).
Navigate to **Integrations** → [**Secrets**](https://app.simplismart.ai/integrations/secrets) in your Simplismart dashboard.
Click **Create Secret** and fill in the following fields:
* **Secret Name**: A descriptive name for this secret.
* **Secret Type**: Select **ECR** from the dropdown.
* **Secret Data**: Paste your AWS credentials in the following JSON format:
```json theme={null}
{
"region": "us-west-2",
"accessKey": "",
"secretKey": ""
}
```
Click **Create**. The secret appears in your secrets list and can be selected when adding an ECR image.
## Adding Your Image
Go to the **My Models** page and click **Bring Your Own Container**.
Fill in the fields for your registry. The **Model Name** and **GPU Per Container** fields are the same for all registries.
Click **Save**. The secret appears in your secrets list and can be selected when adding an NGC image.
Only **public** Quay images are currently supported. No credentials are required. You can skip to [Adding Your Image](#adding-your-image).
Navigate to **Integrations** → [**Secrets**](https://app.simplismart.ai/integrations/secrets) in your Simplismart dashboard.
Click **Create Secret** and fill in the following fields:
* **Secret Name**: A descriptive name for this secret.
* **Secret Type**: Select **ECR** from the dropdown.
* **Secret Data**: Paste your AWS credentials in the following JSON format:
```json theme={null}
{
"region": "us-west-2",
"accessKey": "",
"secretKey": ""
}
```
Click **Create**. The secret appears in your secrets list and can be selected when adding an ECR image.
## Adding Your Image
Go to the **My Models** page and click **Bring Your Own Container**.
Fill in the fields for your registry. The **Model Name** and **GPU Per Container** fields are the same for all registries.
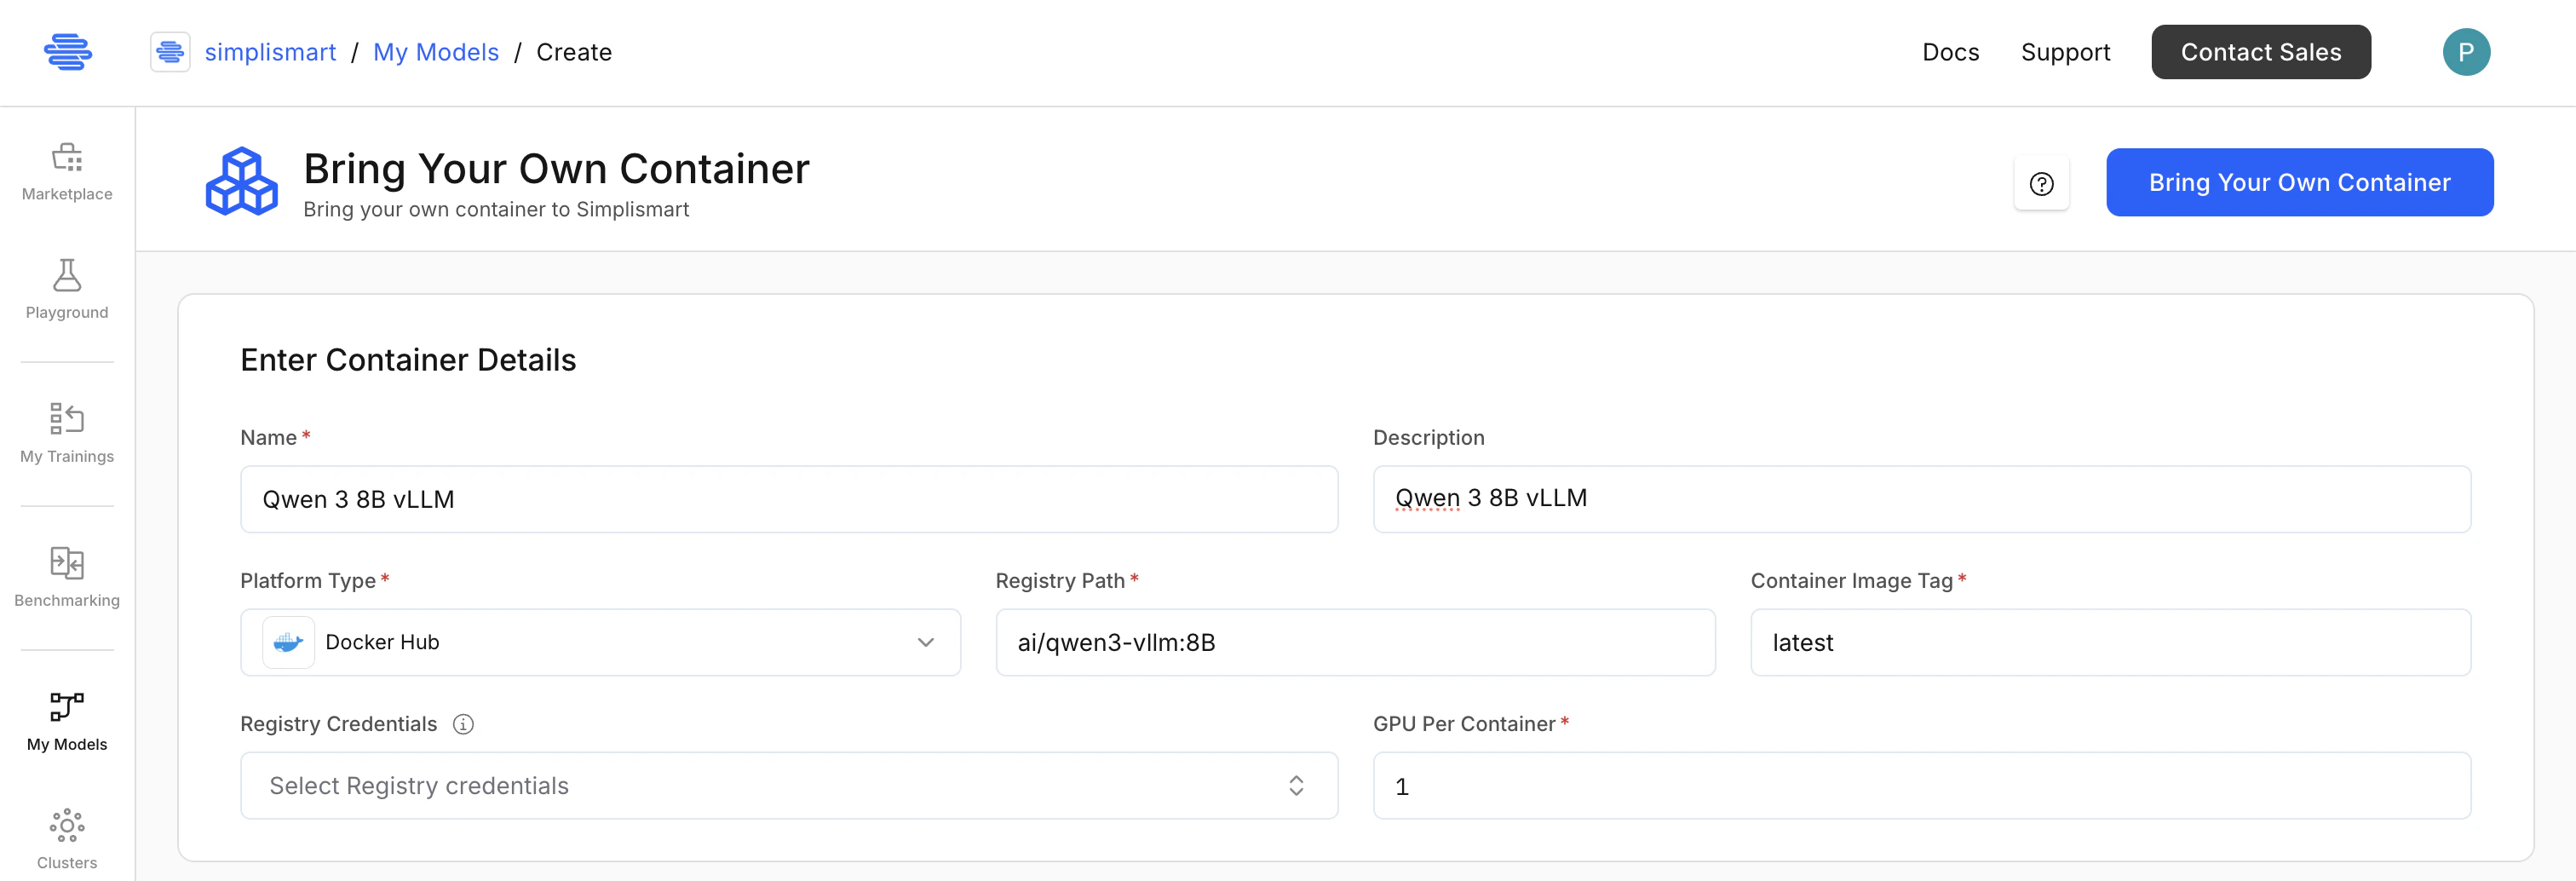 * **Model Name**: A descriptive name for your application.
* **Platform Type**: Select **DockerHub** from the dropdown.
* **Registry Path**: Your Docker Hub registry path (e.g. `myorg/myimage`).
* **Container Image Tag**: The image version or tag (e.g. `latest`).
* **GPU Per Container**: Number of GPUs per container. Default is `1`; maximum is `8`.
* **Registry Credentials**: Select the Docker Hub secret configured earlier. Leave blank for public images.
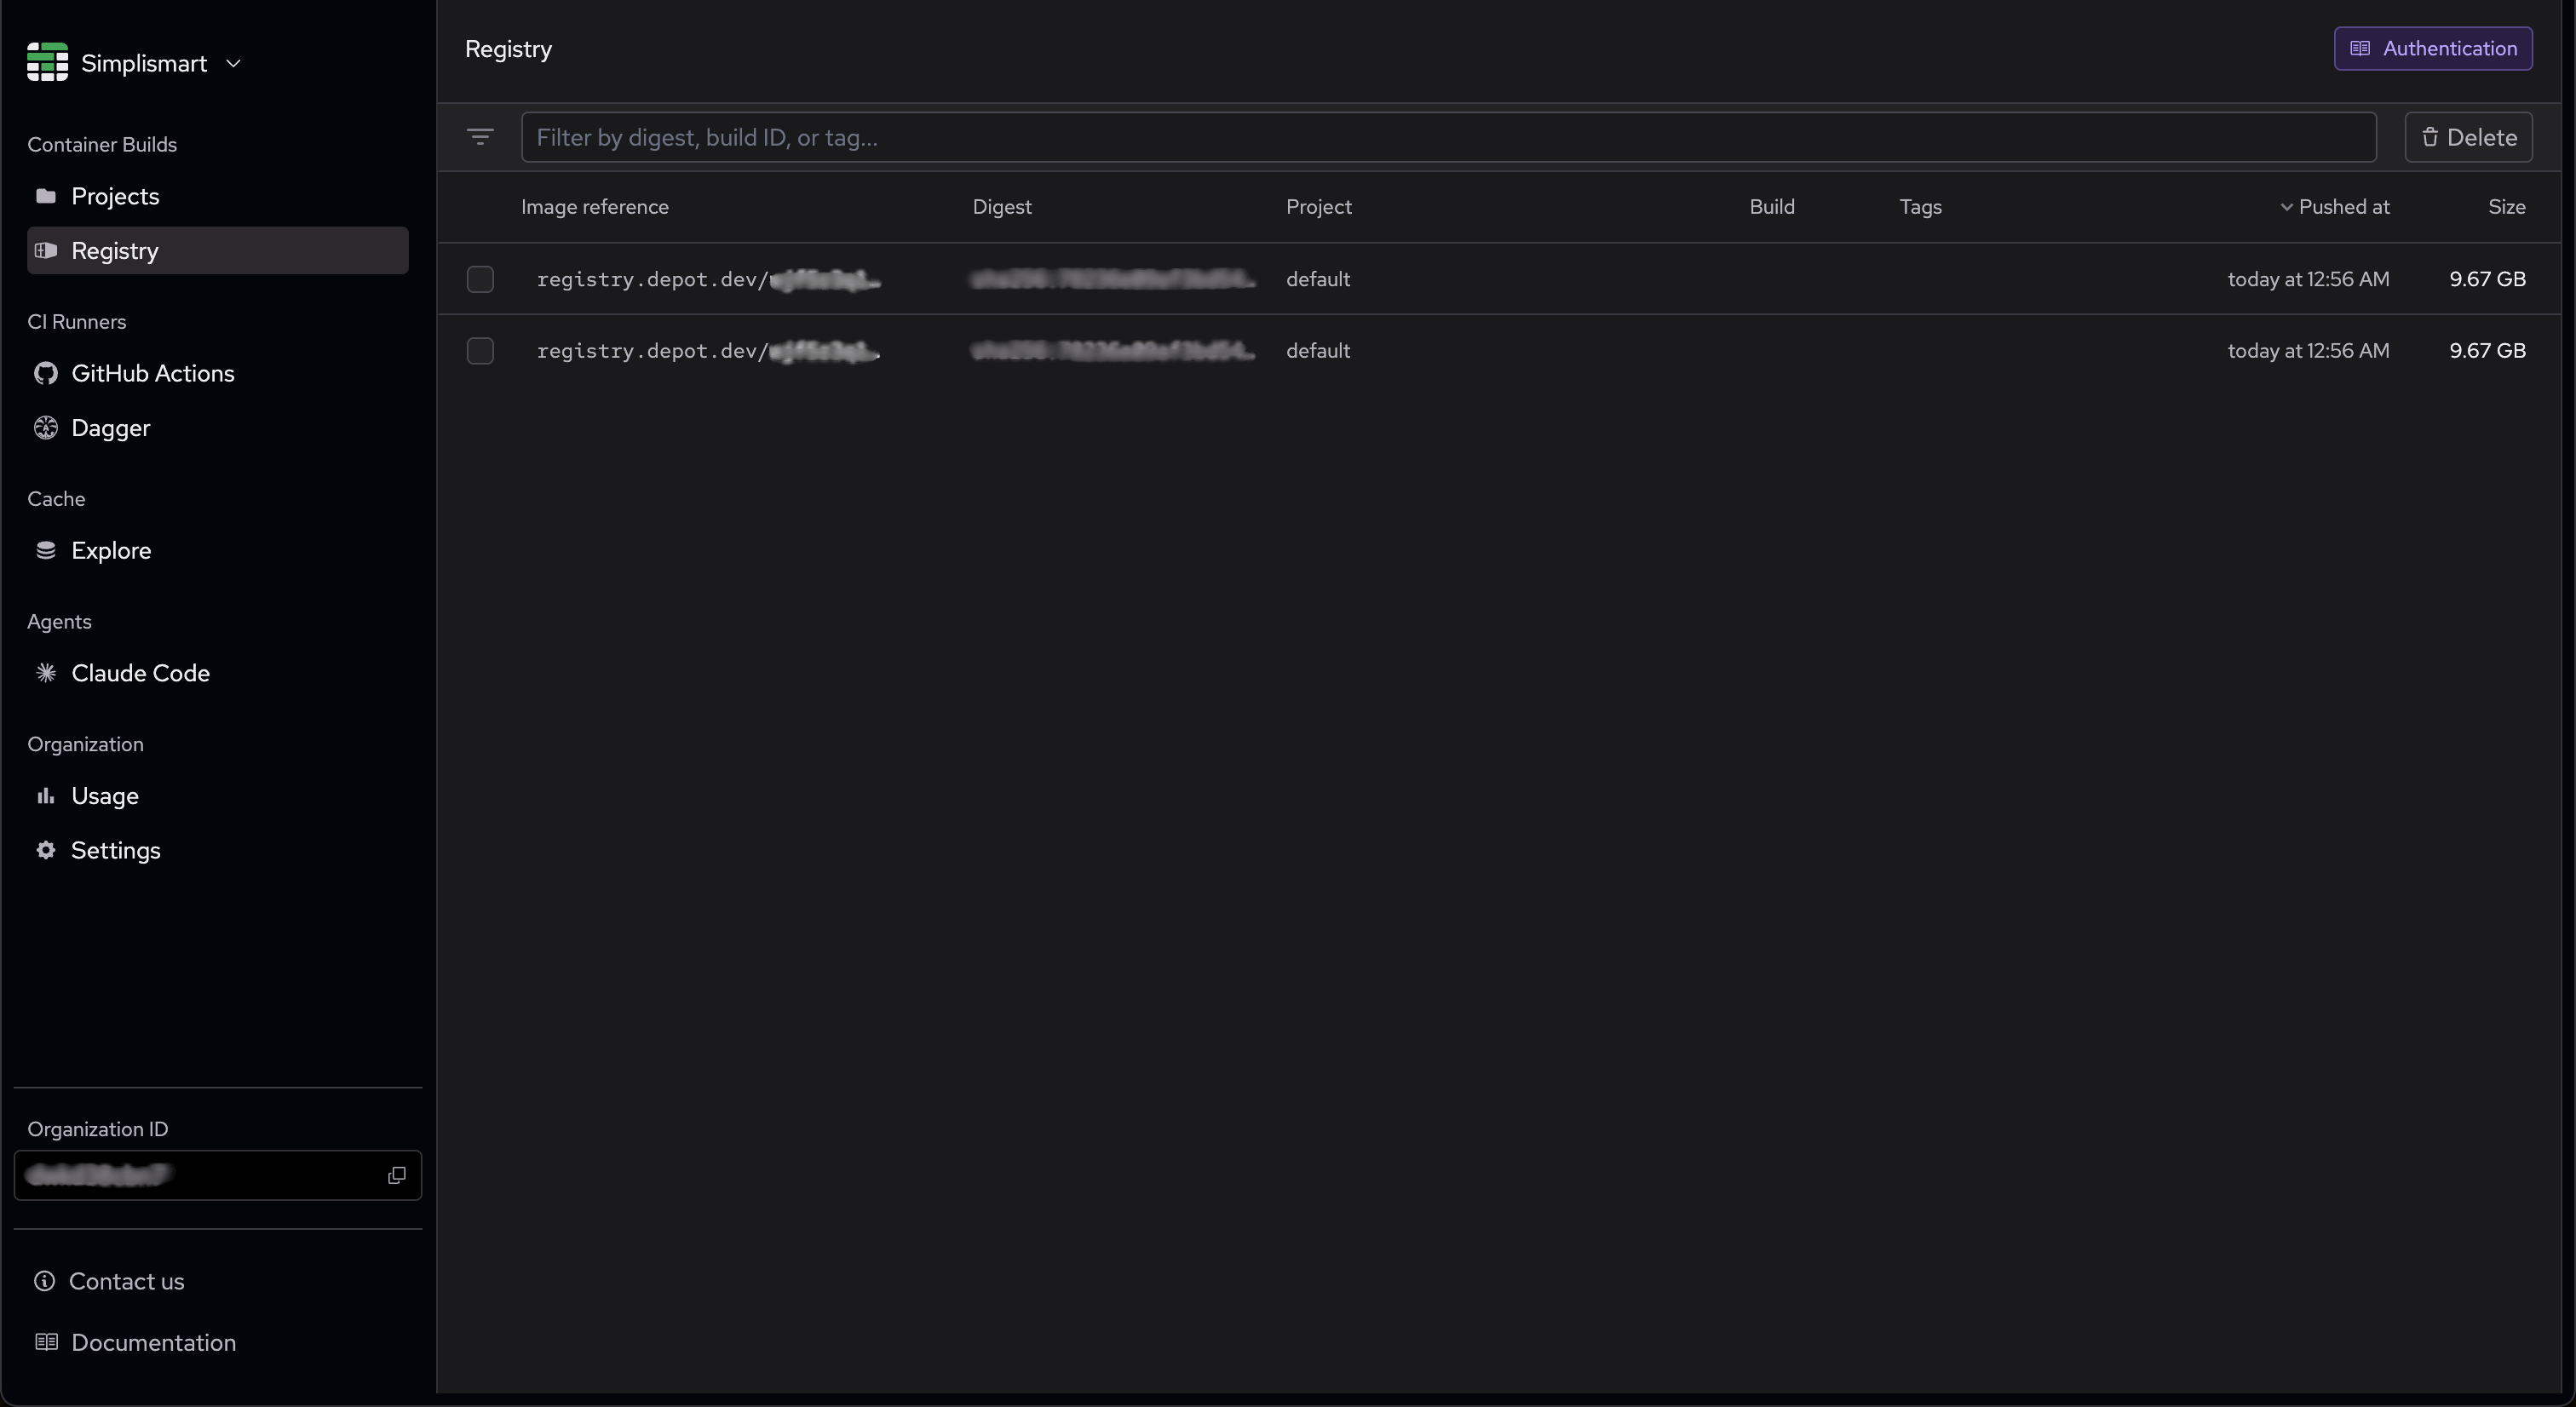
First, locate your registry path in Depot:
1. Go to your **Depot** dashboard and navigate to **Registry**.
2. Find your image in the **Image Reference** column. It will look like:
```
registry.depot.dev/YOUR-ORG-ID:CONTAINER-IMAGE-TAG
```
Split this into two parts:
* **Registry Path**: `registry.depot.dev/YOUR-ORG-ID` (everything before the `:`)
* **Container Image Tag**: `CONTAINER-IMAGE-TAG` (everything after the `:`)
* **Model Name**: A descriptive name for your application.
* **Platform Type**: Select **DockerHub** from the dropdown.
* **Registry Path**: Your Docker Hub registry path (e.g. `myorg/myimage`).
* **Container Image Tag**: The image version or tag (e.g. `latest`).
* **GPU Per Container**: Number of GPUs per container. Default is `1`; maximum is `8`.
* **Registry Credentials**: Select the Docker Hub secret configured earlier. Leave blank for public images.
First, locate your registry path in Depot:
1. Go to your **Depot** dashboard and navigate to **Registry**.
2. Find your image in the **Image Reference** column. It will look like:
```
registry.depot.dev/YOUR-ORG-ID:CONTAINER-IMAGE-TAG
```
Split this into two parts:
* **Registry Path**: `registry.depot.dev/YOUR-ORG-ID` (everything before the `:`)
* **Container Image Tag**: `CONTAINER-IMAGE-TAG` (everything after the `:`)
 Then fill in the model fields:
* **Model Name**: A descriptive name for your application.
* **Platform Type**: Select **Depot** from the dropdown.
* **Registry Path**: The path copied from Depot (e.g. `registry.depot.dev/YOUR-ORG-ID`).
* **Container Image Tag**: The tag copied from Depot.
* **GPU Per Container**: Number of GPUs per container. Default is `1`; maximum is `8`.
* **Registry Credentials**: Select the Depot secret configured earlier.
* **Model Name**: A descriptive name for your application.
* **Platform Type**: Select **NGC** from the dropdown.
* **Registry Path**: The NGC image path (e.g. `nvcr.io/nvidia/nim/meta/llama-3.1-8b-instruct`).
* **Container Image Tag**: The image tag (e.g. `latest`).
* **GPU Per Container**: Number of GPUs per container. Default is `1`; maximum is `8`.
* **Registry Credentials**: Select the Nvidia NGC secret configured earlier.
* **Model Name**: A descriptive name for your application.
* **Platform Type**: Select **Quay** from the dropdown.
* **Registry Path**: The Quay image path (e.g. `quay.io/myorg/myimage`).
* **Container Image Tag**: The image tag (e.g. `latest`).
* **GPU Per Container**: Number of GPUs per container. Default is `1`; maximum is `8`.
* **Registry Credentials**: Leave blank, only public Quay images are supported.
Then fill in the model fields:
* **Model Name**: A descriptive name for your application.
* **Platform Type**: Select **Depot** from the dropdown.
* **Registry Path**: The path copied from Depot (e.g. `registry.depot.dev/YOUR-ORG-ID`).
* **Container Image Tag**: The tag copied from Depot.
* **GPU Per Container**: Number of GPUs per container. Default is `1`; maximum is `8`.
* **Registry Credentials**: Select the Depot secret configured earlier.
* **Model Name**: A descriptive name for your application.
* **Platform Type**: Select **NGC** from the dropdown.
* **Registry Path**: The NGC image path (e.g. `nvcr.io/nvidia/nim/meta/llama-3.1-8b-instruct`).
* **Container Image Tag**: The image tag (e.g. `latest`).
* **GPU Per Container**: Number of GPUs per container. Default is `1`; maximum is `8`.
* **Registry Credentials**: Select the Nvidia NGC secret configured earlier.
* **Model Name**: A descriptive name for your application.
* **Platform Type**: Select **Quay** from the dropdown.
* **Registry Path**: The Quay image path (e.g. `quay.io/myorg/myimage`).
* **Container Image Tag**: The image tag (e.g. `latest`).
* **GPU Per Container**: Number of GPUs per container. Default is `1`; maximum is `8`.
* **Registry Credentials**: Leave blank, only public Quay images are supported.
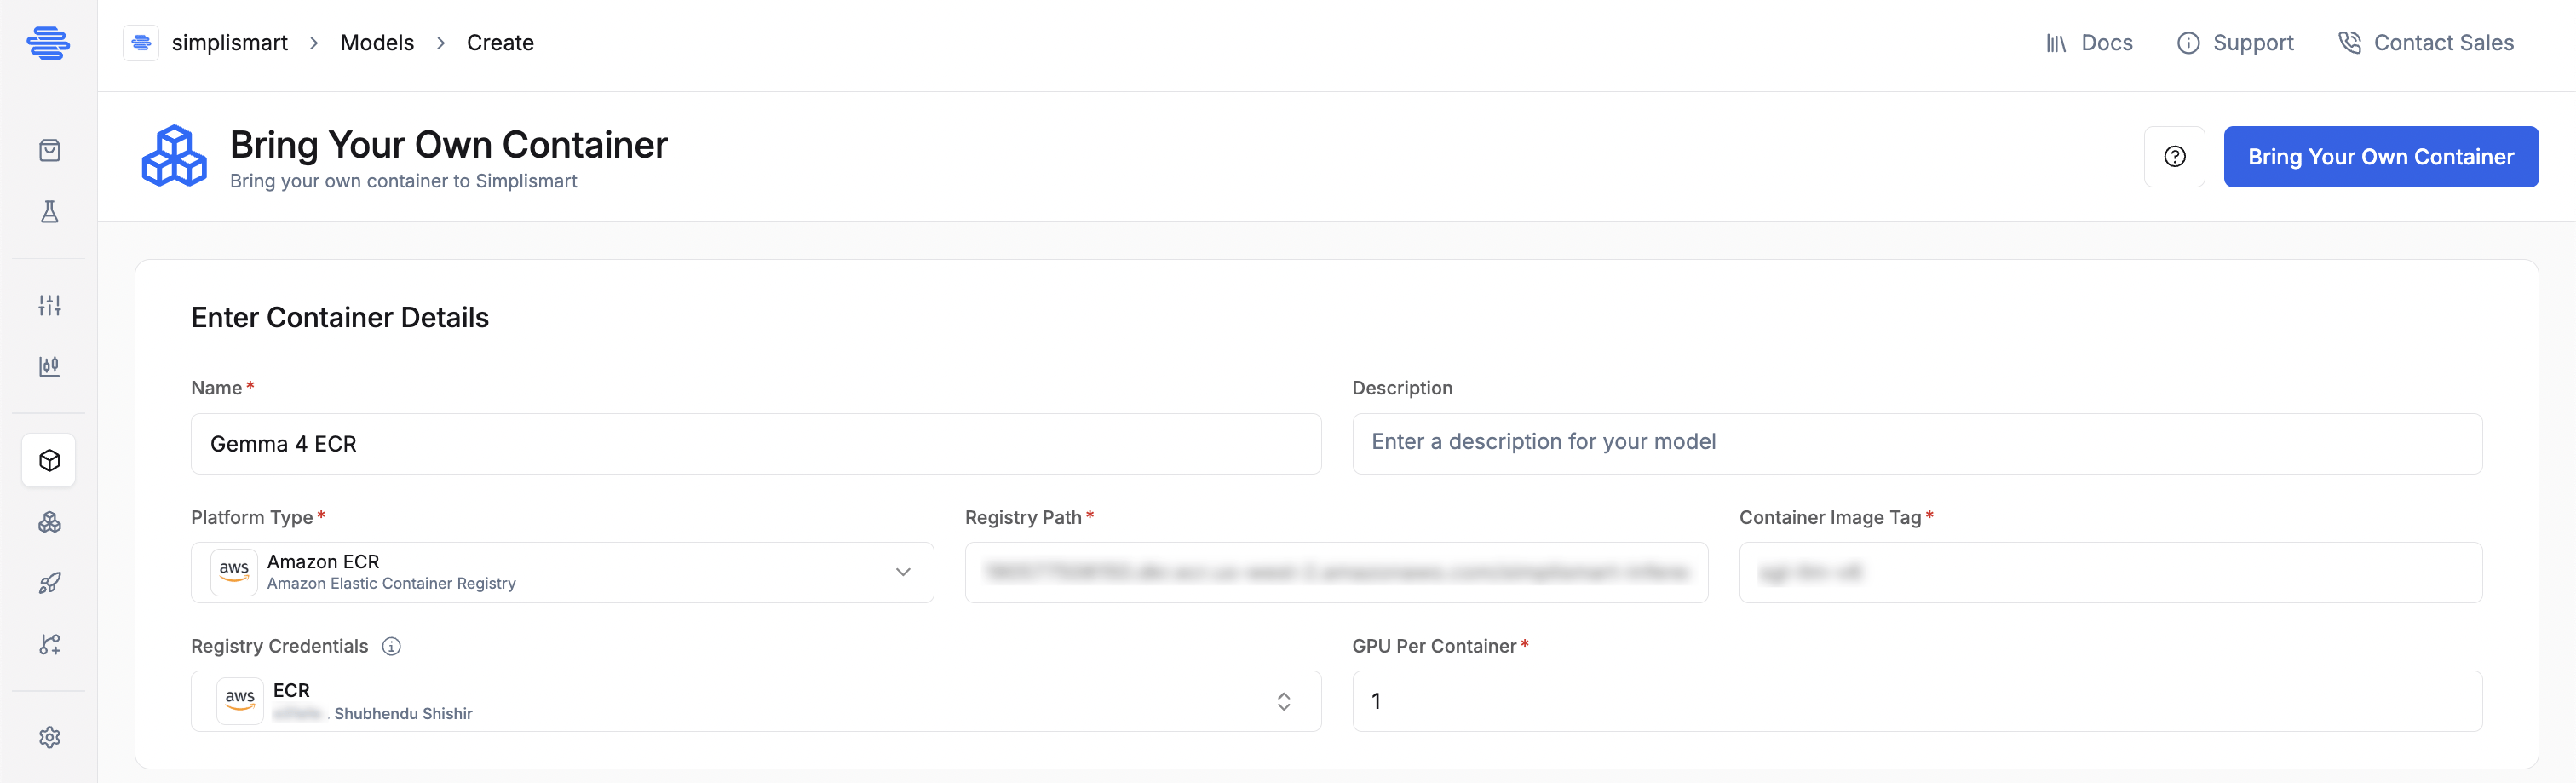 * **Model Name**: A descriptive name for your application.
* **Platform Type**: Select **Amazon ECR** from the dropdown.
* **Registry Path**: The full ECR image URI without the tag (e.g. `123456789012.dkr.ecr.us-west-2.amazonaws.com/my-repo`).
* **Container Image Tag**: The image tag (e.g. `latest`).
* **GPU Per Container**: Number of GPUs per container. Default is `1`; maximum is `8`.
* **Registry Credentials**: Select the Amazon ECR secret configured earlier.
Expand **Container Configuration** to define how the platform interacts with your container. These settings carry over to the deployment step and can be overridden there.
* **Model Name**: A descriptive name for your application.
* **Platform Type**: Select **Amazon ECR** from the dropdown.
* **Registry Path**: The full ECR image URI without the tag (e.g. `123456789012.dkr.ecr.us-west-2.amazonaws.com/my-repo`).
* **Container Image Tag**: The image tag (e.g. `latest`).
* **GPU Per Container**: Number of GPUs per container. Default is `1`; maximum is `8`.
* **Registry Credentials**: Select the Amazon ECR secret configured earlier.
Expand **Container Configuration** to define how the platform interacts with your container. These settings carry over to the deployment step and can be overridden there.
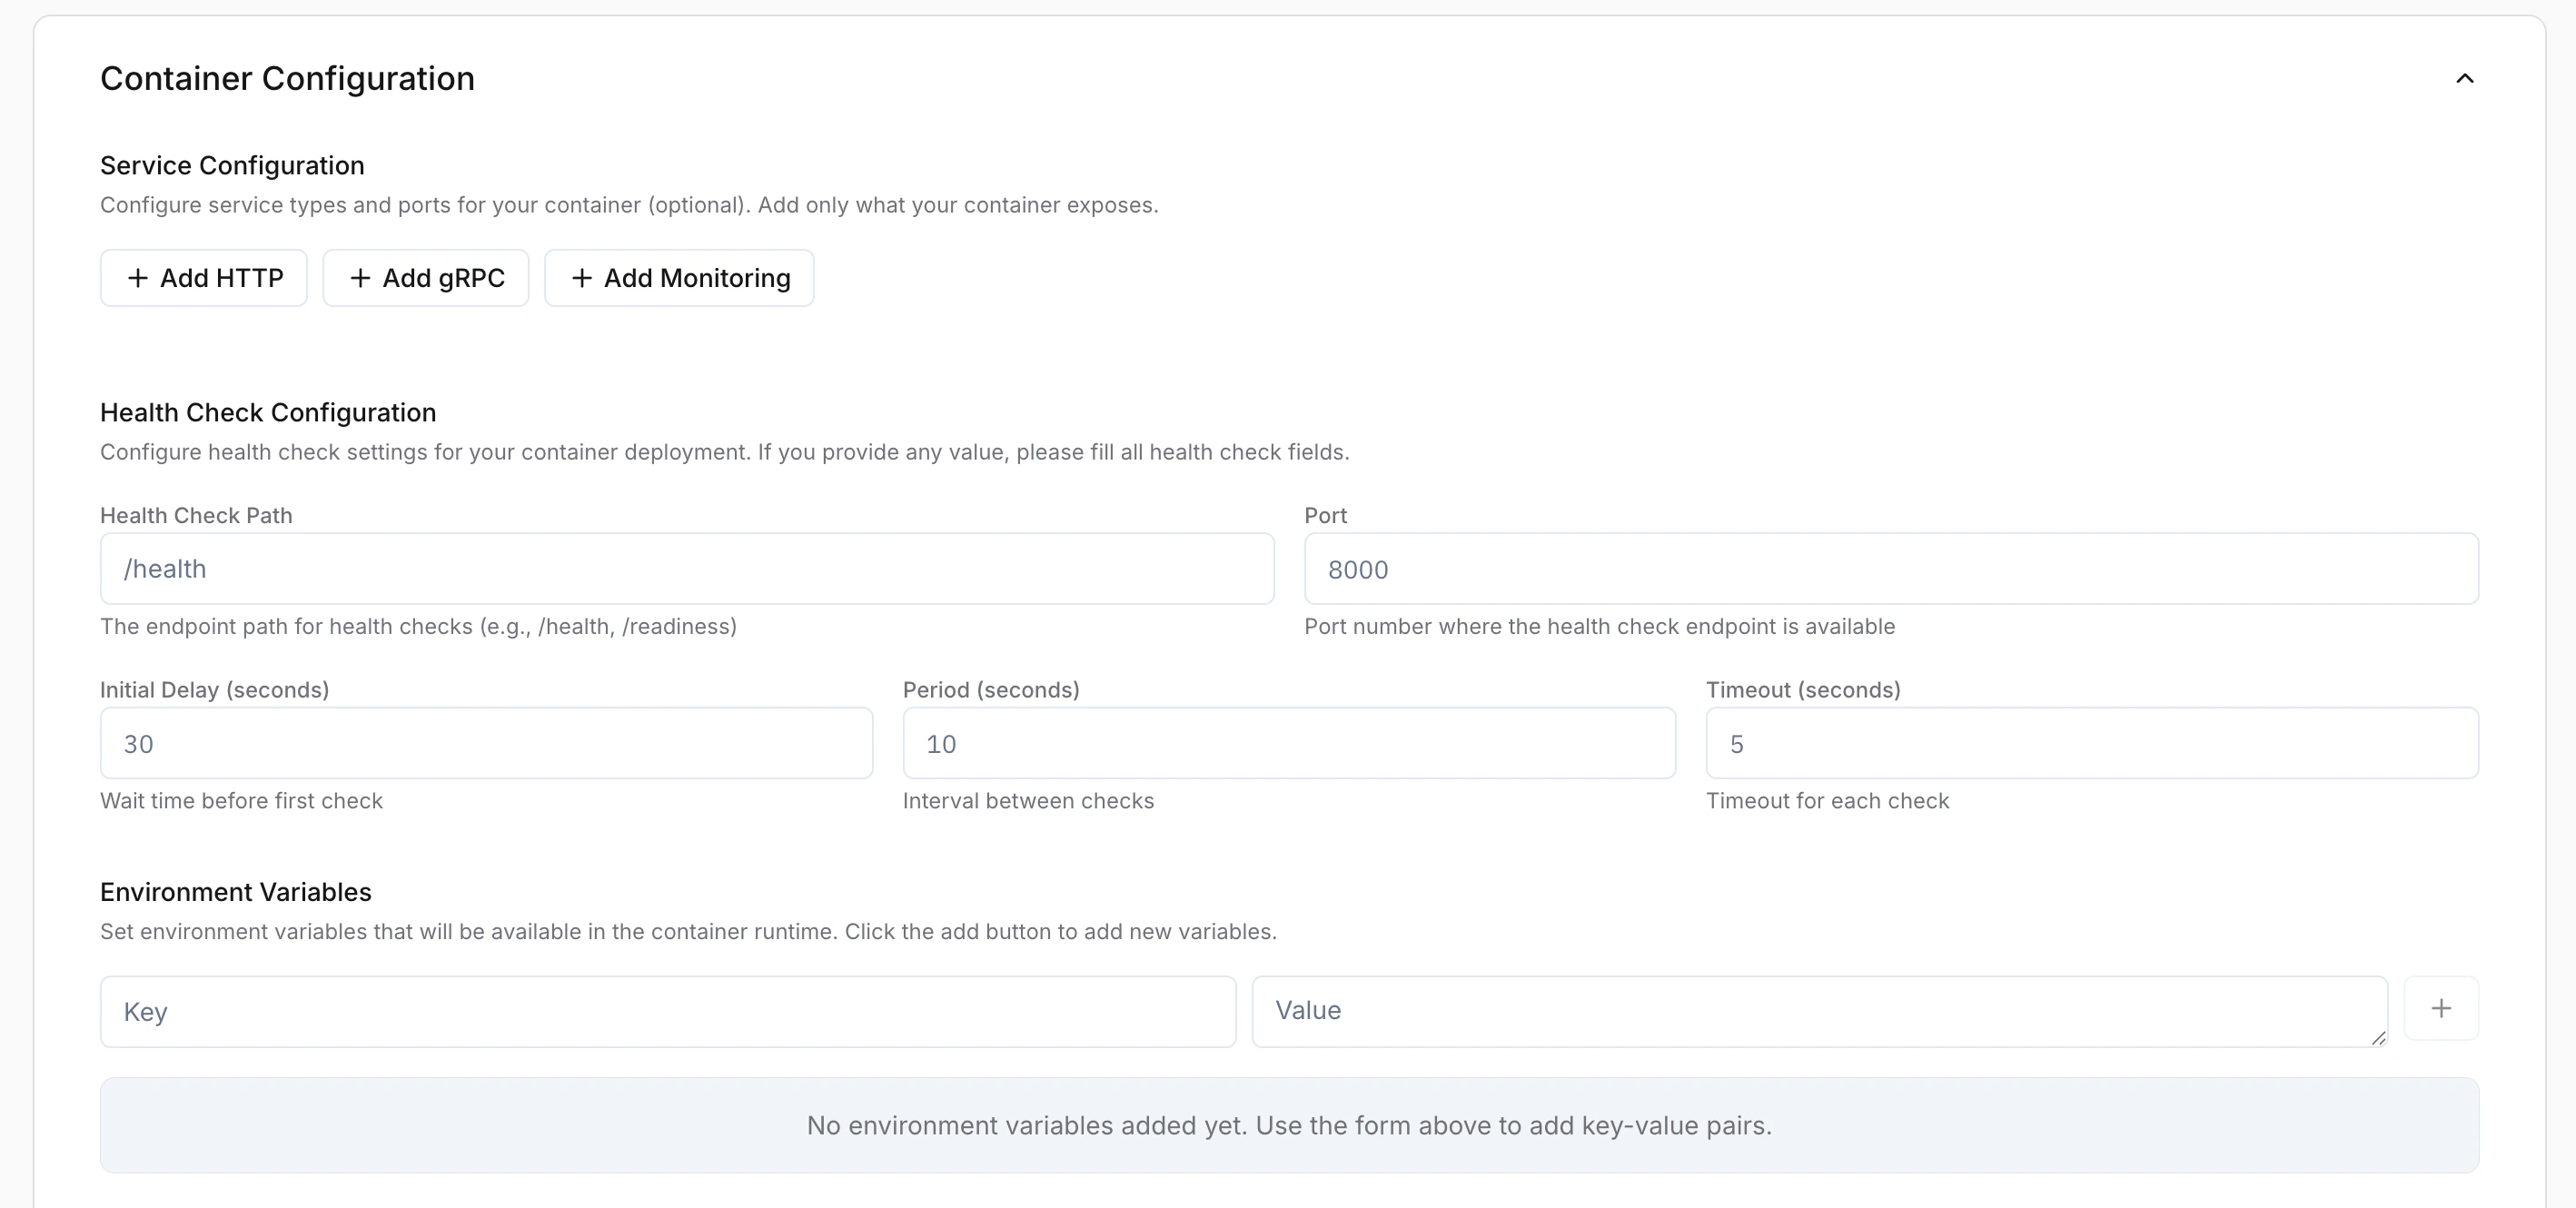 Click **Add HTTP**, **Add gRPC**, or **Add Monitoring** to enable the respective services.
* **HTTP Service** (Required): The port your server listens on (e.g. `8000`).
* **Public Access**: Enable to make the endpoint reachable externally. When disabled, the service is accessible only within the cluster.
* **gRPC Service**: Enable if your application uses gRPC (must use a different port than HTTP).
* **Monitoring Service**: Enable for enhanced monitoring and observability.
* **Health Check Configuration**: If any field is filled, all fields are required.
* **Health Check Path**: e.g. `/health`
* **Port**: Must match your HTTP service port.
* **Initial Delay**: Time in seconds before the first check.
* **Period**: Interval in seconds between checks.
* **Timeout**: Maximum seconds to wait for a response.
* **Environment Variables**: Runtime key-value pairs for your container.
Click **Add HTTP**, **Add gRPC**, or **Add Monitoring** to enable the respective services.
* **HTTP Service** (Required): The port your server listens on (e.g. `8000`).
* **Public Access**: Enable to make the endpoint reachable externally. When disabled, the service is accessible only within the cluster.
* **gRPC Service**: Enable if your application uses gRPC (must use a different port than HTTP).
* **Monitoring Service**: Enable for enhanced monitoring and observability.
* **Health Check Configuration**: If any field is filled, all fields are required.
* **Health Check Path**: e.g. `/health`
* **Port**: Must match your HTTP service port.
* **Initial Delay**: Time in seconds before the first check.
* **Period**: Interval in seconds between checks.
* **Timeout**: Maximum seconds to wait for a response.
* **Environment Variables**: Runtime key-value pairs for your container.
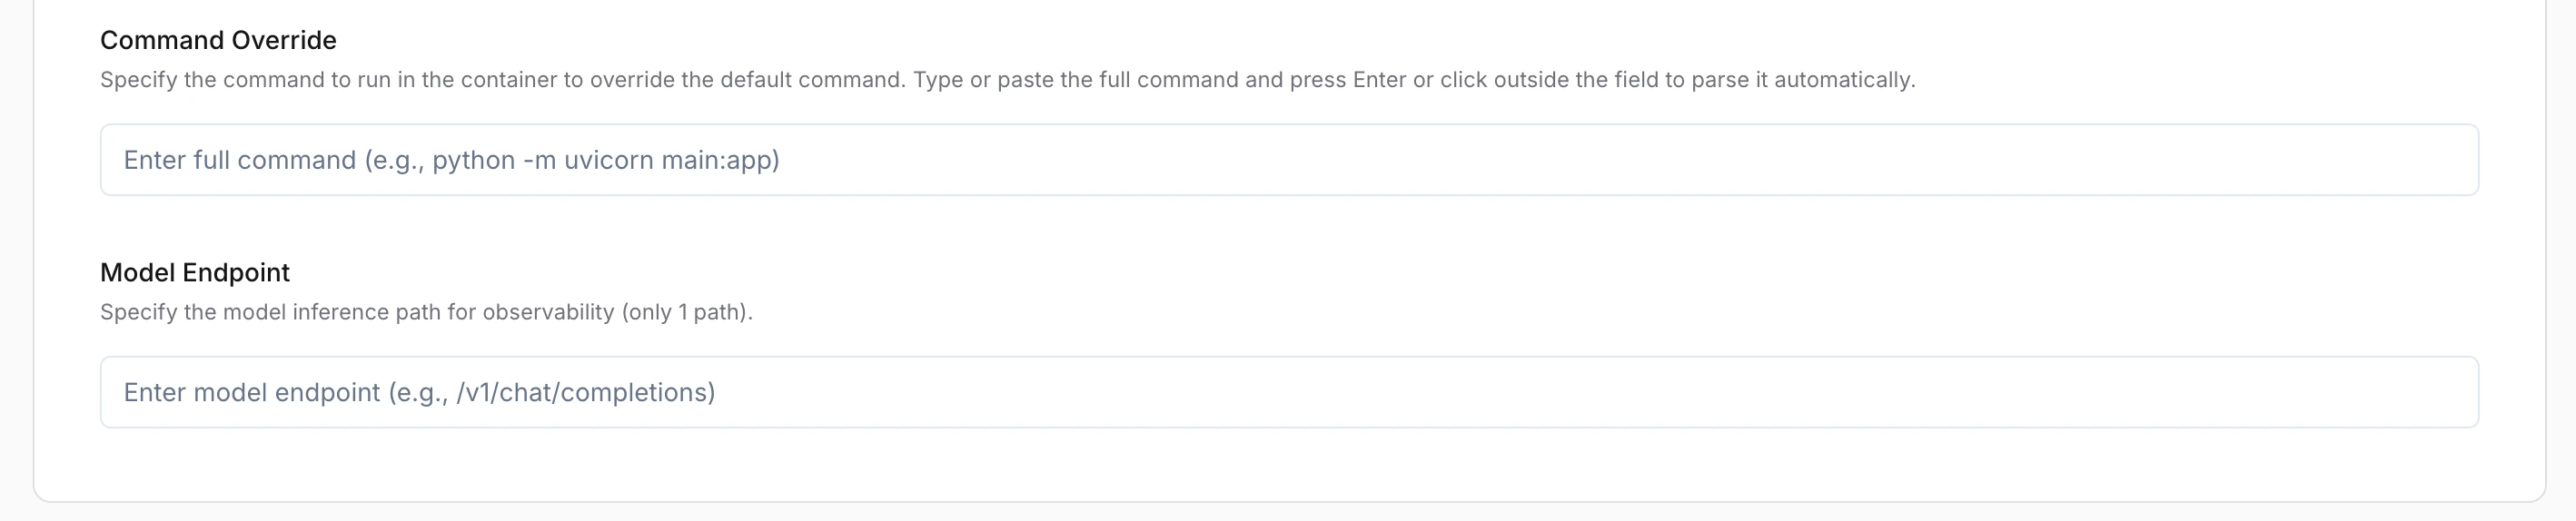 * **Command Override**: (Optional) Custom command to replace the container's default startup command.
* **Model Endpoint**: (Optional) Inference path for observability (e.g. `/v1/chat/completions`).
Click **Add Model**. For Docker Hub, the image path is verified immediately. For other registries, the image is confirmed when the deployment starts.
Once your image is added, continue to [Deploy Your Container](/model-suite/deployments/deploy-container) to configure and launch the deployment.
* **Command Override**: (Optional) Custom command to replace the container's default startup command.
* **Model Endpoint**: (Optional) Inference path for observability (e.g. `/v1/chat/completions`).
Click **Add Model**. For Docker Hub, the image path is verified immediately. For other registries, the image is confirmed when the deployment starts.
Once your image is added, continue to [Deploy Your Container](/model-suite/deployments/deploy-container) to configure and launch the deployment.